November 16, 2025
Save 5 hours a month: The lazy developer's guide to VPS deployments
Tired of typing ssh user@server and running the same 10 commands every time you deploy? This guide shows how to transform your VPS deployment workflow from terminal chaos to visual simplicity.
{/* ------------------------------------------------------------------ */} {/* Introduction */} {/* ------------------------------------------------------------------ */}
Deploying to a VPS shouldn't feel like a part-time job. Yet for most developers, every deployment is the same ritual: SSH in, pull code, install dependencies, build, restart, cross your fingers, check logs, debug, repeat. Multiply that across staging and production servers, and you're easily burning 5+ hours a month on deployments alone.
Server Compass is a $29 one-time purchase desktop app (Mac, Windows, Linux) that replaces that entire workflow with a visual deployment wizard. Every app runs in a Docker container with blue-green deployment for zero downtime. It auto-detects your framework, manages environment variables in an encrypted vault, and can even build your app via GitHub Actions so your low-RAM VPS never breaks a sweat.
In this guide, we'll walk through the entire workflow — from connecting your GitHub account to deploying your first app and setting up automatic deployments — so you can be the laziest (and most productive) developer on your team.
{/* ------------------------------------------------------------------ */} {/* Global GitHub Account Management */} {/* ------------------------------------------------------------------ */}
Global GitHub Account Management
Overview
The Git tab in the main dashboard provides centralized management of your GitHub accounts across all servers. Think of it as your GitHub identity hub in Server Compass.
How It Works
Architecture
GitHub OAuth (Device Flow)
    ↓
Global Account Storage (SQLite)
    ↓
Link to Multiple Servers
    ↓
Deploy Apps Using This Account
Key Features
- OAuth Authentication: Secure, token-based authentication via the GitHub Device Flow (no passwords stored)
- Multi-Account Support: Connect multiple GitHub accounts (personal, work, clients)
- Account Summaries: See which servers use each account and which apps are deployed
- Global Repository Browser: View all repositories from any connected account

Step-by-Step: Connecting GitHub
Step 1: Navigate to GitHub Accounts
- Open Server Compass
- In the main dashboard, click the Git tab in the sidebar
- You'll see the global GitHub accounts management page
Step 2: Connect Your First GitHub Account
- Click the "Connect GitHub Account" or "Add Account" button
- A modal will appear showing available providers (GitHub is available, GitLab coming soon)
- Click the GitHub card
Step 3: Complete OAuth Device Flow
- Server Compass will generate a unique device code (e.g.,
ABCD-1234) - A browser tab opens to
https://github.com/login/device - Click "Copy" to copy the code
- Paste the code in GitHub
- Authorize the Server Compass application
- The modal will automatically close once authenticated
Step 4: View Your Account
Once connected, you'll see your account card showing:
- Profile Picture: Your GitHub avatar
- Account Name/Alias: Your GitHub name
- Username: Your @username
- Linked Servers: How many servers use this account (initially 0)
- Deployed Apps: Which apps are deployed using this account
Step 5: Explore Repositories
- Click on an account card to view its repositories
- The card will expand to show a "Default" badge
- Below, you'll see all repositories from this account:
- Repository name
- Description
- Language
- Default branch
- Private/Public status
- Use the search bar to filter repositories

Step 6: Manage Multiple Accounts
To add another account:
- Click "Add Account" in the top right
- Repeat the OAuth flow
- Switch between accounts by clicking their cards
- Set a default account by clicking "Set Default"
Step 7: Remove an Account
- Click "Remove" on any account card
- A confirmation modal appears showing:
- Which servers are linked to this account
- Which apps are deployed using this account
- Choose whether to automatically unlink from servers (recommended)
- Click "Remove Account" to confirm
{/* ------------------------------------------------------------------ */} {/* Server-Specific Git Account Linking */} {/* ------------------------------------------------------------------ */}
Server-Specific Git Account Linking
Overview
Each server has its own Git tab where you manage the connection between your global GitHub accounts and that specific server. Before you can deploy from GitHub to a server, you must link a GitHub account to that server.
Why Link Accounts to Servers?
Each server needs its own GitHub authentication because:
- Security Isolation: Different servers may need different access levels
- Multi-Tenancy: One server might use a company account, another a personal account
- Access Control: Production servers might use read-only deploy accounts
Step-by-Step: Server Linking
Step 1: Navigate to Server Git Settings
- From the Servers page, click on a server to open its details
- Click the Git tab in the server details view
- You'll see the Git configuration page for this specific server
Step 2: Link a Global Account to This Server
- If you haven't connected any GitHub accounts globally yet, you'll see a message prompting you to go to Server Git Settings
- Click "Link Account"
- You'll see a list of your global GitHub accounts
- Select the account you want to use for this server
- Click "Link to Server"
Step 3: Set a Default Account (if multiple)
If you link multiple accounts to one server:
- Click "Set as Default" on your preferred account
- This account will be used automatically when deploying new apps
- You can still choose a different account during deployment
{/* ------------------------------------------------------------------ */} {/* Deploying Applications */} {/* ------------------------------------------------------------------ */}
Deploying Applications
Overview
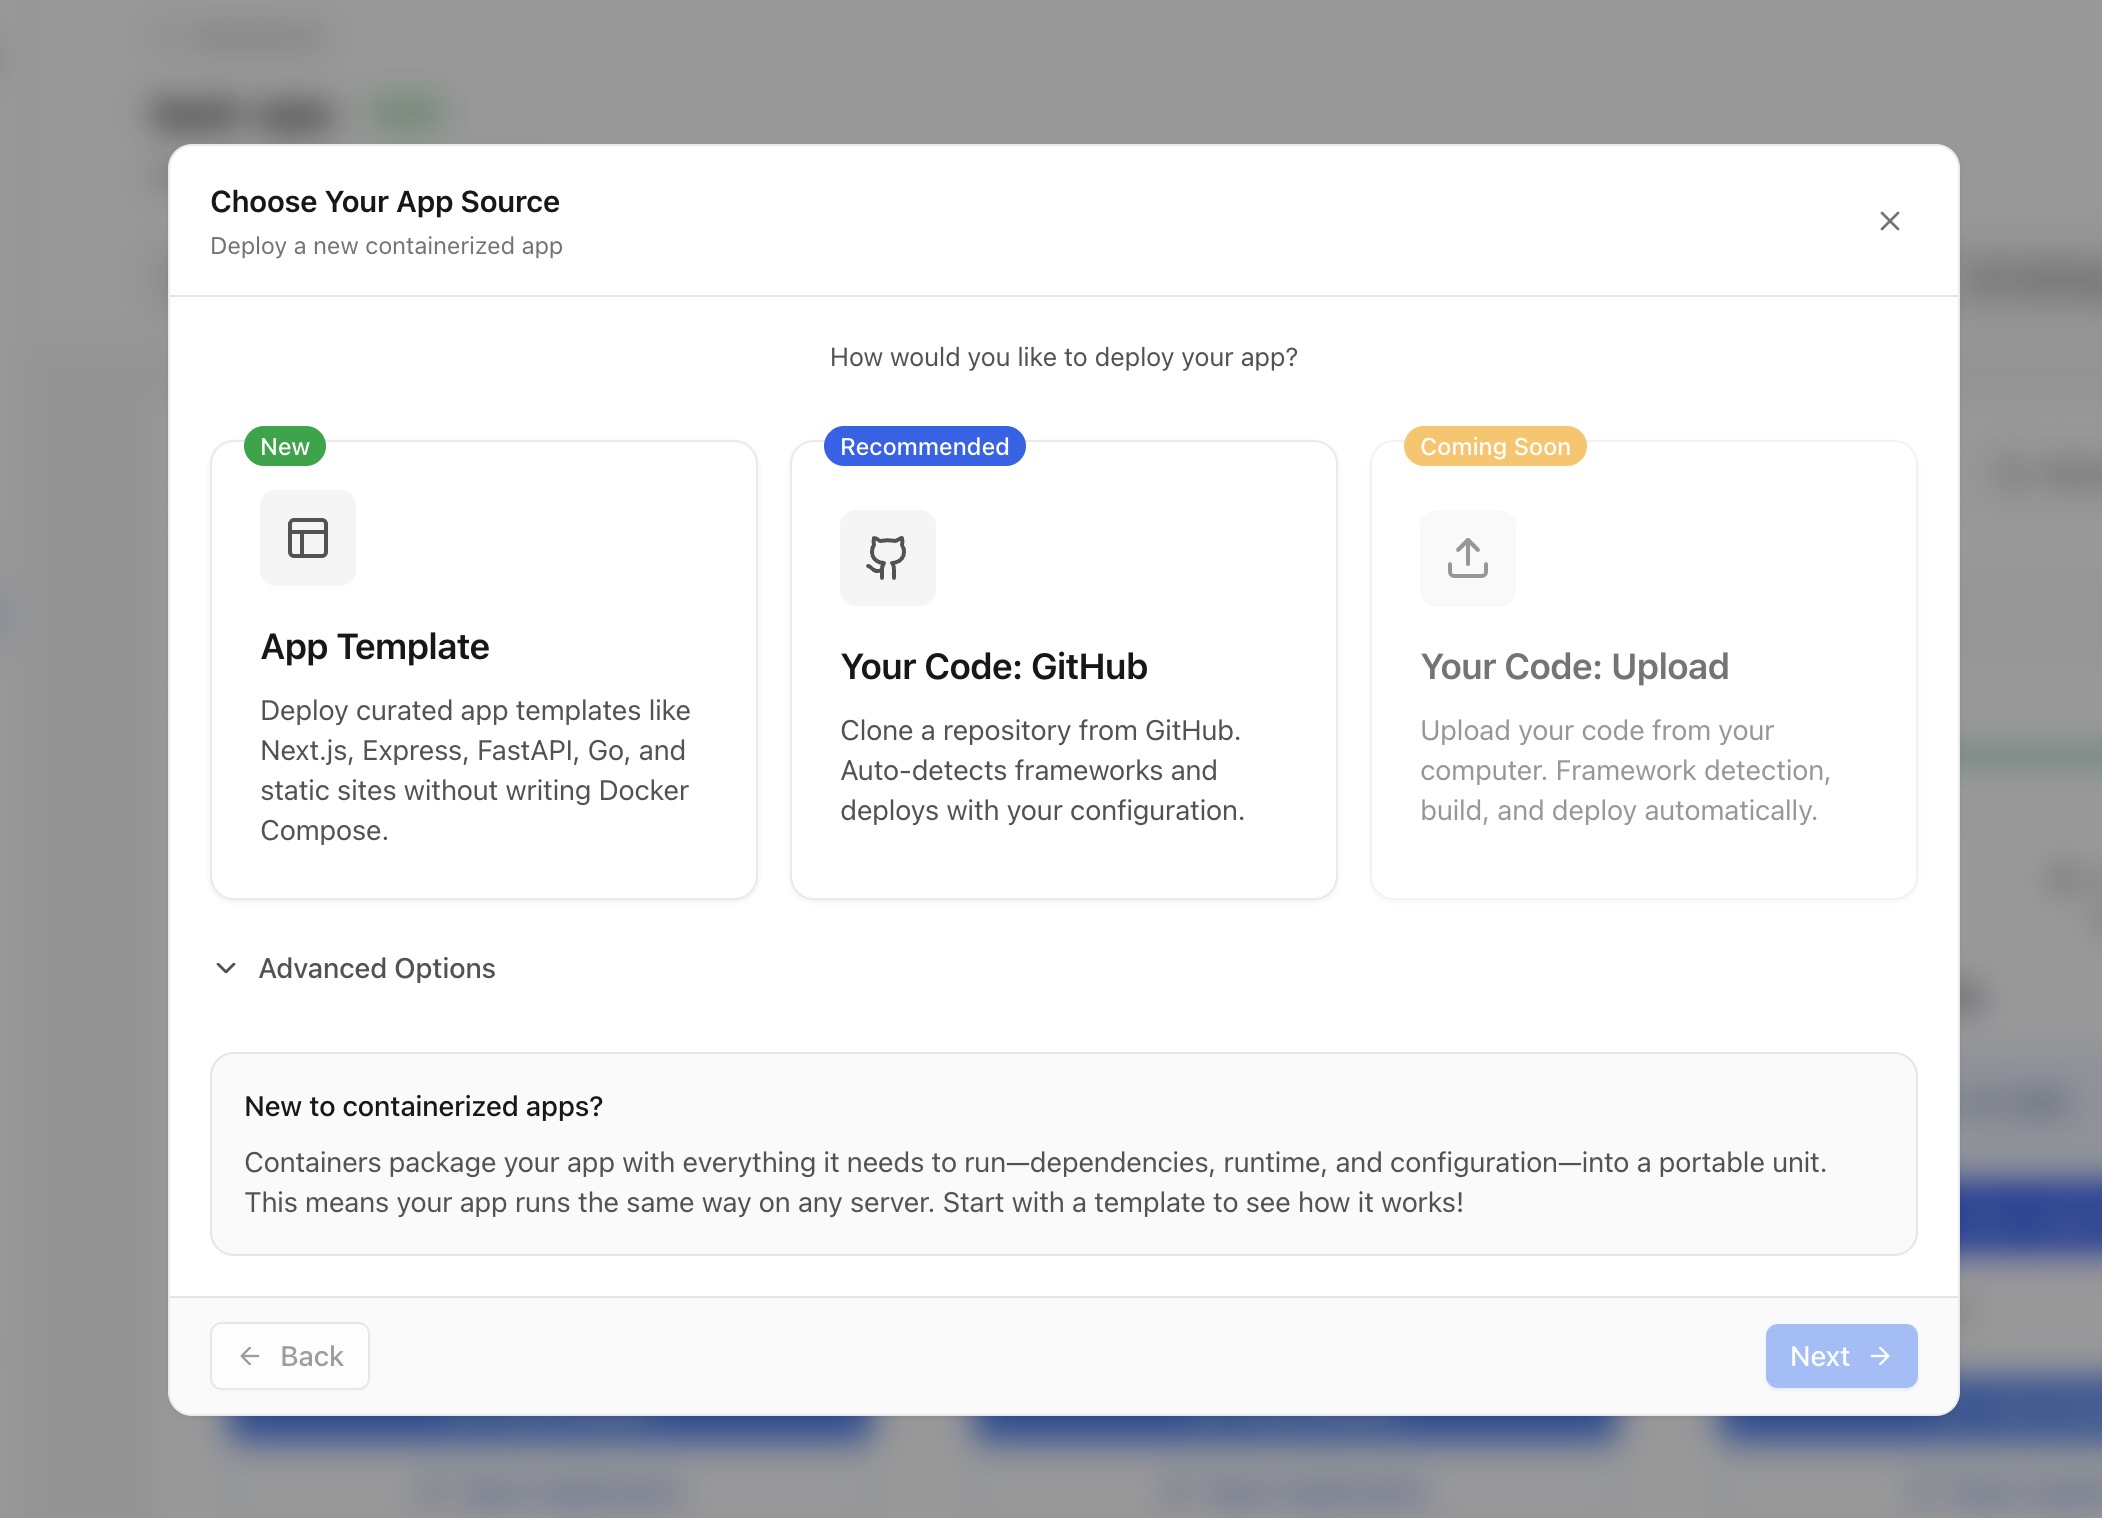
Server Compass provides a Docker Stack Wizard that walks you through deploying applications to your servers. Every app runs inside a Docker container with blue-green deployment for zero downtime. The wizard supports two deployment paths:
- Deploy from GitHub: Connect a repository, auto-detect the framework, choose a build strategy, and deploy
- Deploy a Template: Pick from 100+ one-click templates (databases, CMS, monitoring tools, and more)
Tutorial: Deploy from GitHub
Step 1: Start Deployment
- From the Servers page, click on a server to open its details
- Click the Apps tab in the server details view
- Click the "New App" button to open the Docker Stack Wizard
- Select "Deploy from GitHub"
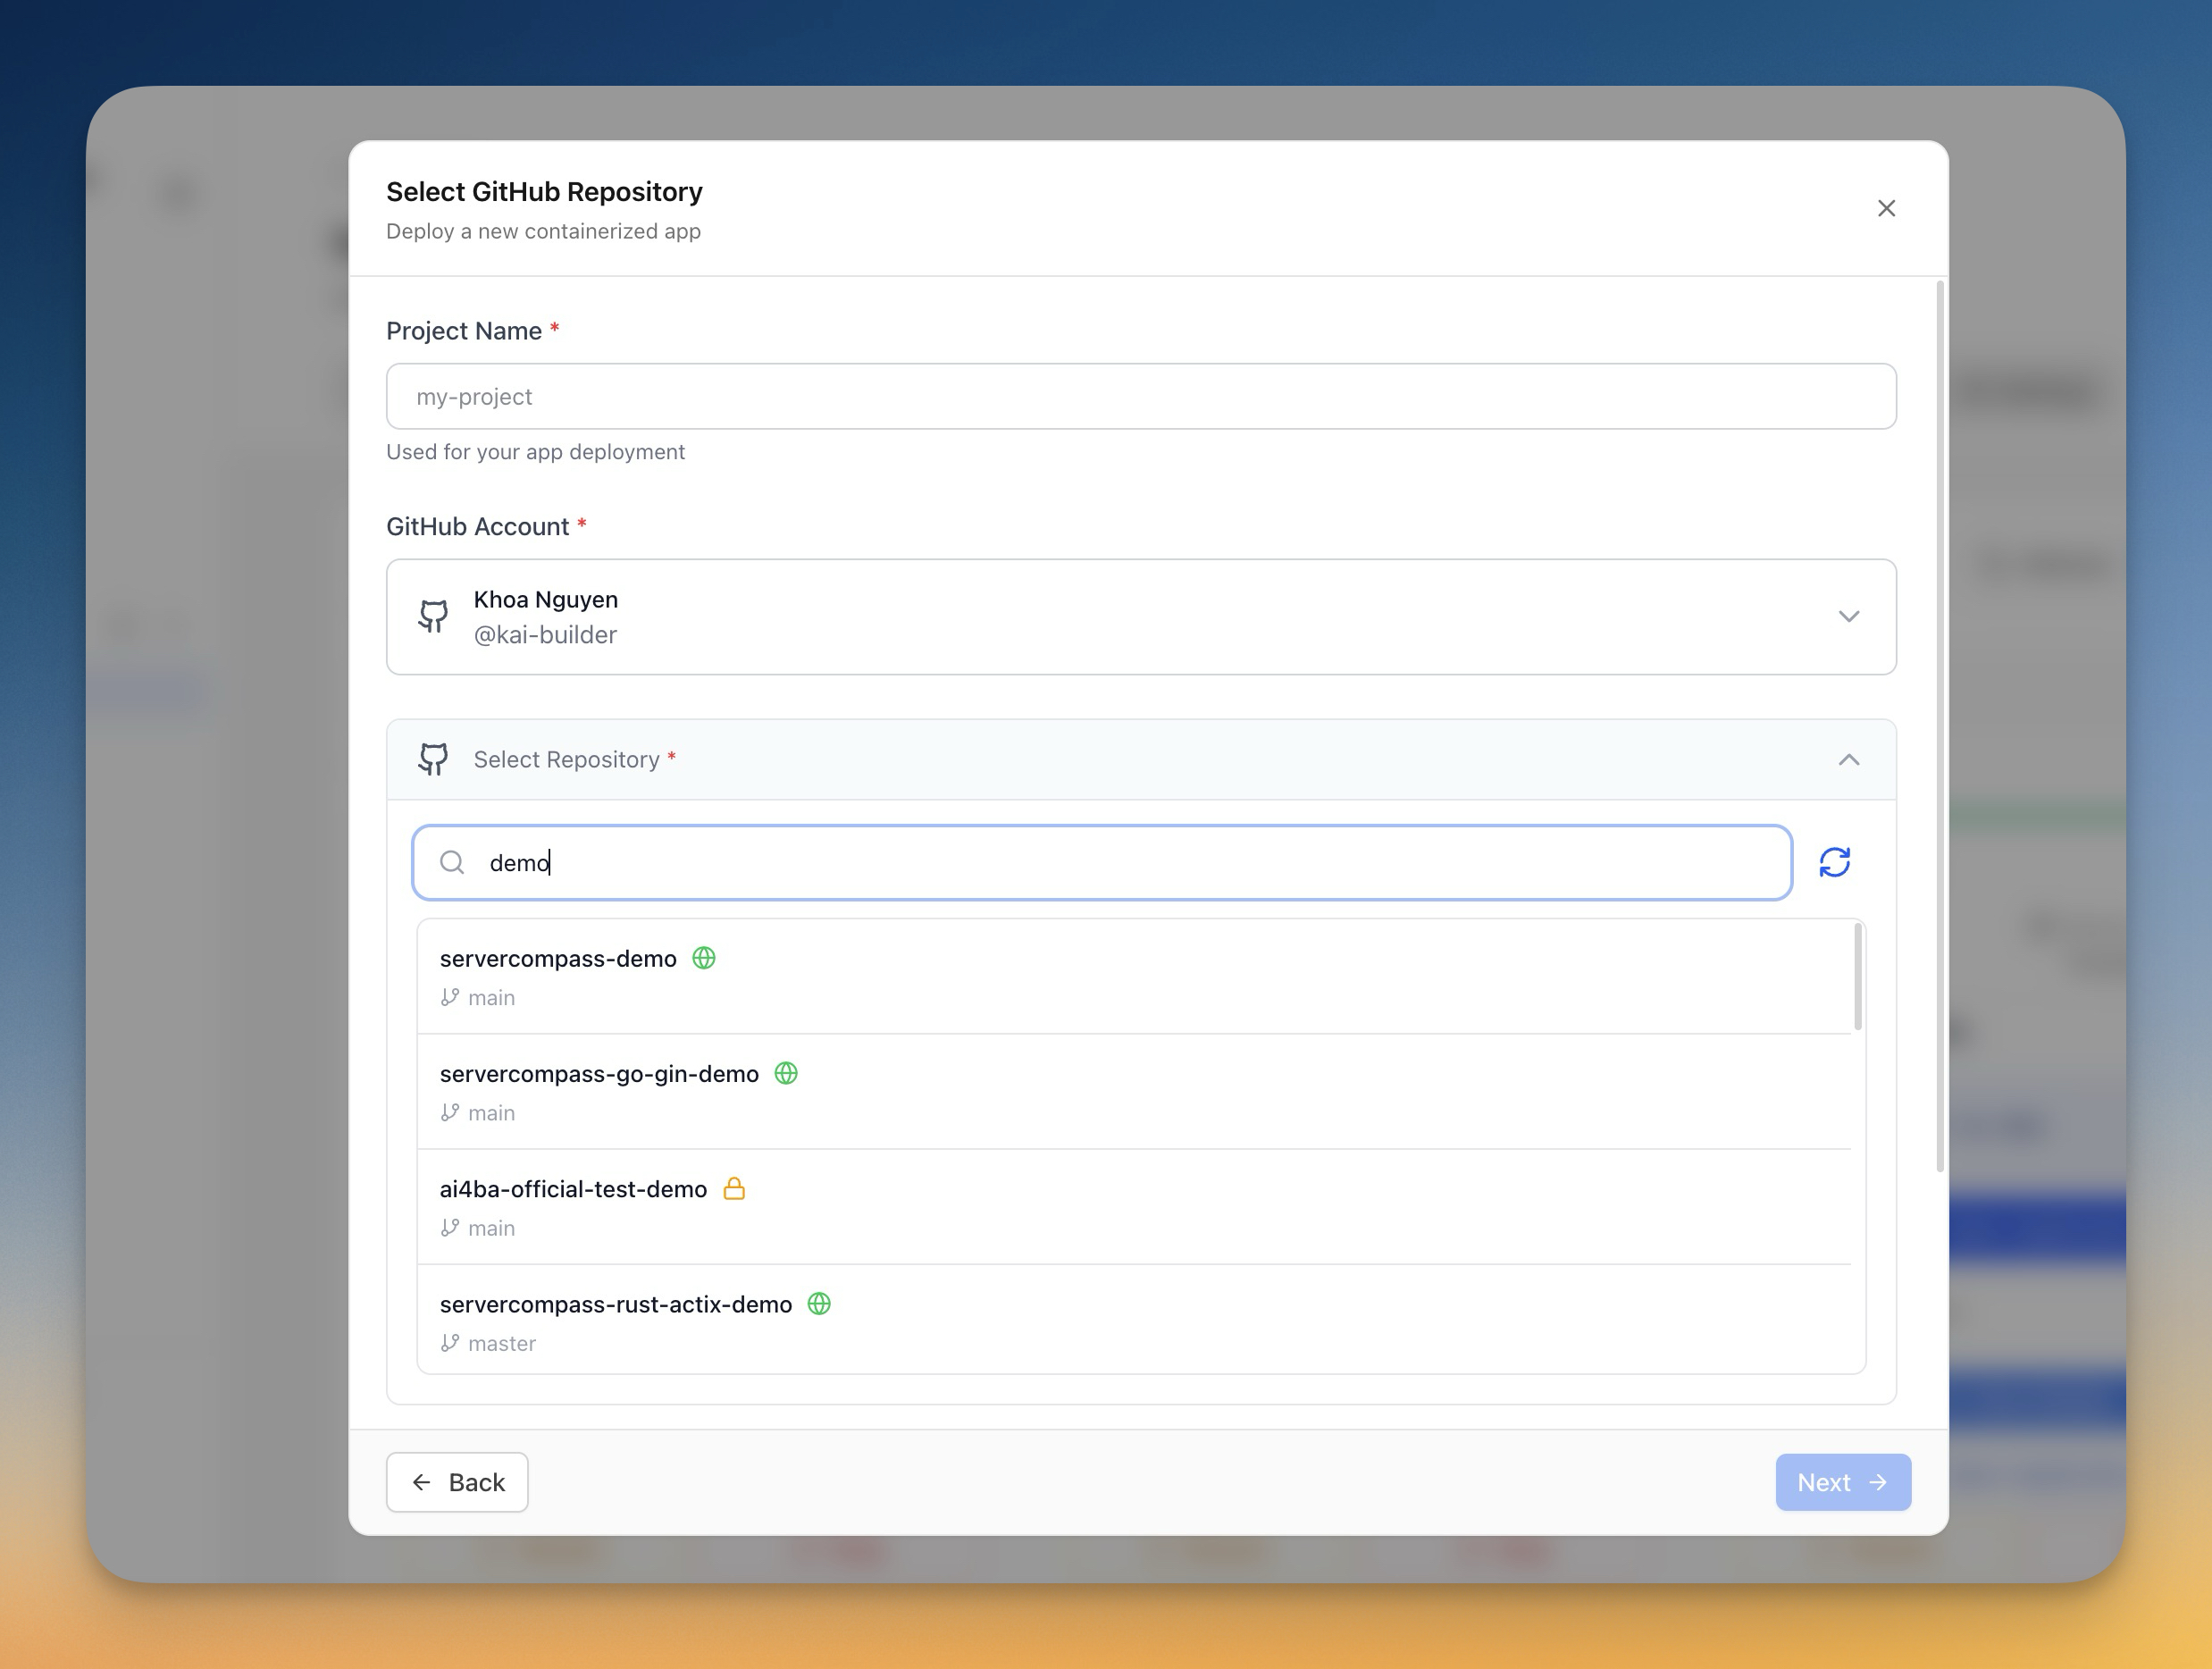
Step 2: Select GitHub Account and Repository
- If you have multiple linked accounts, select the one you want to use
- Server Compass fetches all repositories from the selected account
- Use the search bar to filter repositories
- Click a repository to select it
Step 3: Automatic Framework Detection
This is where Server Compass saves you the most time. Once you select a repository, framework detection kicks in automatically. It analyzes your codebase and detects:
- Framework — Next.js, React, Vue, Nuxt, Svelte, SvelteKit, Angular, Express, NestJS, Fastify, Django, Flask, FastAPI, Laravel, Go, Rust, Ruby on Rails, and more
- Package manager — npm, yarn, pnpm, bun, pip, composer, cargo, etc.
- Build command — auto-suggested based on the detected framework
- Start command — auto-suggested based on your project's scripts
- Port — the default port for the detected framework

You can override any of these values, but in most cases the defaults are exactly right. For a standard Next.js app, you typically don't need to change a thing.
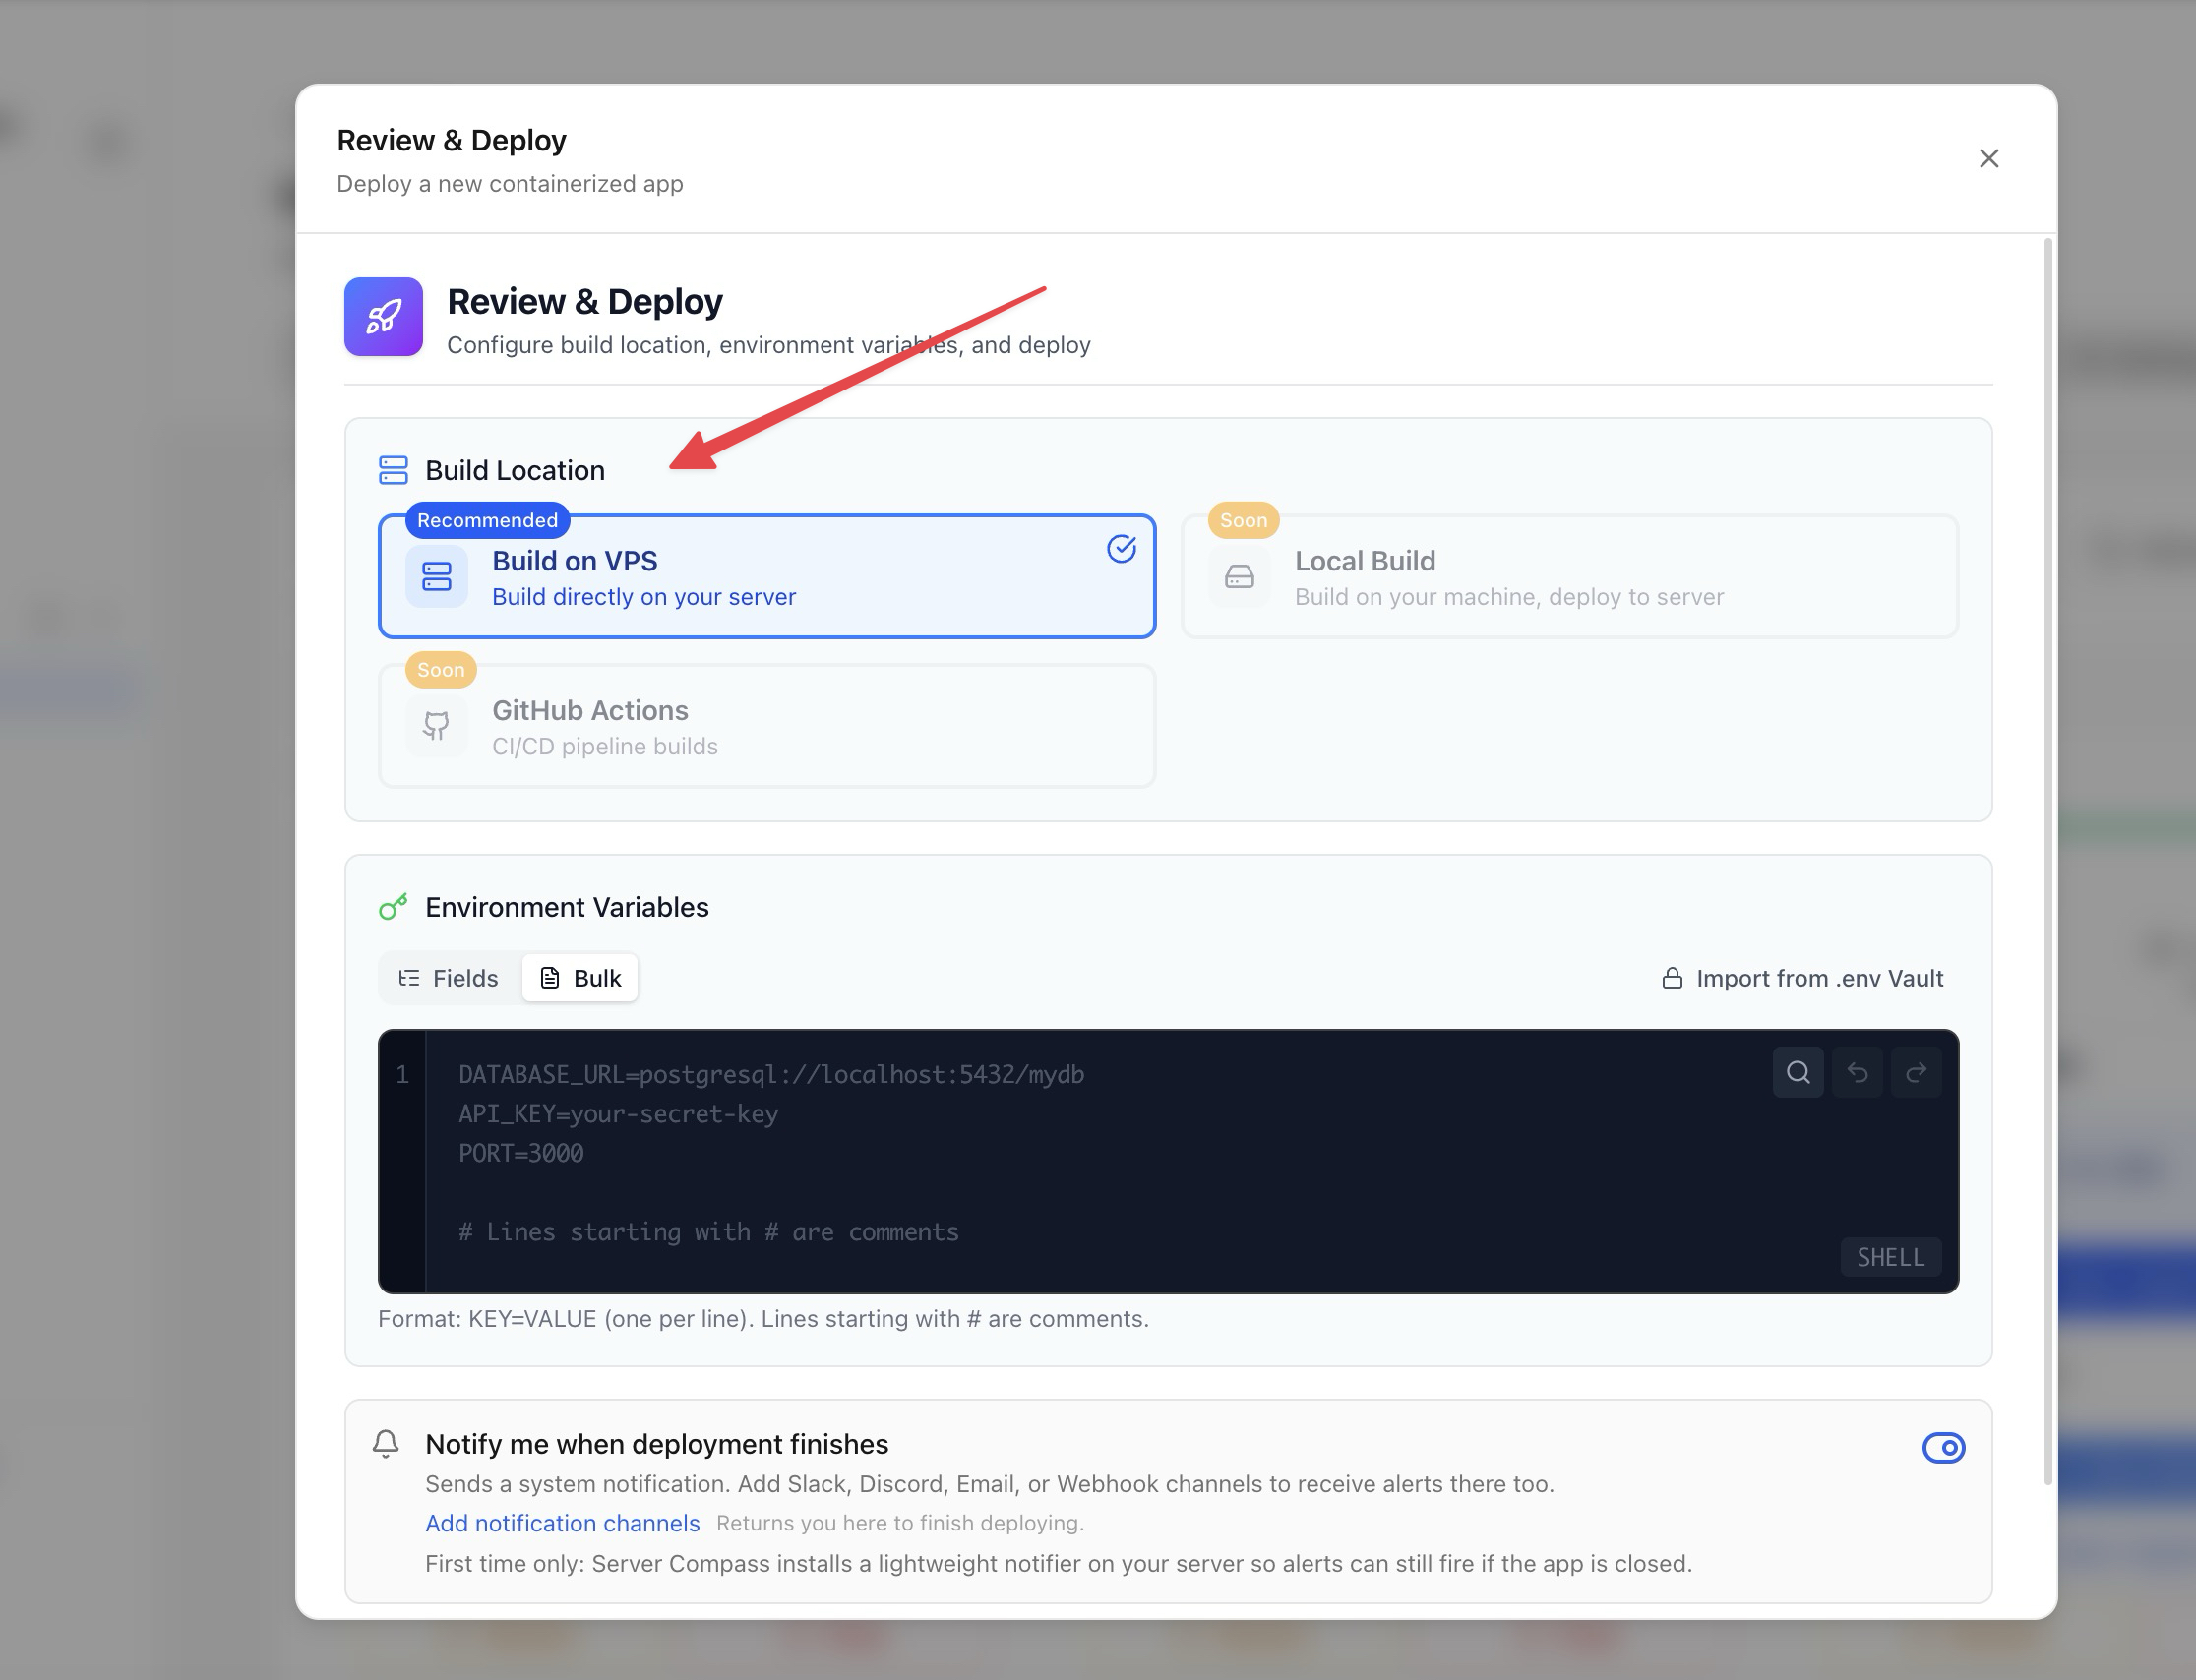
Step 4: Choose Build Location
Server Compass gives you three options for where your app gets built. This is especially important if your VPS has limited RAM:
- Build on VPS — The default. Your code is cloned and built directly on the server. Works great for servers with 1GB+ RAM.
- Build Locally — Server Compass builds the Docker image on your local machine, then pushes it to the server. Perfect for low-RAM VPS instances (512MB).
- Build with GitHub Actions — Offload the build to GitHub's CI/CD runners. Your VPS receives a pre-built Docker image. Zero build load on the server, and you get a full CI/CD pipeline for free.
Step 5: Configure Deployment
Fine-tune your deployment settings:
App Name — Used as the Docker container name and the directory name on the server. Must be unique per server.
Branch — Select which Git branch to deploy.

Build Command — Auto-detected from your framework. Examples:
npm install && npm run build(Next.js)pip install -r requirements.txt(Django / Flask)composer install --no-dev(Laravel)cargo build --release(Rust)
Start Command — Auto-detected from your project. Examples:
npm start(Next.js)gunicorn app:app(Flask)php artisan serve(Laravel)./target/release/myapp(Rust)
Port — Auto-detection finds an available port. Conflict detection warns if the port is already in use by another container, database, or system process.
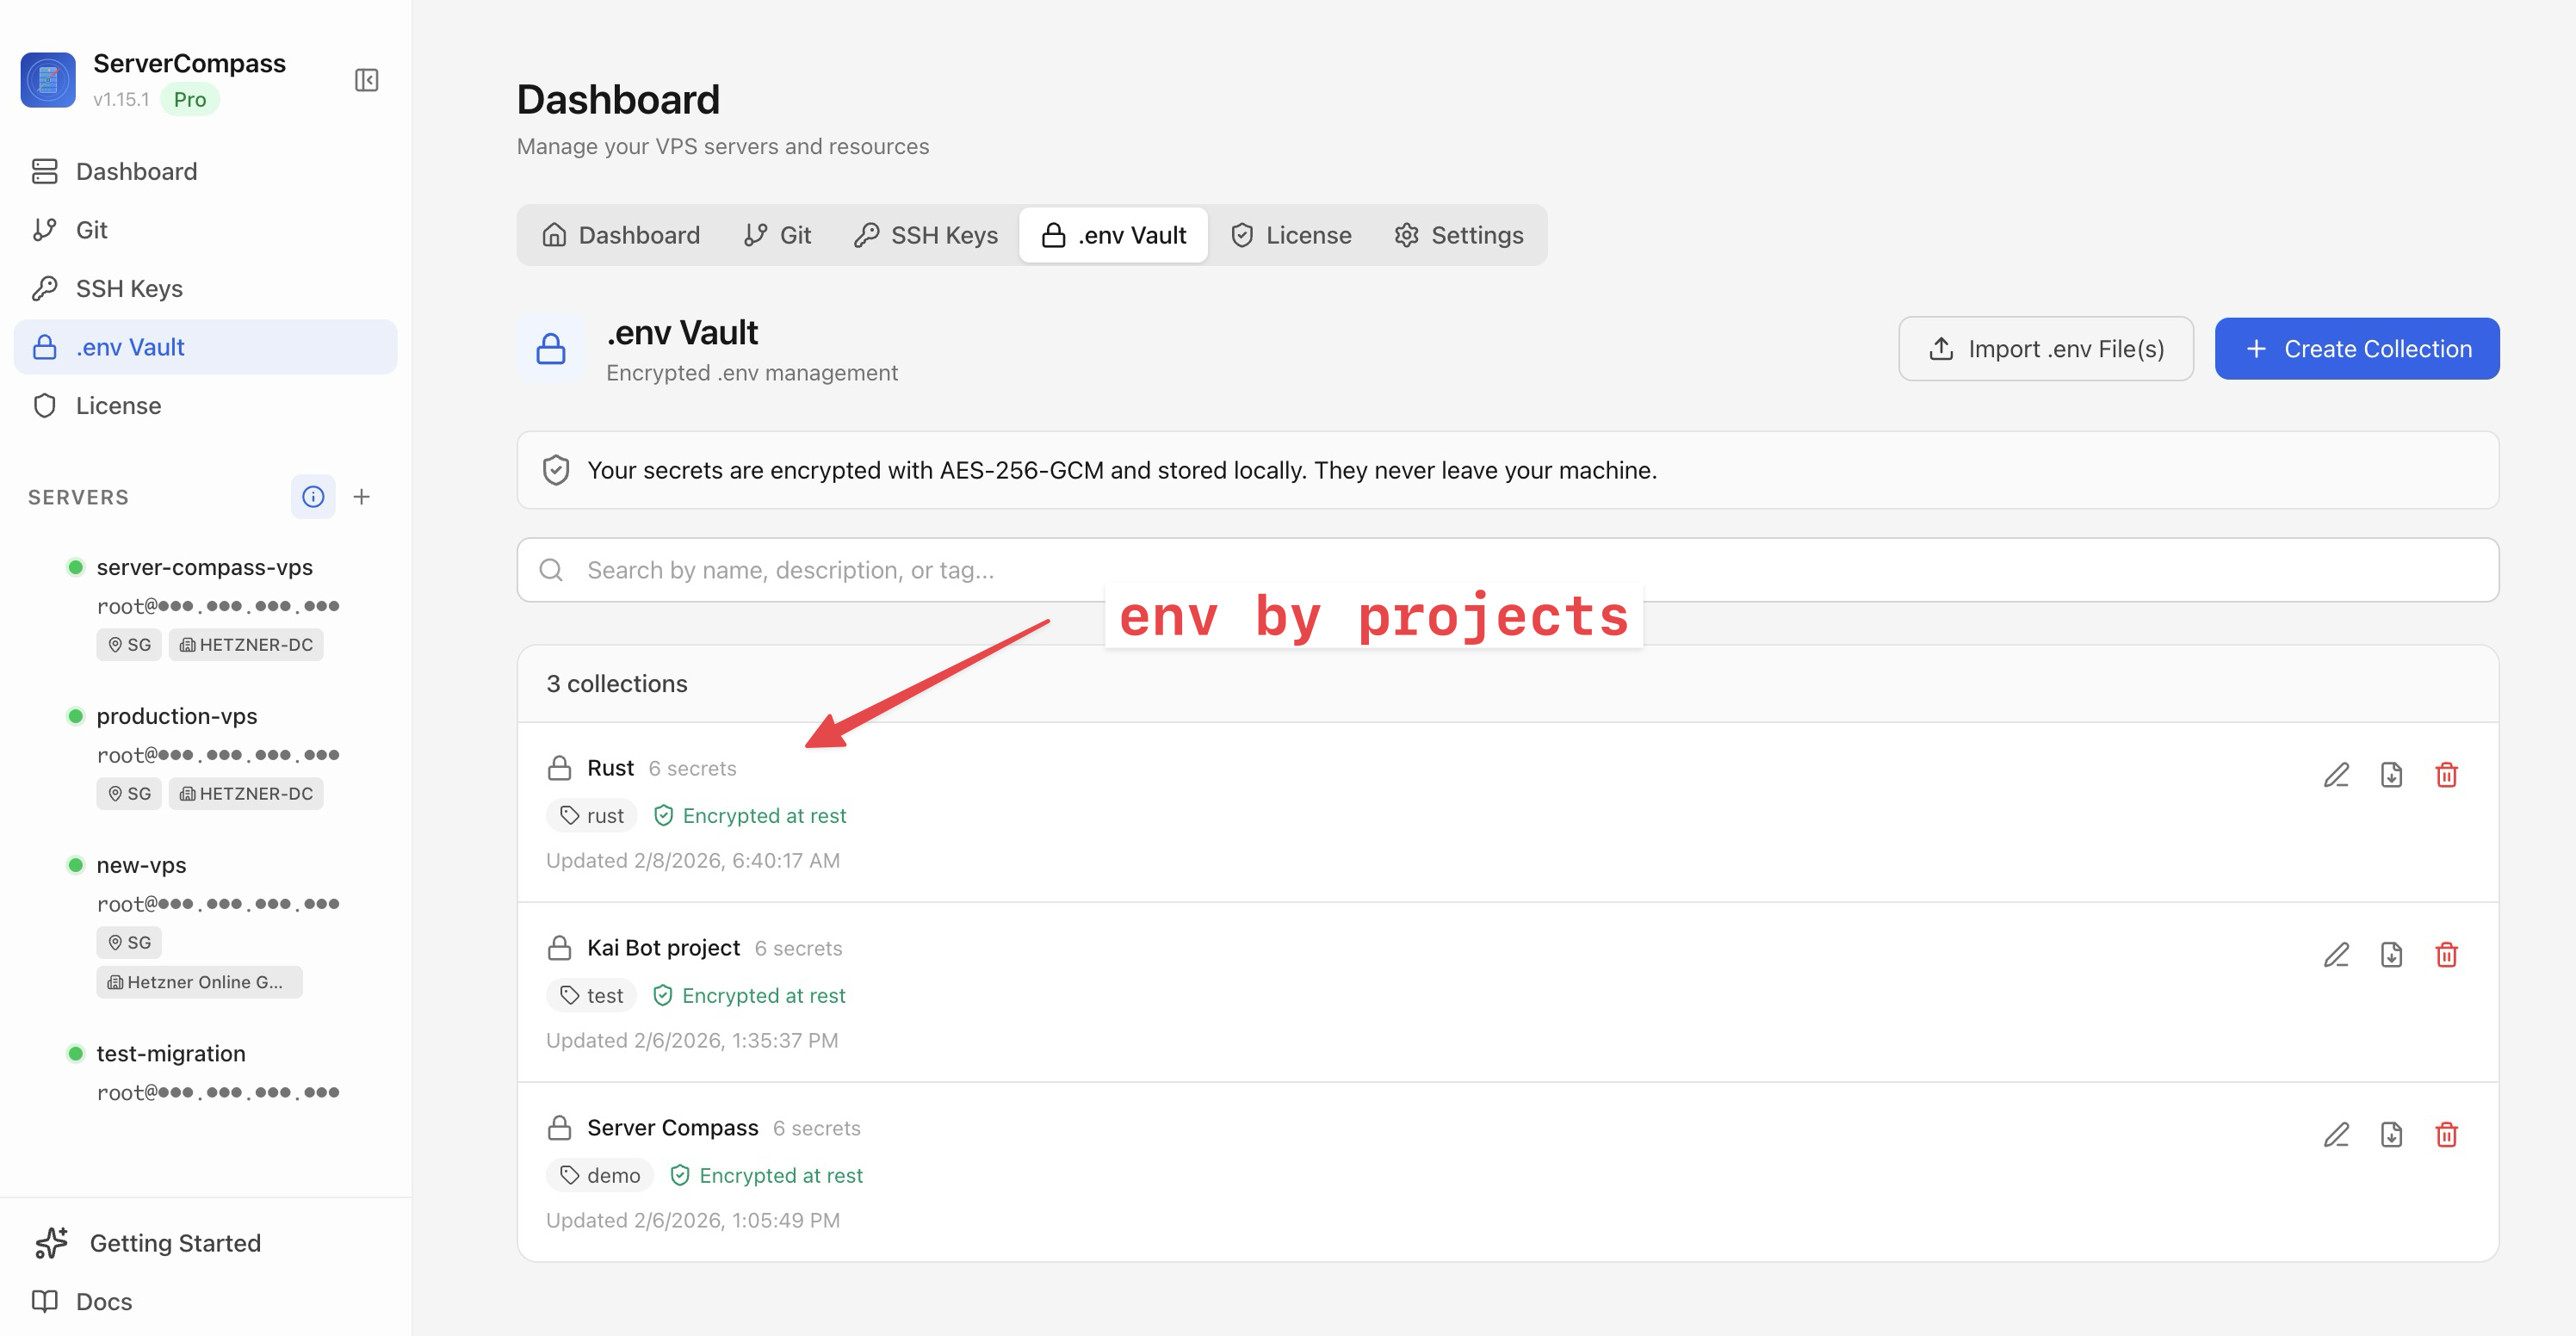
Environment Variables — Add key-value pairs directly, or manage them later through the environment variable vault with AES-256-GCM encryption.
Step 6: Deploy and Monitor
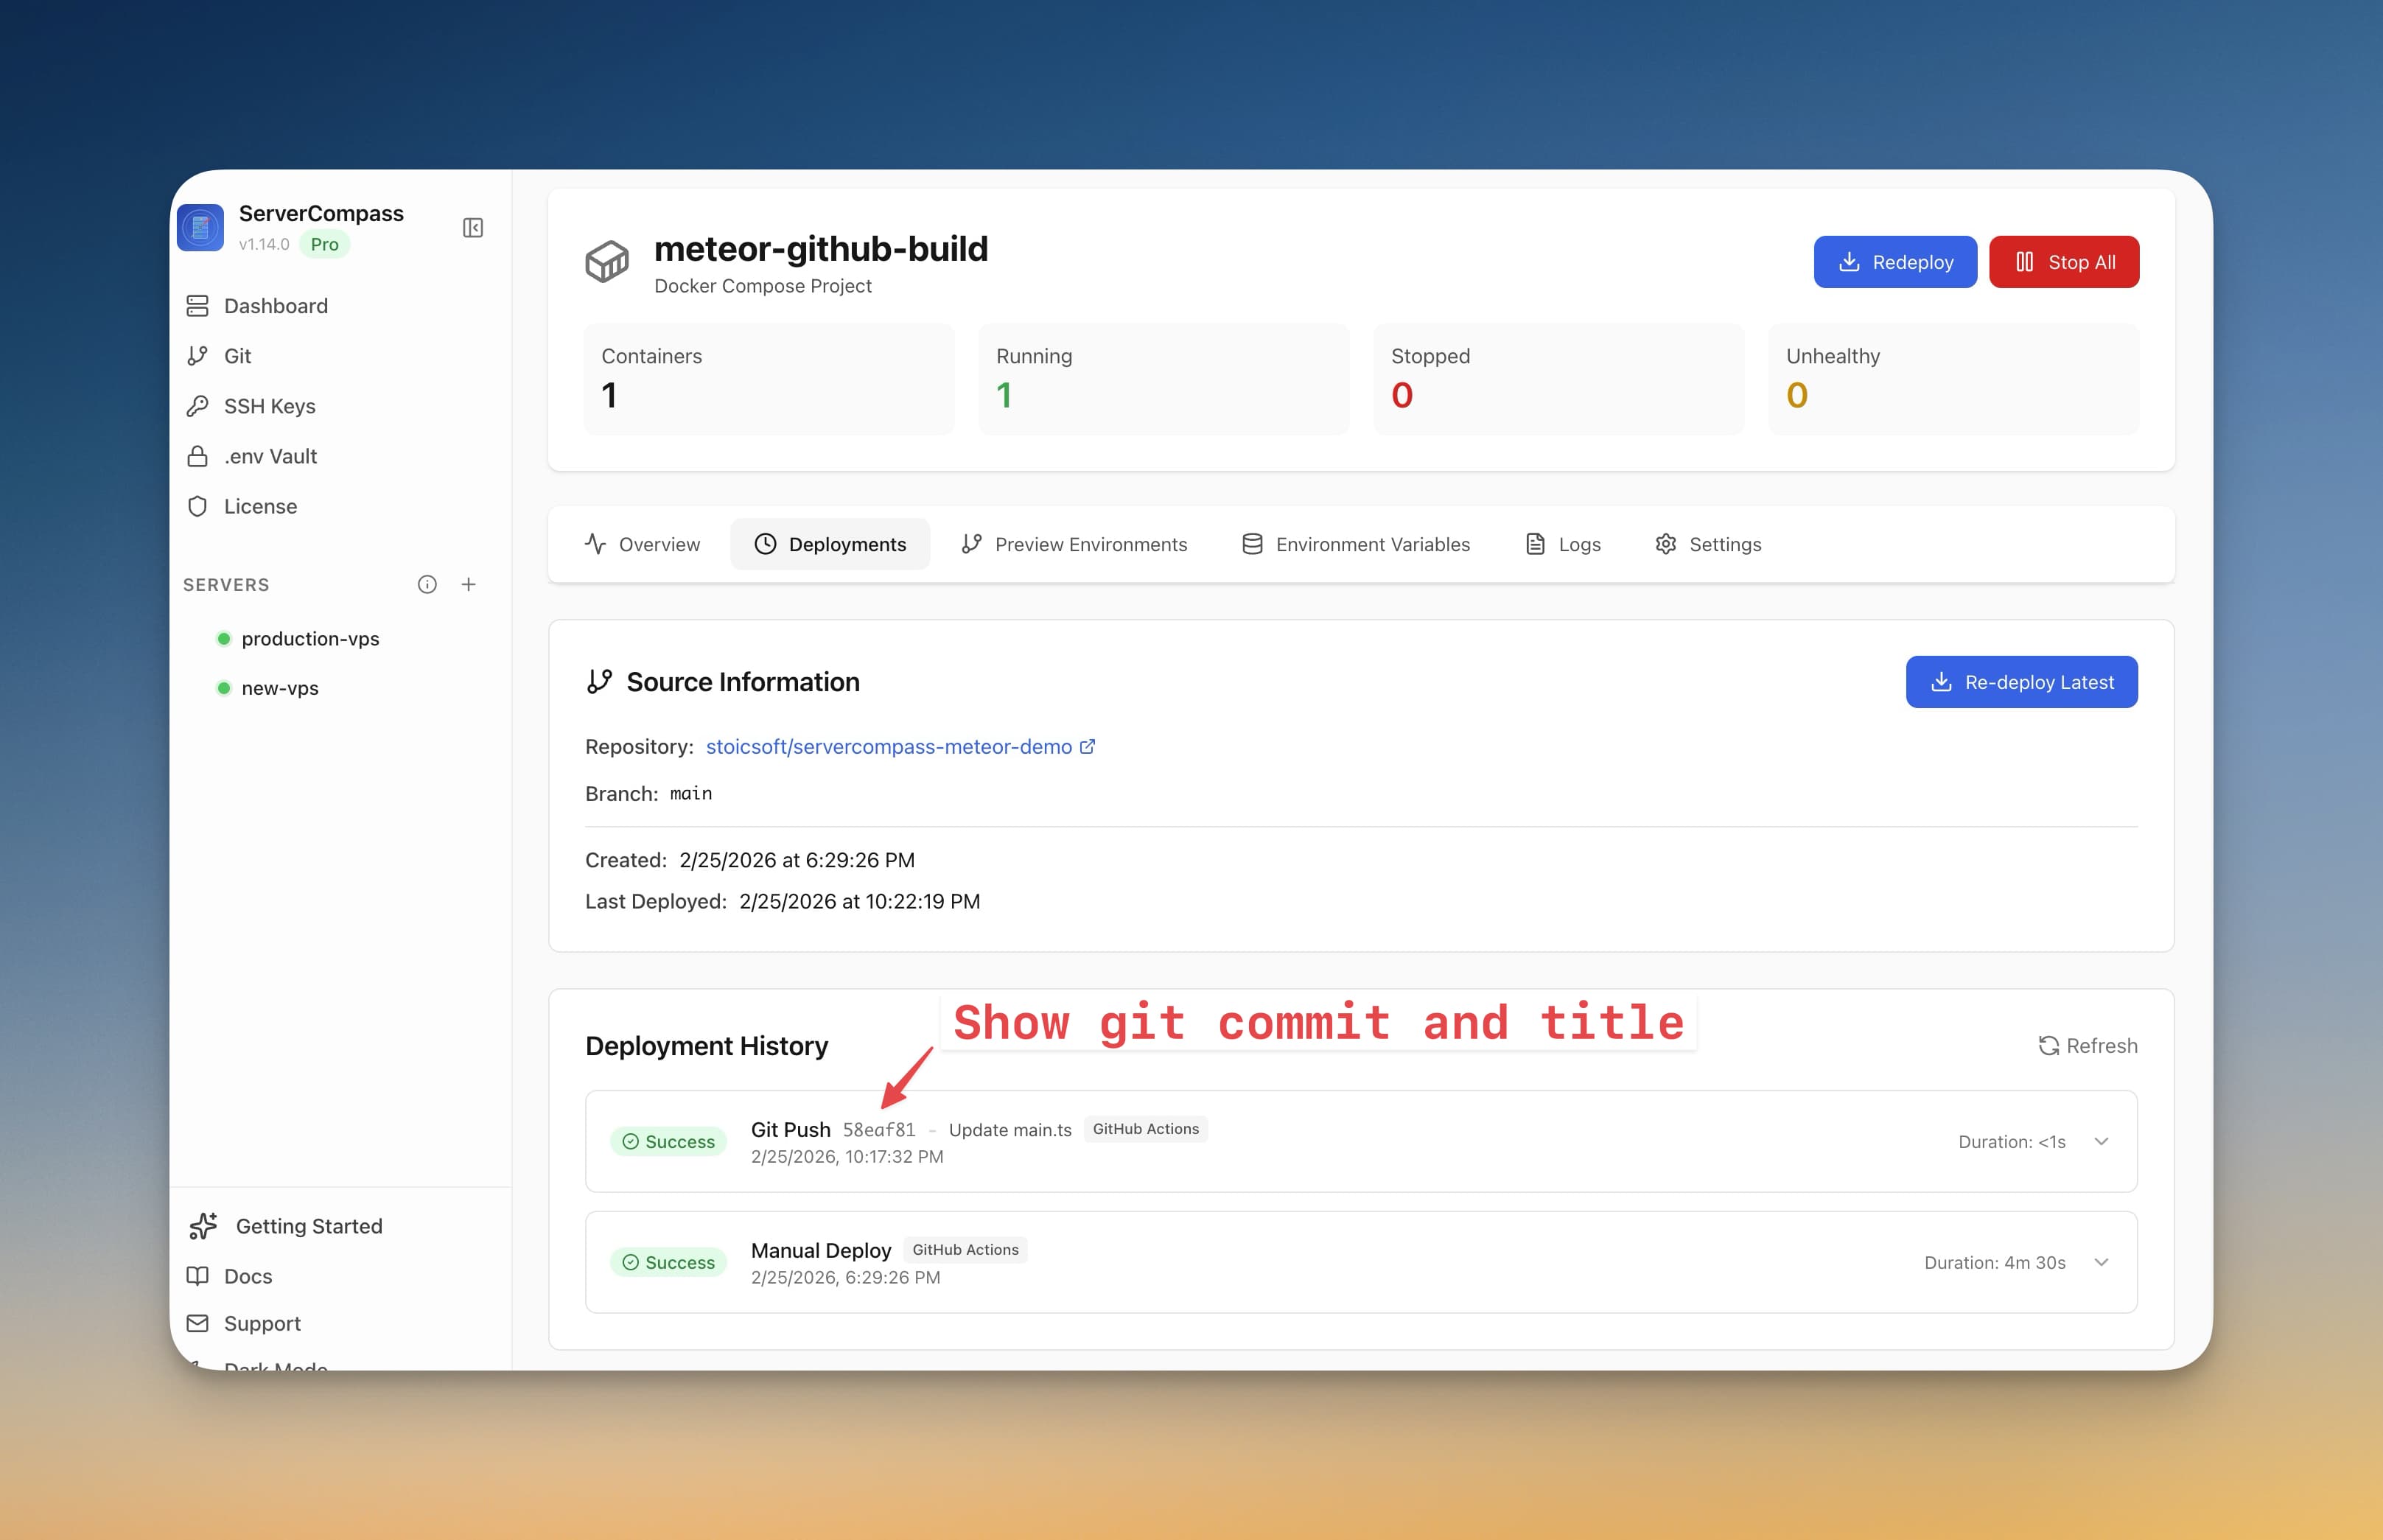
Click "Deploy Now" to start deployment. Live log streaming shows real-time deployment progress with color-coded logs. You'll see every step: pulling the repository, building the Docker image, starting the container, and running health checks.

Your application is now running in a Docker container. Click the URL to open your deployed app. You can view deployment history, container status, resource usage, and logs at any time from the app dashboard.
Tutorial: Deploying with Templates
Don't have a GitHub repo? Server Compass ships with 100+ one-click templates for popular software:
- Databases — PostgreSQL, MySQL, MongoDB, Redis, MariaDB
- CMS — WordPress, Ghost, Strapi, Directus
- Monitoring — Uptime Kuma, Grafana, Prometheus
- Dev Tools — Gitea, n8n, Plausible Analytics, MinIO
- And many more — Browse all templates
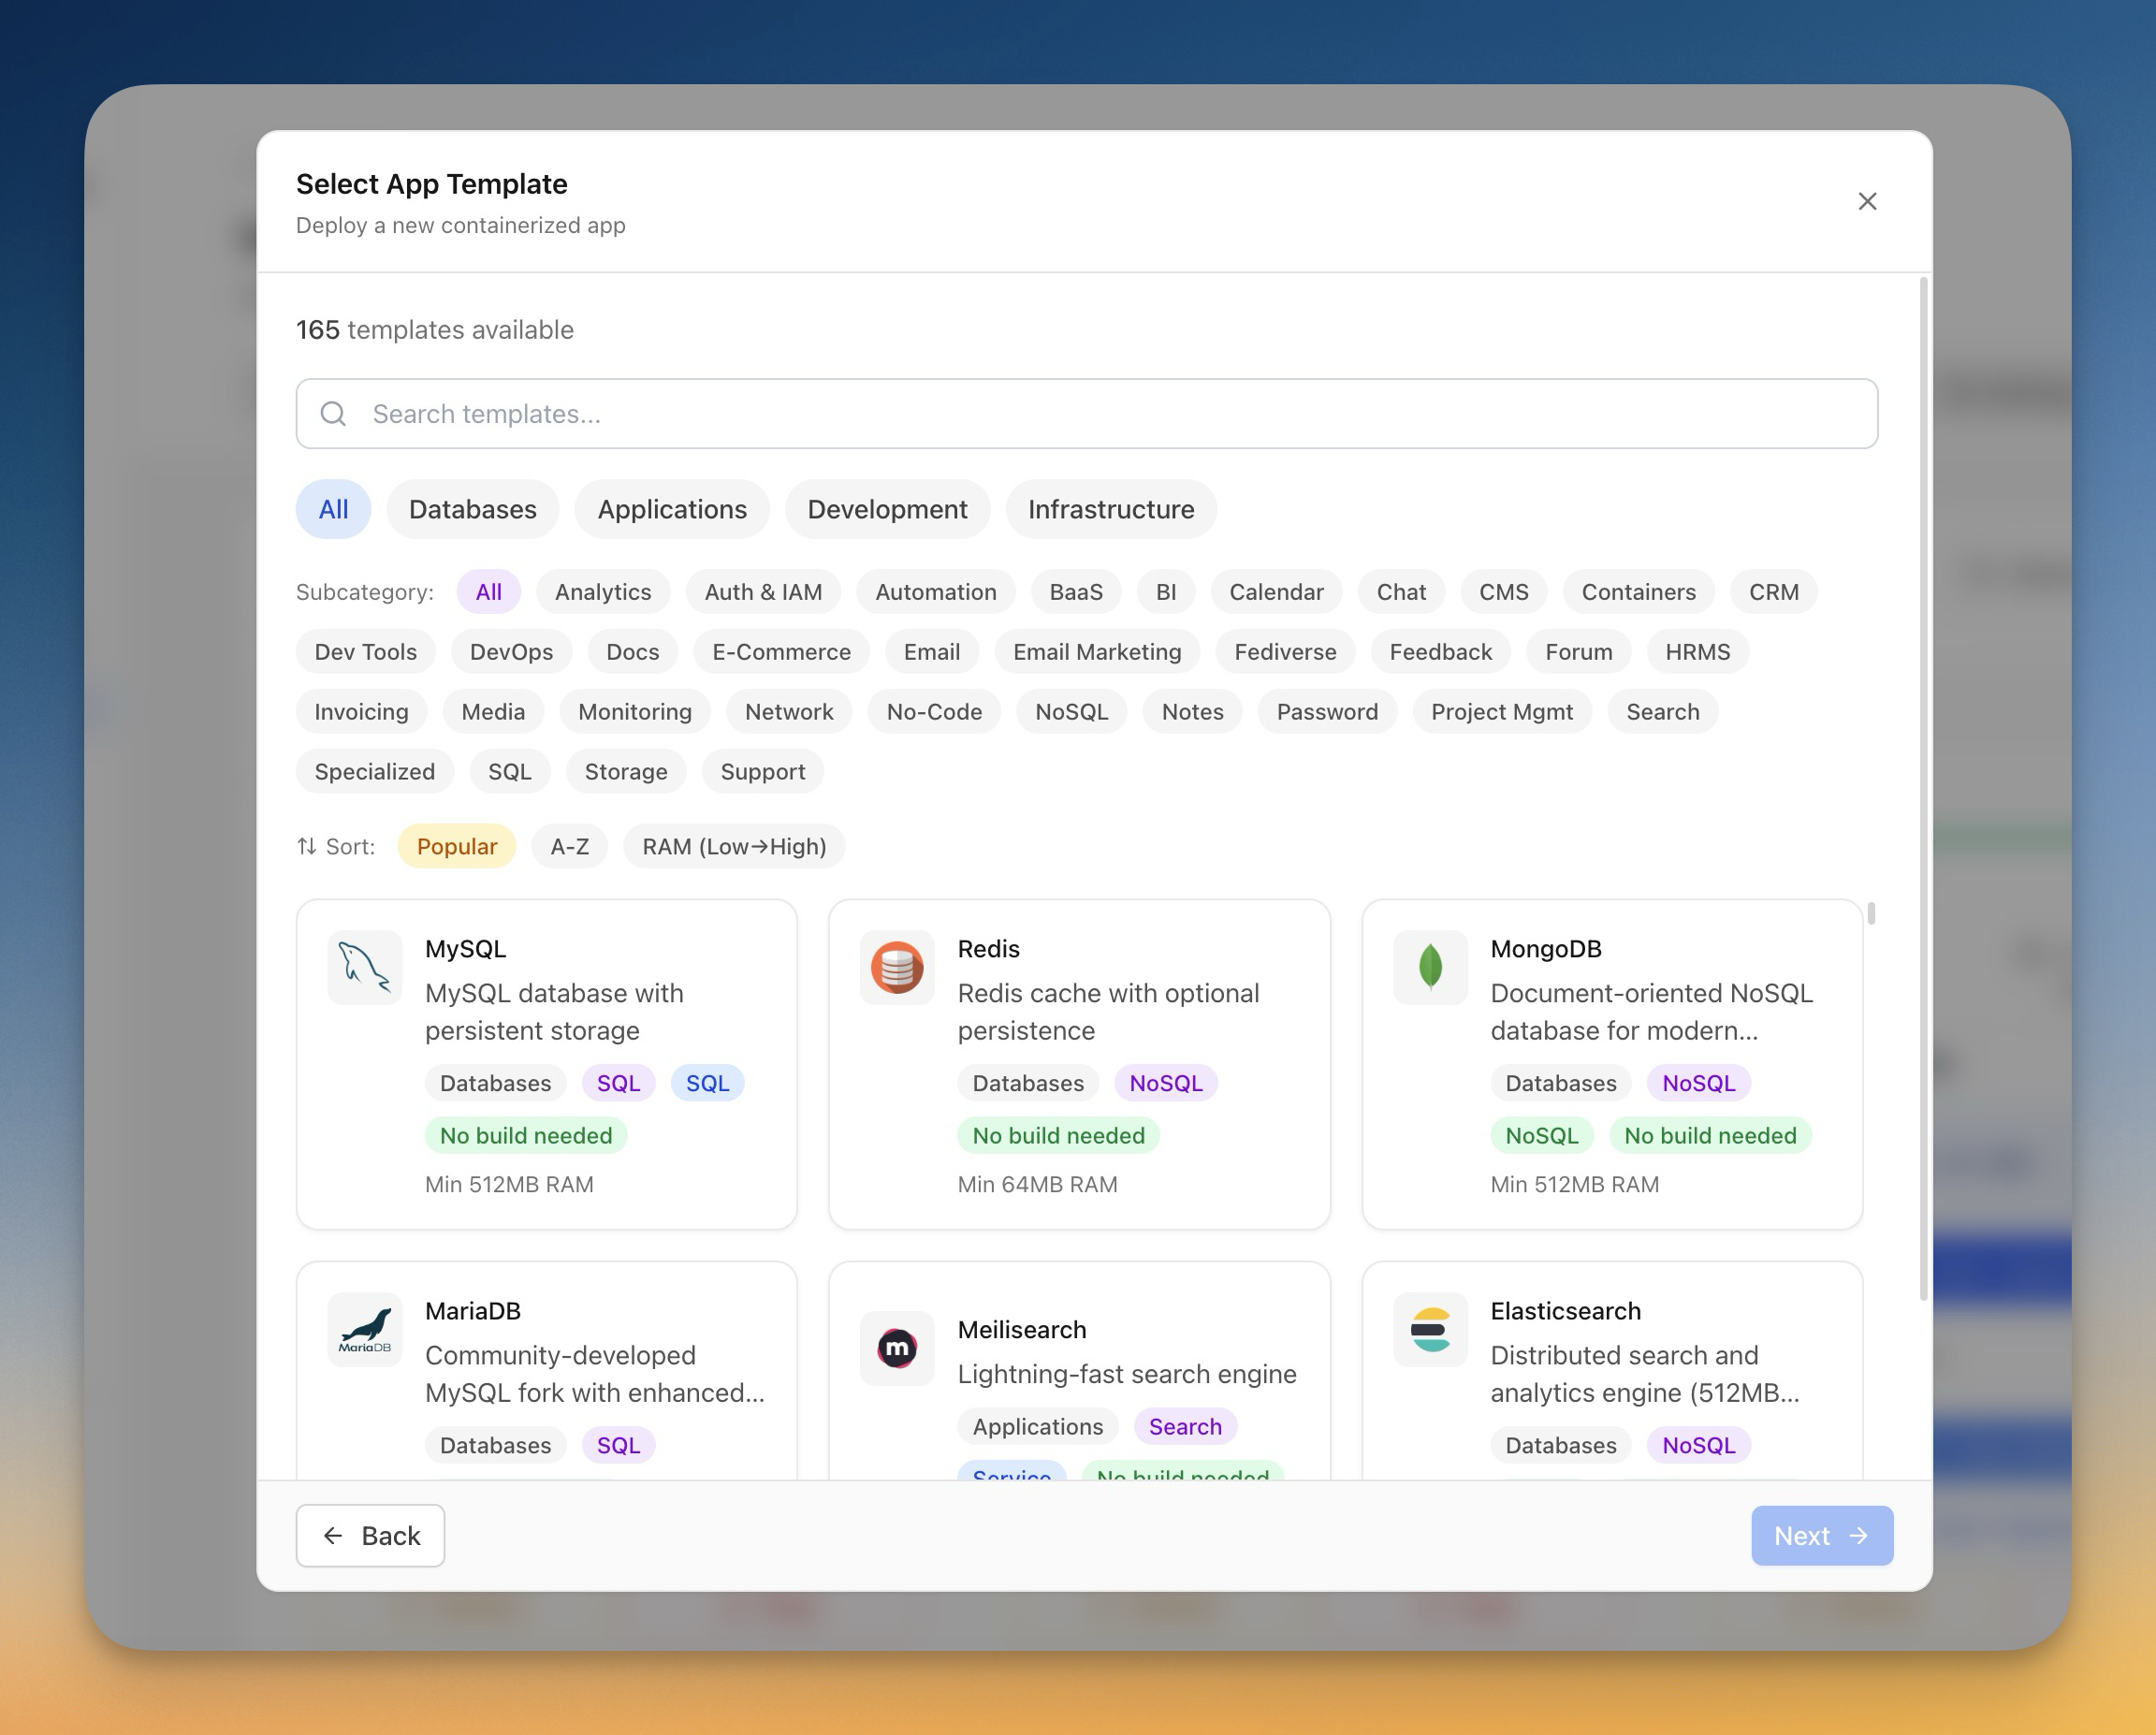
- Choose "Deploy a Template" from the Docker Stack Wizard
- Browse or search templates
- Configure the app name and any required settings
- Click "Deploy" — templates are pre-configured, so deployment is fast
{/* ------------------------------------------------------------------ */} {/* Understanding Auto-Deploy */} {/* ------------------------------------------------------------------ */}
Understanding Auto-Deploy
How Auto-Deploy Works
Auto-deploy is the feature that makes you truly lazy — in the best way. When enabled, Server Compass watches your GitHub repository for new commits and automatically redeploys your app when changes land on the tracked branch.
Auto-Deploy Workflow
- Initial Deployment: Repository is cloned, a Docker image is built, and the container starts running
- Watching for Changes: Server Compass monitors the tracked branch for new commits via GitHub push detection
- Automatic Redeployment: When changes are detected — pull latest code, build a new Docker image, perform a blue-green container swap (zero downtime), update the deployment record
- Notifications: Real-time updates in the Server Compass UI with desktop notifications for success or failure

Blue-Green Deployment
Every redeployment uses Docker blue-green deployment. Here's what happens under the hood:
- A new container ("green") is built with the latest code
- Health checks run on the new container
- Traffic is switched from the old container ("blue") to the new one
- The old container is removed
Your users never see downtime. If the new container fails its health check, the old container keeps running and you get notified.
GitHub Actions CI/CD Pipeline
If you chose GitHub Actions as your build location, auto-deploy gets even more powerful. Every push triggers a GitHub Actions workflow that:
- Builds the Docker image on GitHub's runners (free for public repos, 2,000 minutes/month for private)
- Pushes the built image to your server
- Performs the blue-green swap automatically
This means your VPS uses zero CPU for builds — it only runs the final container. See our GitHub Actions CI/CD tutorial for a complete walkthrough.
Benefits of Auto-Deploy
Zero Manual Intervention — Old way: ssh, cd, git pull, docker compose build, docker compose up -d, check logs, exit. Server Compass way: git push origin main. Done.
Zero Downtime — Docker blue-green deployment keeps your app running during updates. No dropped requests.
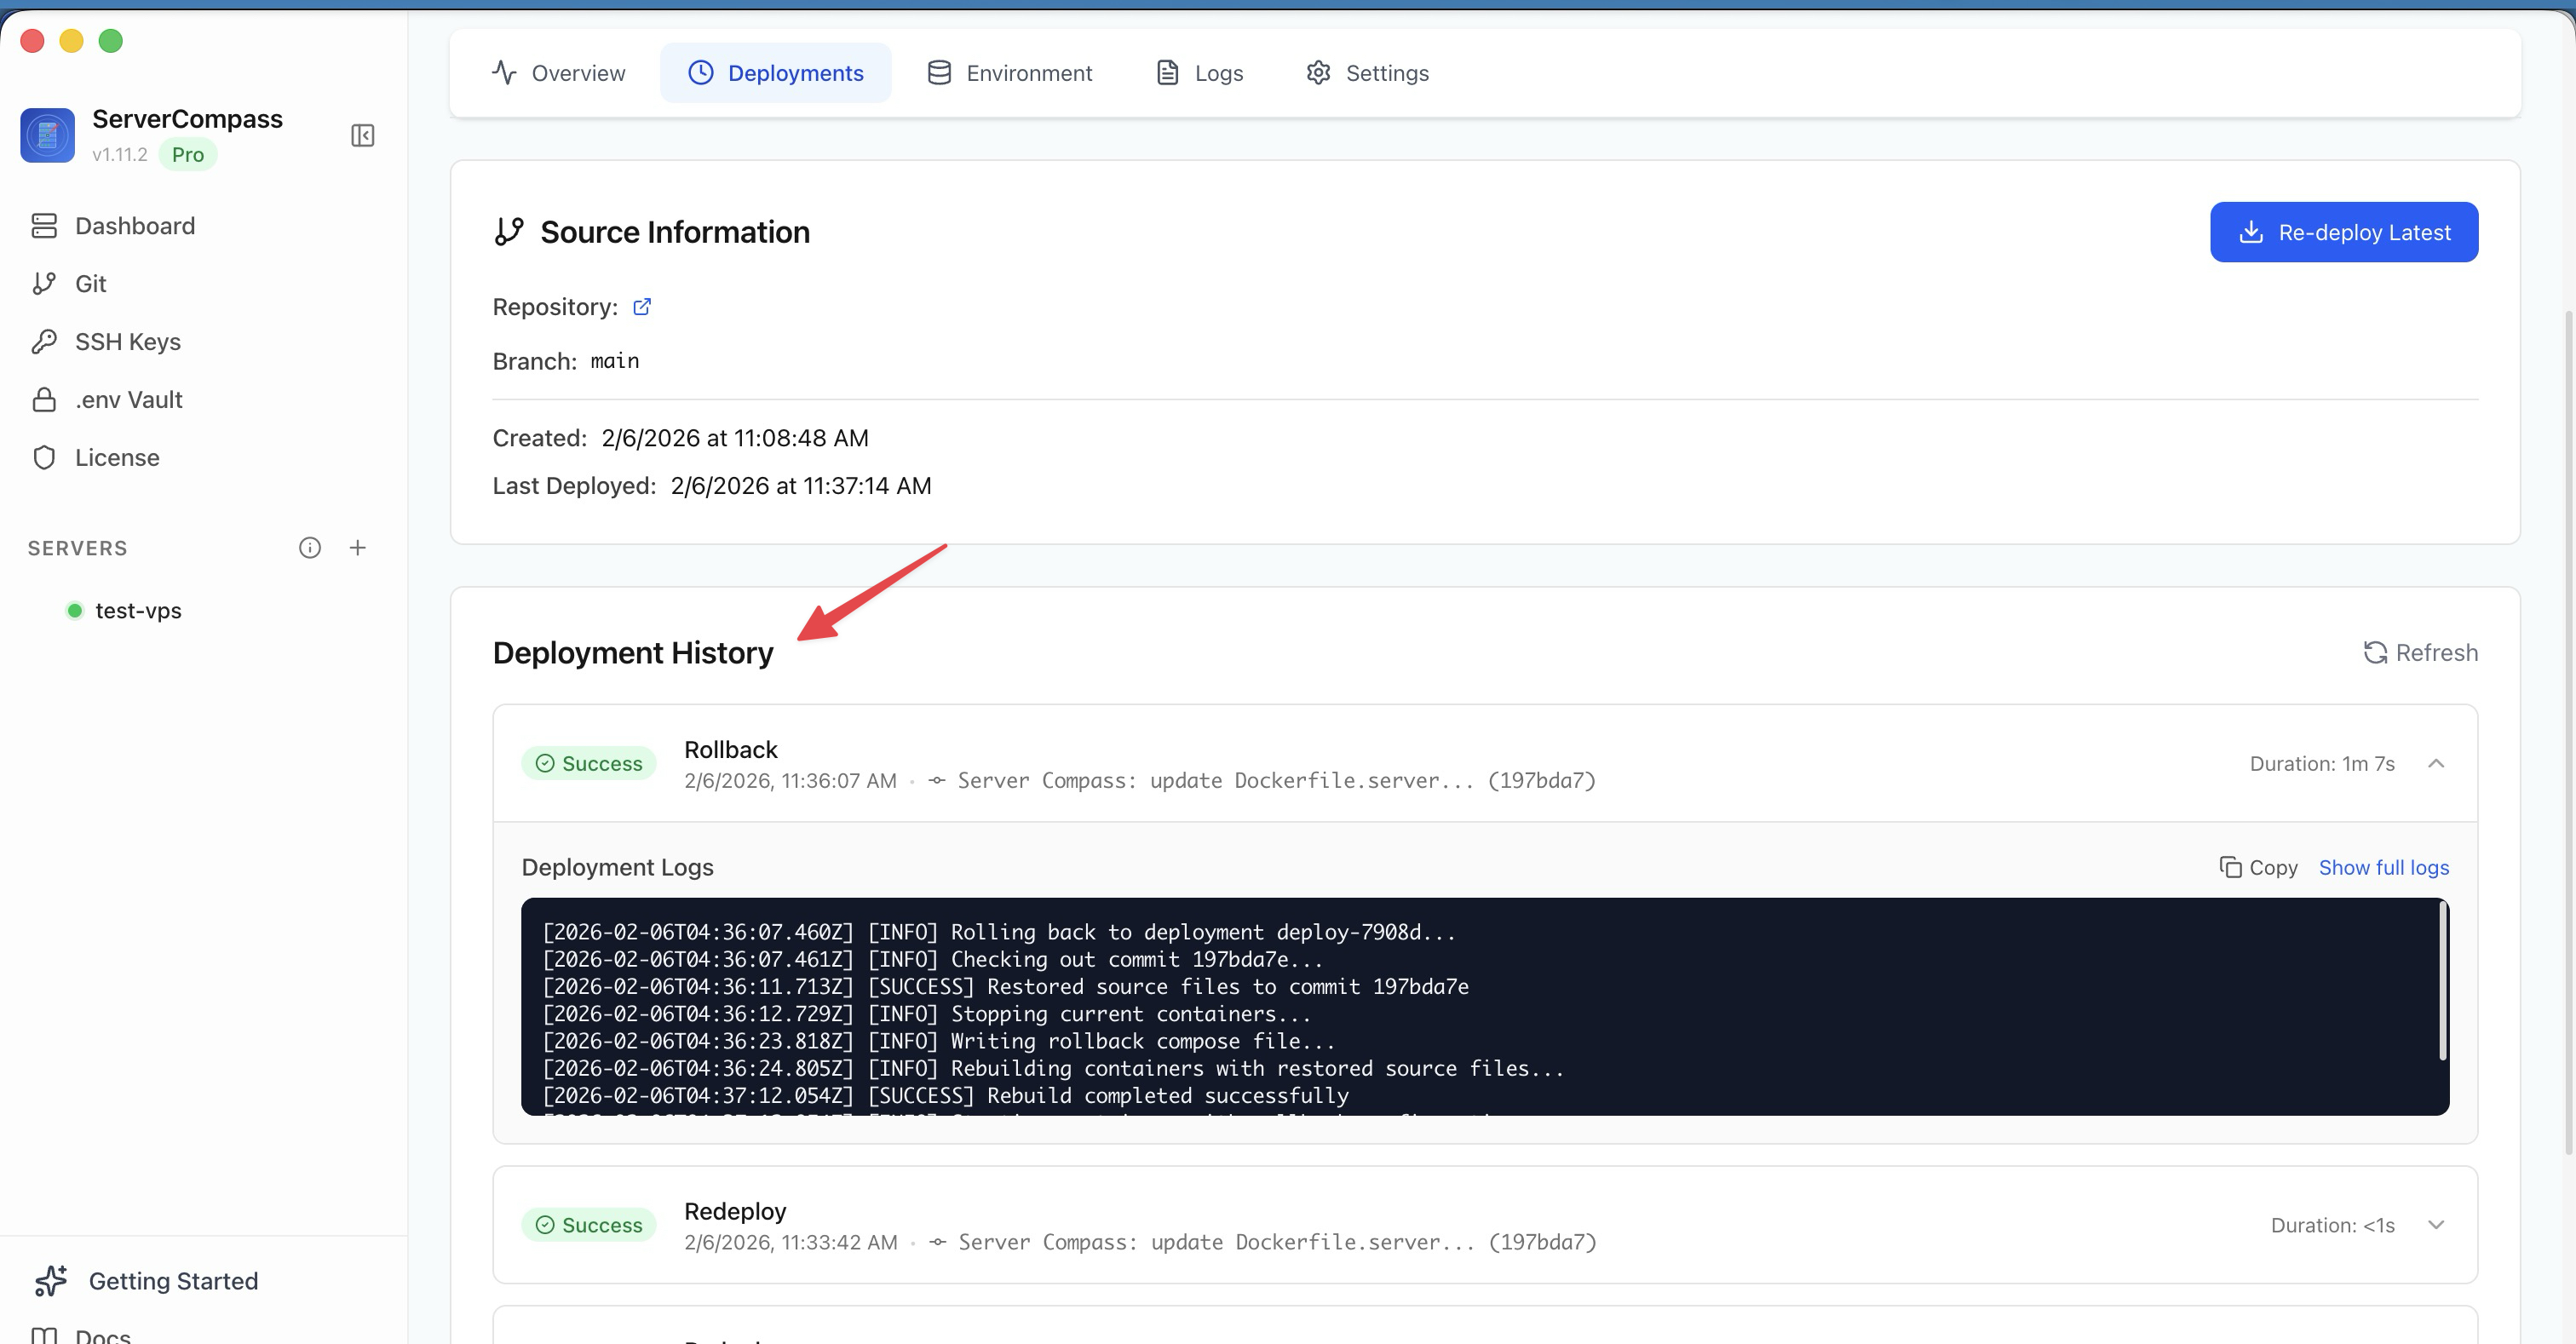
One-Click Rollback — Every deployment is tracked in deployment history. If something goes wrong, roll back to any previous version with a single click.
Managing Auto-Deploy
- View full deployment history with build logs for every deploy
- Pause auto-deploy with a toggle switch when you need to freeze deployments
- Change the tracked branch from the app settings
- Roll back to any previous deployment with one click
{/* ------------------------------------------------------------------ */} {/* Why ServerCompass vs Raw CLI */} {/* ------------------------------------------------------------------ */}
Why Server Compass vs Raw CLI
The Traditional VPS Workflow (Pain Points)
Every manual deployment looks something like this: SSH in, navigate to the project, pull code, install dependencies, build, restart the container (or process), check status, check logs, exit. Time: ~5–10 minutes per deployment. Complexity: 8+ commands.
Multiple servers? Double the time and commands.
Common problems:
- Dependency Hell — different Node/Python/PHP versions across servers
- Port Conflicts — "address already in use" errors at the worst time
- Environment Variables — manually editing
.envfiles over SSH - No Deployment Logs — did it deploy? Who deployed? When?
- No Easy Rollback — reverting means manual
git resetand rebuilding - No Isolation — one app's dependency upgrade breaks another
The Server Compass Workflow (Solutions)
One-click deployment: Open Server Compass, click "New App", select a repository, click "Deploy." Time: 30 seconds. 4 clicks.
Solutions for every pain point:
- Docker Containerization — every app runs in its own isolated container with its own dependencies
- Port Conflict Detection — scans all Docker containers, databases, and system processes before deployment
- .env Vault — visual editor with AES-256-GCM encryption, version history, and team sharing
- Live Deployment Logs — color-coded, searchable, stored in deployment history
- One-Click Rollback — revert to any previous deployment instantly
- Complete Isolation — Docker containers prevent dependency conflicts between apps
Feature Comparison Table
Feature
Raw CLI
Server Compass
Initial Setup
1 hour+
5 minutes
Deployment Time
5–10 min/server
30 seconds
Multi-Server Deploy
10–20 min
1 minute
Containerization
Manual Docker setup
Automatic (Docker)
CI/CD Pipeline
Manual GitHub Actions YAML
Built-in GitHub Actions
Framework Detection
Manual config
Auto-detect (16+ types)
Port Management
Manual checking
Auto-detection + conflict alerts
Environment Variables
Manual .env editing
Encrypted vault (AES-256-GCM)
Deployment Logs
docker logs
Live streaming + history
Zero-Downtime Deploy
Manual blue-green setup
Automatic (Docker blue-green)
Rollback
Manual git reset + rebuild
One-click
Auto-Deploy
Manual webhook setup
Built-in
Templates
Copy-paste docker-compose
100+ one-click templates
Database Management
CLI tools
Visual SQL/NoSQL editor
Server Backups
Manual scripts
Scheduled + on-demand
GitHub Integration
Manual SSH keys
OAuth + auto-sync
Multi-Account Support
Complex SSH config
Visual management
Branch Selection
Manual git checkout
Dropdown menu
Build Command Presets
Memorize commands
Auto-suggested
Error Handling
Manual debugging
Visual feedback + notifications
Real-World Scenarios
Scenario 1: Hotfix in Production
Raw CLI: SSH in, pull code, rebuild Docker image, swap containers, check logs — ~10 minutes, 8+ commands.
Server Compass: git push, auto-deploy triggers, blue-green swap, done. Zero commands.
Scenario 2: Deploy a New Next.js App
Raw CLI: Write a Dockerfile, create docker-compose.yml, configure Nginx, set up SSL, manage environment variables — ~45 minutes.
Server Compass: Select repo, framework auto-detected, click Deploy — ~2 minutes. See our Next.js deployment tutorial.
Scenario 3: Onboarding a New Developer
Raw CLI: ~2 hours explaining server access, Docker workflows, deployment procedures.
Server Compass: ~15 minutes — "Click New App, select the repo, click Deploy."
Scenario 4: Managing Multiple Client Projects
Raw CLI: Remembering different servers, credentials, ports, branches, Docker configs.
Server Compass: Organized visual server list with per-client GitHub accounts.
Cost-Benefit Analysis
Assuming 20 deployments/month:
Raw CLI: 20 x 10 min = 200 min + 2 hours troubleshooting = ~5.3 hours/month
Server Compass: 20 x 0.5 min = 10 min + 15 min troubleshooting = ~25 min/month
Time saved: ~5 hours/month. At $100/hour, that's $500/month in developer time saved.
Server Compass costs $29 one-time (no subscription). It pays for itself in the first hour.
Error reduction: ~15% deployment failures with CLI vs ~2% with Server Compass (87% fewer failed deployments).
Learning curve: Raw CLI 2–4 weeks vs Server Compass 1–2 hours.
Security Benefits
- No Password Storage — OAuth tokens via GitHub Device Flow, never stored as plain text
- Encrypted Environment Variables — .env Vault uses AES-256-GCM encryption. Learn more in our environment variables tutorial
- Docker Isolation — each app runs in its own container with isolated networking
- Credential Isolation — each server has its own linked GitHub account with granular access
- Server Backups — scheduled and on-demand backups with one-click restore
Monitoring and Debugging Benefits
- Container Logs — per-app, filterable, searchable, color-coded live streaming
- Deployment History — visual timeline with build logs and one-click rollback
- Health Monitoring — dashboard with CPU, memory, disk, uptime, and container status
- Desktop Notifications — instant alerts for deployment success, failure, or container crashes
{/* ------------------------------------------------------------------ */} {/* Conclusion */} {/* ------------------------------------------------------------------ */}
Conclusion
Server Compass transforms VPS management from a technical chore into a visual, intuitive workflow. Every app runs in a Docker container. Every deployment is tracked. Every environment variable is encrypted. And you never have to SSH into a server to deploy code again.
From this (Raw CLI):
ssh user@server
cd /var/www/myapp
git pull origin main
docker compose build
docker compose up -d
docker logs myapp --tail 50
# hope it works
exit
To this (Server Compass):
git push origin main
# auto-deploy handles the rest ✓
Key advantages:
- 90% time reduction — 30 seconds vs 10 minutes per deployment
- 87% fewer errors — automated builds eliminate human mistakes
- Docker containerization — complete app isolation and reproducibility
- GitHub Actions CI/CD — offload builds to GitHub's free runners
- 16+ framework detection — auto-configured for your stack
- 100+ templates — databases, CMS, dev tools in one click
- Zero-downtime deploys — blue-green container swaps
- One-click rollback — revert any deployment instantly
- Encrypted .env Vault — AES-256-GCM encryption for secrets
- $29 one-time — no monthly subscription, no per-seat pricing
Server Compass doesn't just make VPS management easier — it makes it enjoyable. Stop wasting 5 hours a month on deployments. Be lazy. Be productive.
Try Server Compass — deploy with confidence.
From across the StoicSoft network
Hand-curated reads on the same topic from sister sites in the StoicSoft family.
 1DevTool
Dry-Run Before You Migrate: A Workflow That Catches the 90% of Bugs Production Catches Otherwise
A migration that ran cleanly on a fresh test database often fails in production because the production data has shapes the test database doesn't. The fix is dry-running against a copy of production. Here's the workflow that takes 20 minutes and saves a 2 AM rollback.
Read on 1devtool.com 1DevTool9 min read
Resume a Previous AI Session in a Different Agent Without Re-Explaining Context
Resume a past Claude Code, Codex, or Gemini session in a different AI agent, get explicit SSH connection status, and avoid Vercel deploy failures on unsupported local Node versions.
Read on 1devtool.com