November 11, 2025
How to connect your GitHub account and deploy your first Next.js app to your VPS
This guide will walk you through connecting your GitHub account to your Virtual Private Server (VPS) and deploying your first Next.js application using Server Compass. No complex configurations needed.

Deploying a Next.js app to your own VPS used to mean hours of SSH commands, Nginx configuration, PM2 setup, and manual Git pulls. Server Compass turns that into a few clicks: connect your GitHub account with OAuth, pick a repo, and deploy — all inside a Docker container with automatic HTTPS and zero-downtime deployment.
This guide walks you through the entire process, from GitHub authentication to a live production deployment.
Prerequisites
Before you begin, make sure you have:
- A VPS added to Server Compass (connected via SSH — see the server connection tutorial if you haven't done this yet)
- A GitHub account with a Next.js repository
- The Server Compass desktop app installed (Mac, Windows, or Linux)
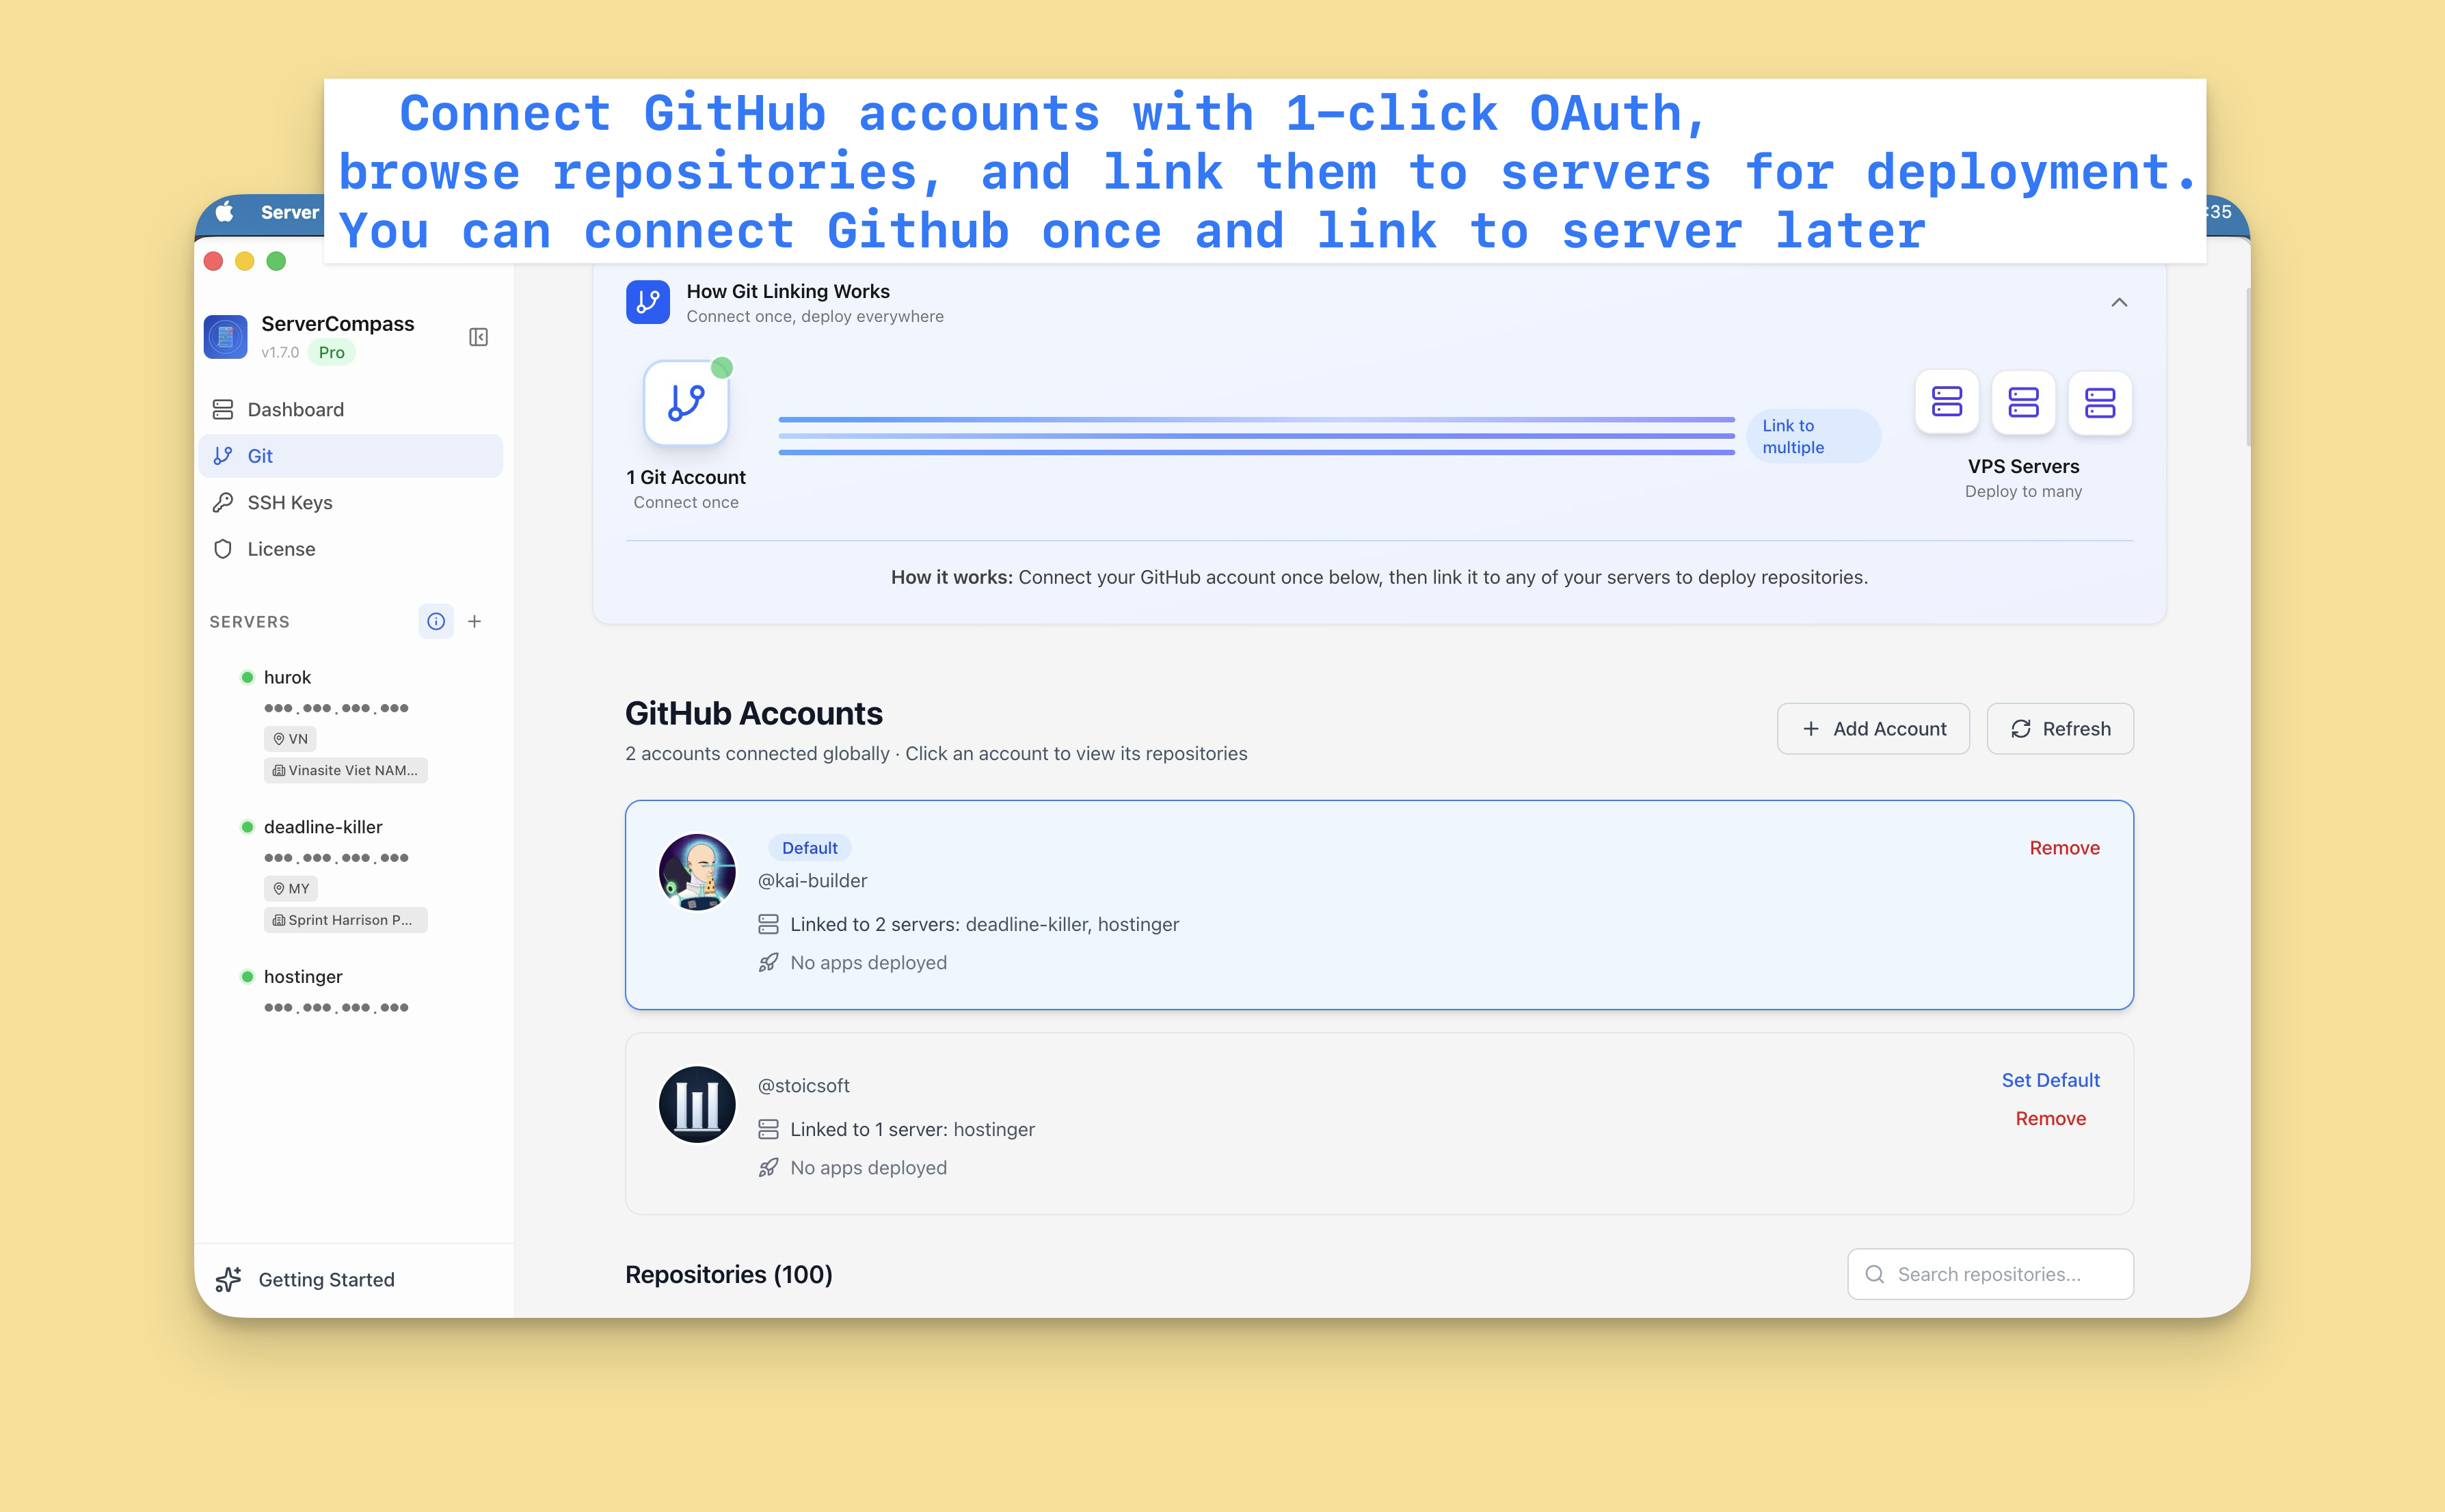
Step 1: Connect Your GitHub Account
Server Compass uses GitHub's OAuth Device Flow to authenticate your account. There are no Personal Access Tokens to create, no scopes to configure, and no tokens to copy-paste. The entire flow takes about 30 seconds.
Start the OAuth Flow
- Open Server Compass and go to the Git tab in the main dashboard
- Click "Connect GitHub Account"
- Select GitHub as the provider (GitLab support coming soon)
- Server Compass generates a unique device code (e.g.,
ABCD-1234) - A browser tab opens automatically to
https://github.com/login/device - Copy and paste the device code into the GitHub page
- Click "Authorize" to grant Server Compass access
- The modal in Server Compass automatically closes once authenticated
That's it. Your GitHub account is now connected to Server Compass.
Why OAuth Instead of Personal Access Tokens?
Earlier versions of Server Compass required you to create a GitHub Personal Access Token (PAT) manually, configure the correct scopes, and paste it in. The OAuth device flow replaces all of that:
- No manual token creation — no visiting GitHub's token settings page
- No scope configuration — Server Compass requests exactly the permissions it needs
- Automatic token management — tokens are refreshed behind the scenes
- More secure — follows GitHub's recommended authentication flow for desktop apps
Step 2: Link GitHub Account to Your Server
Once your GitHub account is connected globally, you need to link it to the specific server you want to deploy to.
- Navigate to your server and open the Git tab
- Click "Link Account"
- Select your GitHub account from the list
- Click "Link to Server"
This step tells Server Compass which GitHub accounts are authorized to deploy to this particular server. You can link multiple accounts to a single server — useful for agencies managing client repositories or developers with separate personal and work accounts.
Step 3: Deploy Your Next.js Application
Now for the exciting part. Server Compass uses a Docker Stack Wizard that walks you through deployment step by step. Everything runs inside Docker containers — no PM2, no manual process management, no system-level Node.js installs.
Open the Docker Stack Wizard
- Navigate to the Apps tab on your server
- Click "New App" to open the Docker Stack Wizard
- Select "Deploy from GitHub"
- Choose your linked GitHub account
- Search or browse for your Next.js repository
- Select the branch you want to deploy (usually
main)
Automatic Framework Detection
Once you select a repository, Server Compass's framework detection engine automatically identifies your project's stack:
- Framework: Next.js (supports 16+ frameworks including React, Vue, Nuxt, SvelteKit, Astro, Laravel, Django, Rails, and more)
- Package Manager: npm, yarn, pnpm, or bun
- Build Command: detected from your
package.jsonscripts - Start Command: detected automatically
- Port: typically 3000 for Next.js

All detected values are pre-filled but fully editable. If Server Compass gets something wrong, you can override any field.
Choose Your Build Location
Server Compass gives you three options for where your Docker image gets built:
- Build on VPS — builds the Docker image directly on your server. Simple and works for most projects, but uses your server's CPU and RAM during builds.
- Build Locally — builds on your machine, then deploys the finished image to the server. Great for heavy builds that would strain a small VPS.
- Build with GitHub Actions — uses a CI/CD pipeline to build on GitHub's infrastructure and deploy automatically. The most robust option for production workflows. See our GitHub Actions CI/CD guide for details.
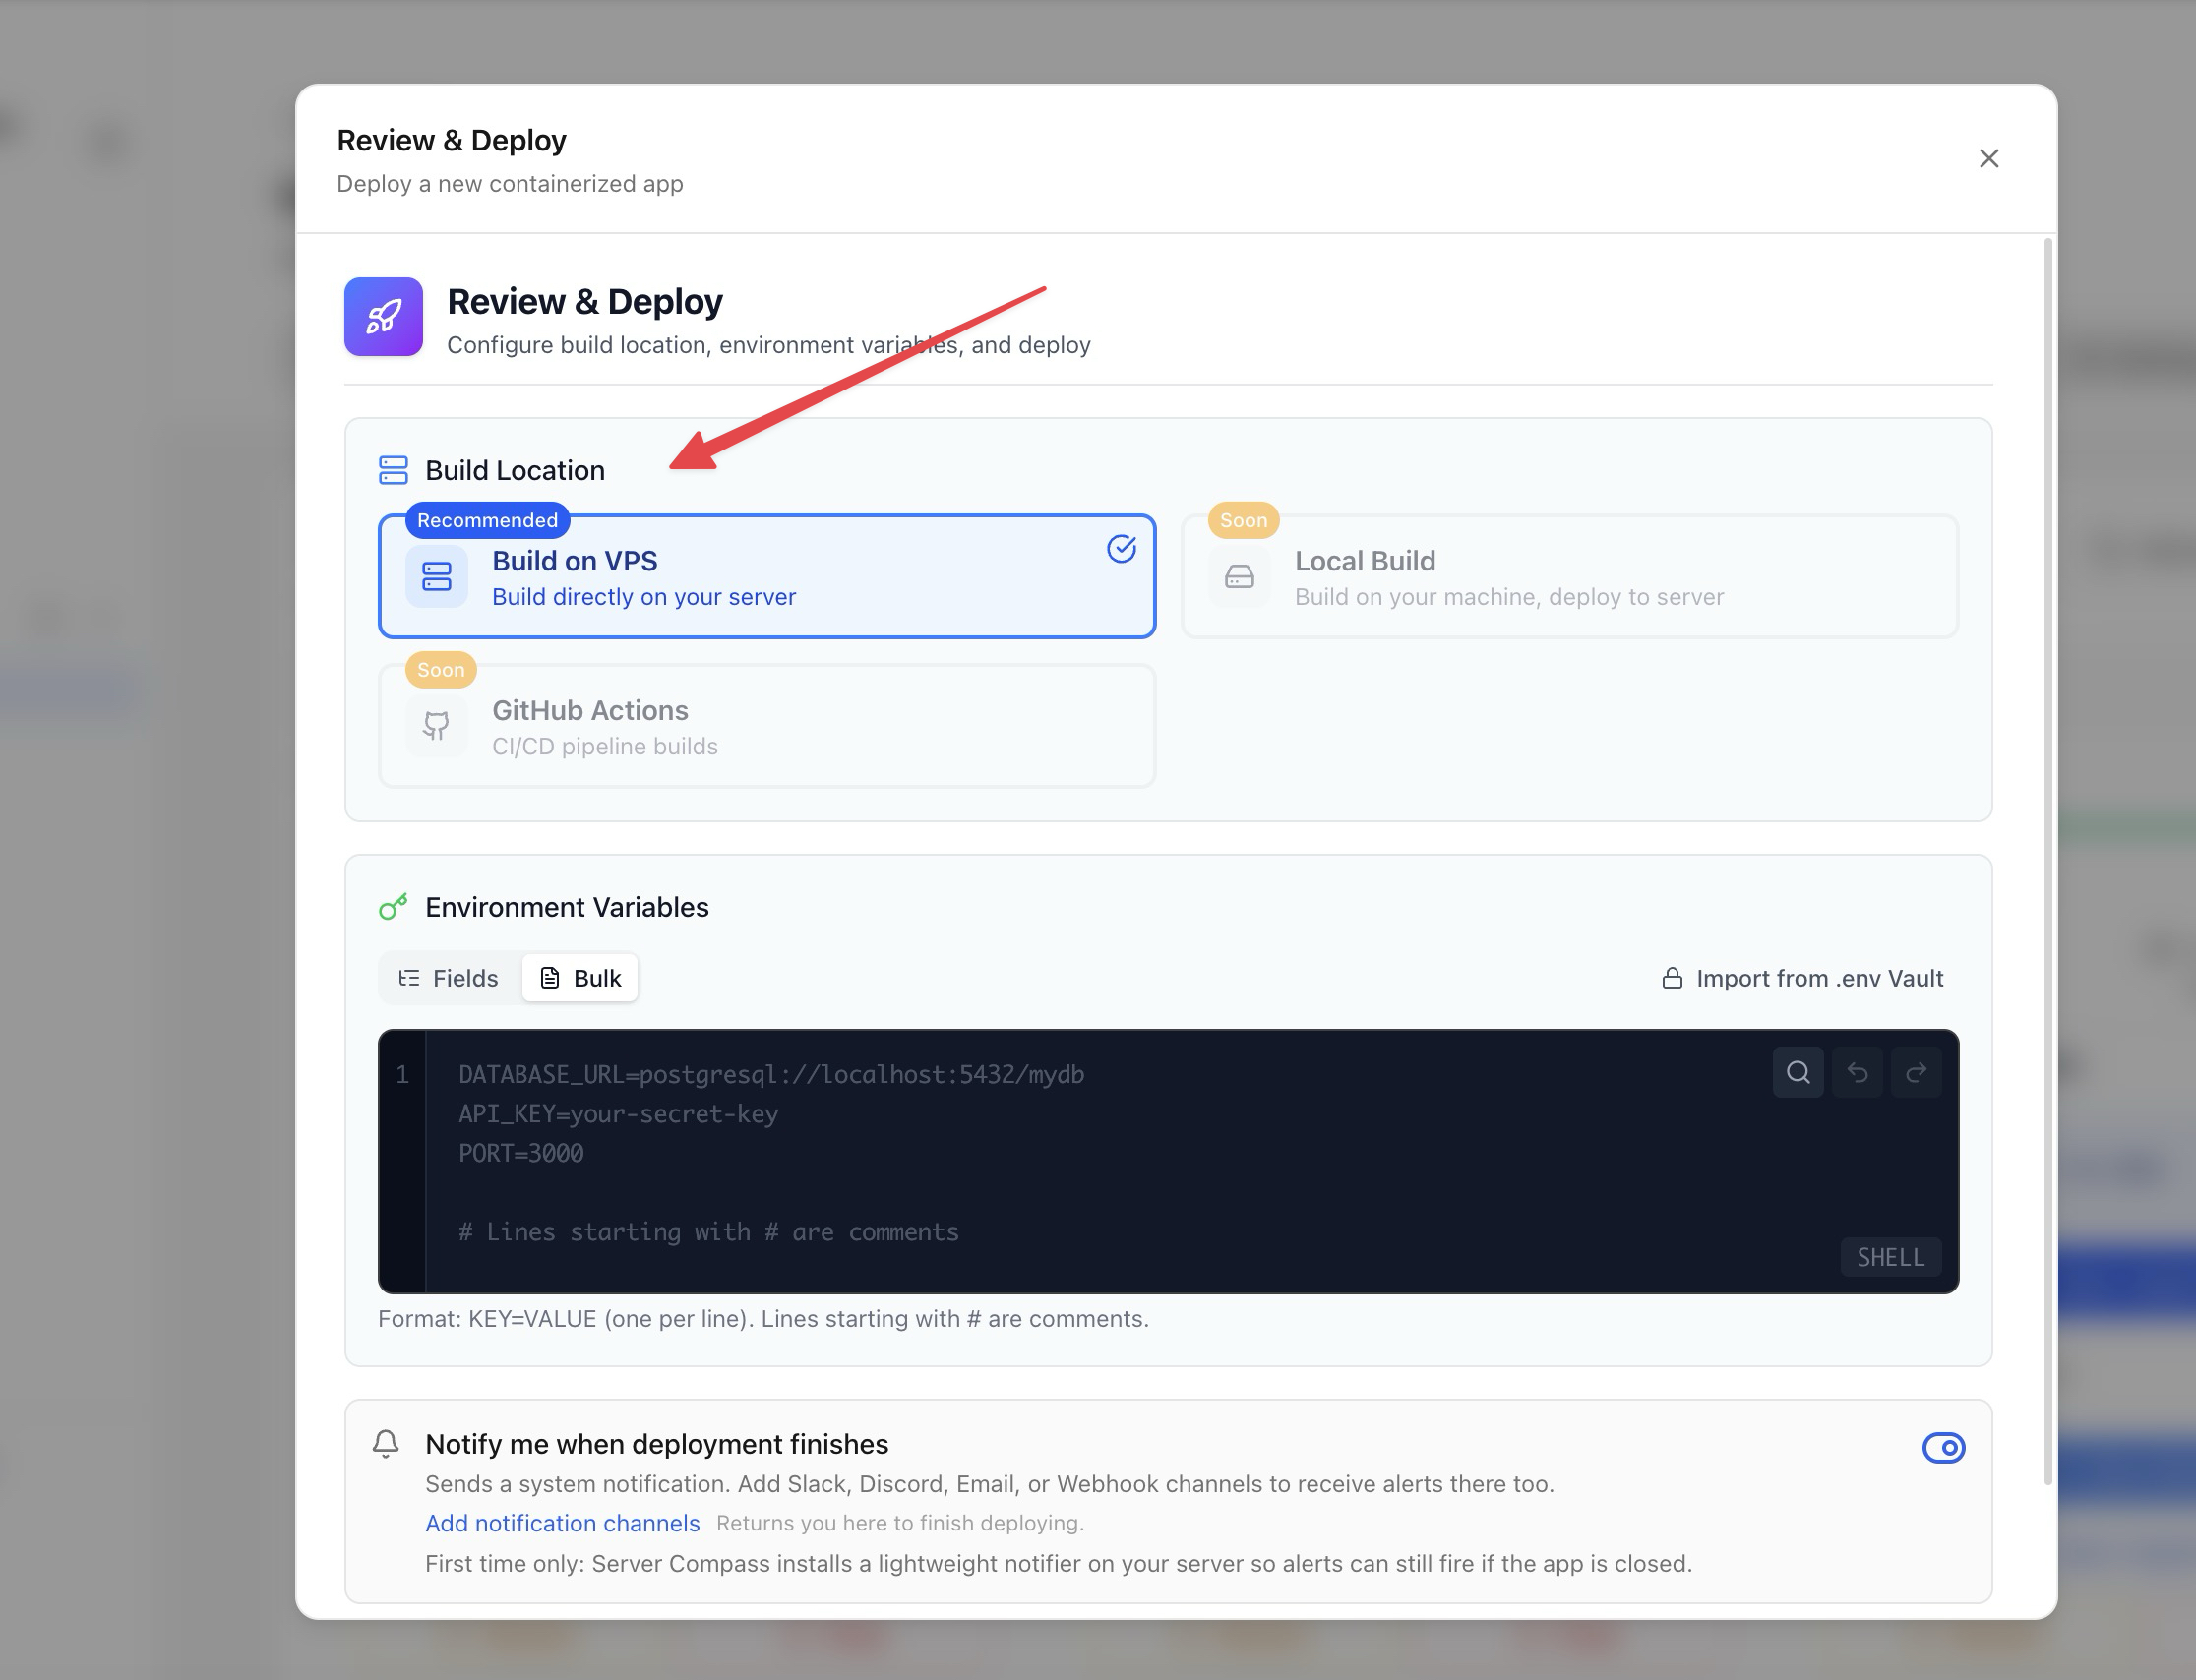
Add Environment Variables
If your Next.js app needs environment variables, add them in the .env Vault step:
`DATABASE_URL=postgresql://user:pass@host/db NEXT_PUBLIC_API_URL=https://api.mysite.com API_SECRET_KEY=your-secret-key`
You can paste directly from a .env file — Server Compass parses bulk paste input and splits it into individual key-value pairs. Variables like PORT and NODE_ENV are handled automatically; you don't need to add them.
Deploy
- Review your configuration
- Click "Deploy"
- Watch the live deployment logs
Here is what happens behind the scenes when you hit deploy:
- Dockerfile generation — if your repo doesn't already include a Dockerfile, Server Compass generates one optimized for your detected framework
- Docker image build — your application is built inside a Docker container
- Blue-green deployment — the new container starts alongside the old one, traffic switches once the new container is healthy, and the old container is removed ( zero downtime)
- HTTPS configuration — automatic SSL with Let's Encrypt is set up through the Caddy reverse proxy
- Reverse proxy setup — Caddy routes traffic from your domain to the Docker container
Typical deployment time: 2–5 minutes depending on your app size and server performance.
Access Your Application
Once deployment completes:
- URL: your app is accessible at your server's IP or configured domain
- Status: real-time container status in the Apps tab
- Logs: live container logs for debugging
- Controls: start, stop, restart, or redeploy with one click
Step 4: Enable Auto-Deploy (Optional)
Want your app to redeploy automatically every time you push to GitHub? Enable auto-deploy.
Toggle Auto-Deploy
- Go to your deployed app in the Apps tab
- Navigate to the Deployments section
- Toggle "Auto-Deploy" ON
- Select the branch to watch (e.g.,
main)
How Auto-Deploy Works
When you push to the watched branch, Server Compass automatically:
- Detects the new commit
- Pulls the latest code from your repository
- Builds a new Docker image
- Performs a blue-green deployment (zero downtime)
- Updates deployment history with a full log
There is no polling or cron job involved. Deployments are triggered by push detection, so your app updates within seconds of a push.
Alternative: GitHub Actions CI/CD
For production workloads that need a more robust pipeline, you can enable GitHub Actions builds instead:
- Server Compass generates a complete GitHub Actions workflow for your repository
- Builds run on GitHub's infrastructure (no load on your server)
- Docker images are pushed to GitHub Container Registry (GHCR)
- Your server pulls the built image and deploys automatically
Learn more about GitHub Actions CI/CD
Troubleshooting
Problem: "OAuth Authorization Failed"
Solution:
- Make sure you copied the device code correctly — codes are case-sensitive
- Check that you authorized the correct GitHub account
- If the code expired, close the modal and click "Connect GitHub Account" again to generate a fresh code
- Ensure your browser isn't blocking the
github.com/login/devicepage
Problem: "Build Failed"
Solution:
- Check the deployment logs for specific error messages — Server Compass streams the full Docker build output
- Missing environment variables: add any required variables in the .env Vault
- Insufficient server memory: Next.js builds can be memory-intensive. Consider upgrading your VPS or using the "Build Locally" or "Build with GitHub Actions" options to offload the build
- TypeScript errors: fix locally, push, and redeploy
- Verify locally first: run
docker build .on your machine to confirm the build succeeds before deploying
Problem: "Docker Build Failed"
Solution:
- If you have a custom Dockerfile, ensure it's valid and builds successfully locally
- If Server Compass auto-generated the Dockerfile, check that your framework was detected correctly in the wizard. You can edit the Dockerfile from the app settings
- Ensure your
.dockerignorefile isn't excluding necessary files (likepackage.jsonornext.config.js) - Check that all dependencies in
package.jsonare properly listed — Docker builds start from a clean environment
Problem: "Port Already in Use"
Solution:
- Choose a different port in the Docker Stack Wizard (e.g., 3001, 3002)
- Or stop the conflicting application in the Apps tab
Problem: "Cannot Access Application After Deployment"
Solution:
- Check that your domain DNS is pointing to your server's IP address
- Verify the container is running in the Apps tab (look for a green status indicator)
- View container logs for runtime errors
- Check your VPS firewall settings — ensure ports 80 and 443 are open for HTTP/HTTPS traffic
Behind the Scenes
Docker Container Management
Every app deployed through Server Compass runs inside a Docker container. This provides complete isolation between applications, consistent environments between development and production, and easy rollbacks to previous versions.
When you deploy, Server Compass:
- Generates or uses your existing Dockerfile
- Builds a Docker image tagged with the commit hash
- Starts a new container alongside the existing one (blue-green deployment)
- Runs a health check against the new container
- Switches traffic from the old container to the new one via the Caddy reverse proxy
- Removes the old container
This blue-green approach means your users never see downtime during deployments.
Security: Credential Encryption
Your GitHub OAuth credentials are encrypted using industry-standard encryption:
- Credentials are encrypted with AES-256-GCM
- The master key is stored in
<userData>/.vault_key - Encrypted credentials are stored in the local SQLite database
- Decrypted only when needed for Git operations
- Never exposed to the renderer process or UI
Multi-Account Architecture
- Connect multiple GitHub accounts to Server Compass
- Link different accounts to different servers
- Switch between accounts per project
- Accounts are completely isolated from each other
- Ideal for agencies managing multiple client repositories
Next Steps
Your Next.js app is live. Here is what to do next:
- Set up a custom domain: Configure domain management to point your domain to your app, or follow the domain + SSL + Cloudflare tutorial
- Enable HTTPS: Server Compass can automatically provision SSL certificates with Let's Encrypt
- Enable auto-deploy: toggle it on so pushes to
mainautomatically redeploy your app - Deploy more apps: browse 100+ templates for databases, CMS platforms, monitoring tools, and more — or deploy another Git repository using template deployment
- Watch the video tutorial: Next.js deployment video tutorial covers this entire process in under 5 minutes
Conclusion
You've gone from a GitHub repository to a live, containerized Next.js application running on your own VPS — with OAuth authentication, automatic framework detection, Docker containerization, and optional auto-deploy. No SSH commands, no Nginx config files, no manual process management.
What you've learned:
- Connecting your GitHub account via OAuth device flow (no PAT tokens needed)
- Deploying a Next.js app using the Docker Stack Wizard
- Choosing between three build locations: VPS, local, or GitHub Actions
- Enabling auto-deploy for continuous deployment from GitHub
- Troubleshooting common deployment issues
Server Compass makes self-hosted deployment as simple as pushing to GitHub. What used to take hours of manual configuration now takes a few clicks.
Ready to get started? Try Server Compass and deploy your first app today.
From across the StoicSoft network
Hand-curated reads on the same topic from sister sites in the StoicSoft family.