March 5, 2026
Beginner's Guide: Host Multiple WordPress Sites on One Server - No Terminal Required
A beginner's guide to deploying multiple WordPress sites on a Hetzner Cloud server with automatic SSL certificates using a visual interface.

Running multiple WordPress websites typically requires either expensive managed hosting ($15-30/month per site) or complex server administration with terminal commands, nginx configuration, and manual SSL certificate management. For beginners, freelancers, and small agencies, these costs and complexity add up quickly.
The good news: You don't need to be a server expert to host your own WordPress sites anymore.
This tutorial walks you through setting up multiple WordPress sites on a single Hetzner Cloud server — step by step, with screenshots. We'll use Server Compass, a desktop app that lets you manage servers visually without typing commands. Each WordPress site runs in its own isolated container with a dedicated database, and SSL certificates are obtained automatically.
What you'll achieve:
- 3+ WordPress sites running on a single €4.35/month Hetzner Cloud server (CX12)
- Automatic HTTPS with Let's Encrypt certificates (auto-renewed)
- Isolated environments (one site can't affect another)
- Visual management — click buttons instead of typing commands
- Secure SSH key authentication
- Easy backups and updates
Architecture overview:
+-------------------------------------------+
|           Hetzner Cloud VPS               |
|  +--------------------------------------+ |
|  |     Traefik (Reverse Proxy)          | |
|  |   - Routes by domain name            | |
|  |   - Auto SSL via Let's Encrypt       | |
|  +----------+-----------+--------------+ |
|             |           |                |
|      +------+---+  +---+-------+         |
|      | WordPress|  | WordPress |   ...   |
|      |  Site A  |  |  Site B   |         |
|      | + MySQL  |  | + MySQL   |         |
|      +----------+  +----------+          |
+-------------------------------------------+
Prerequisites
- A computer running macOS, Windows, or Linux
- A Hetzner Cloud account ( sign up here )
- One or more domain names you control (we'll show you how to configure DNS)
No prior experience required — this tutorial explains everything from the beginning, including how to set up SSH keys and connect to servers.
Example terminology
This tutorial uses example values that you should replace with your own:
Placeholder
Example
Description
<server-ip>
203.0.113.10
Your Hetzner server's public IP
<your-domain>
example.com
Your domain name
<db-password>
Kx7mP9qR2sT4vW6y
Generated database password
Step 1 - Create SSH Key, Server, and Connect
In this step, we'll set up everything you need: Server Compass on your computer, an SSH key for secure access, a Hetzner cloud server, and connect them together.
Step 1.1 - Download and install Server Compass
- Download Server Compass from servercompass.app
- Install it on your computer (available for macOS, Windows, and Linux)
- Open the application
Step 1.2 - Create your SSH key
An SSH key is like a secure password that your computer uses to connect to servers. Server Compass makes creating one easy.
- In Server Compass, click "SSH Keys" in the left sidebar
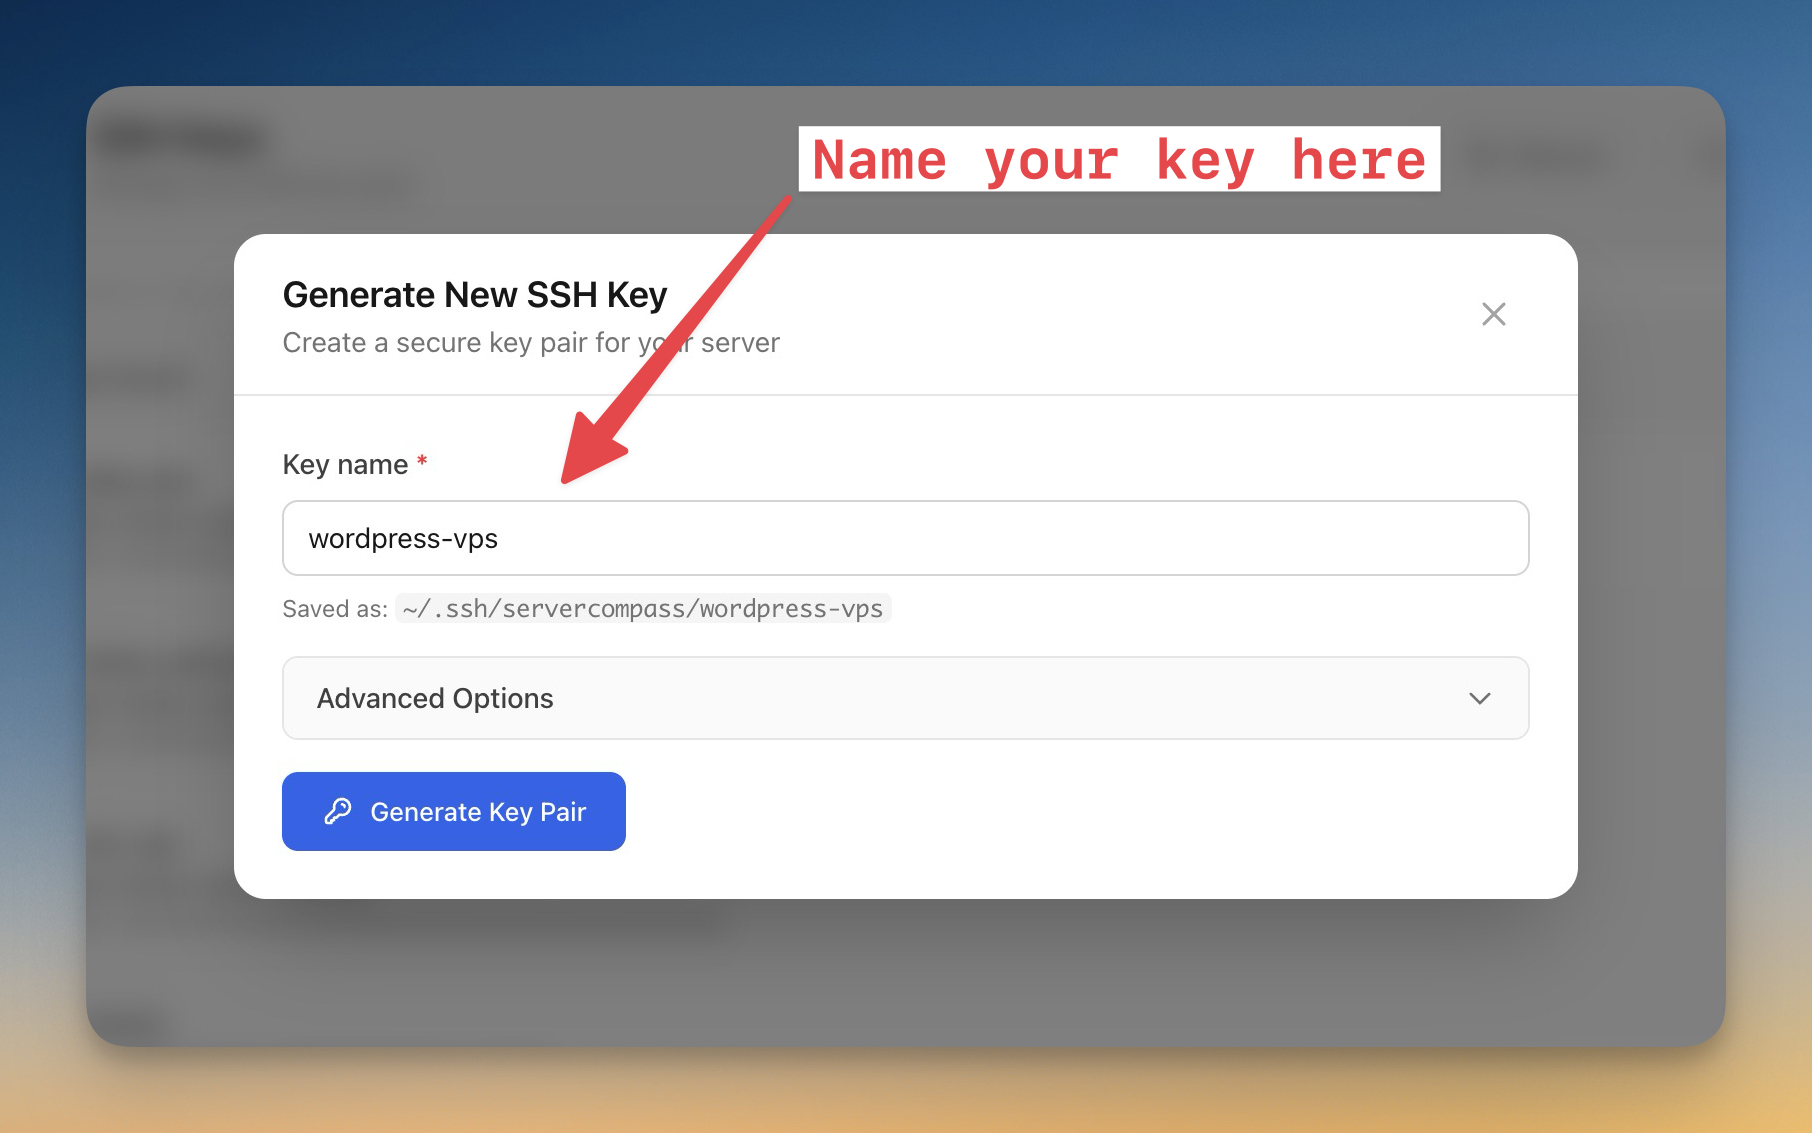
- Click "+ Generate New Key" in the top right
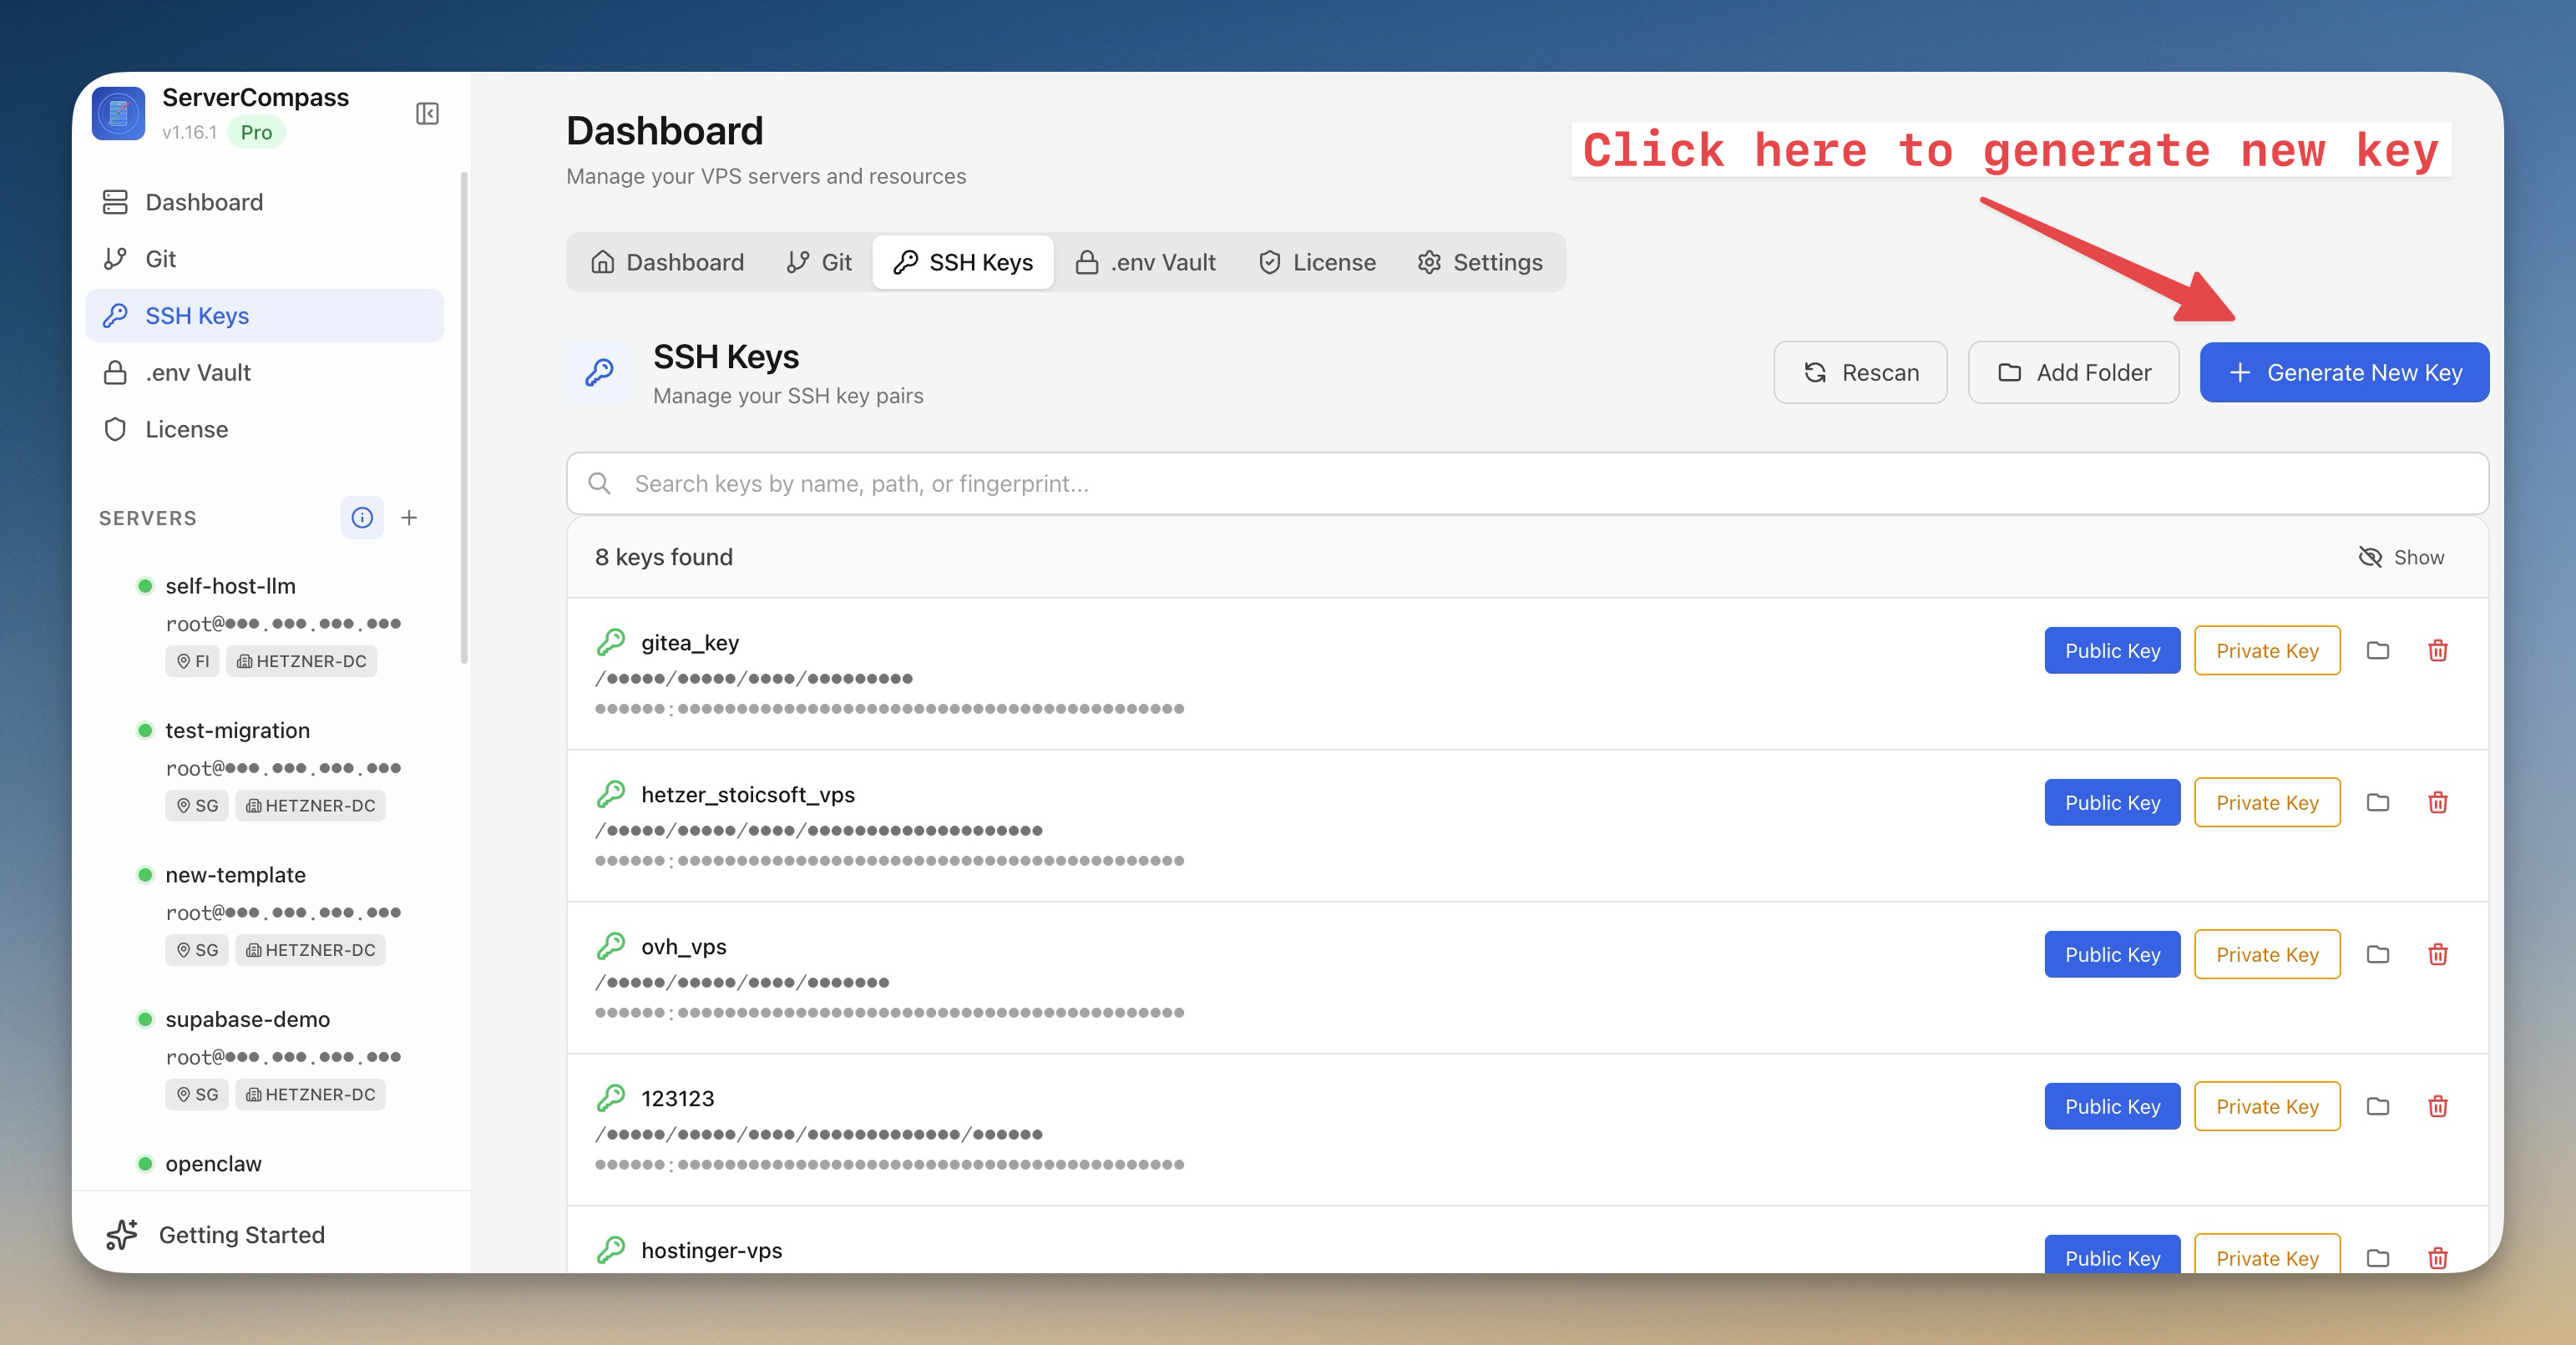
- Enter a name for your key (e.g.,
wordpress-vps) - Click "Generate Key Pair"
- Find your new key in the list and click "Public Key" to copy it to your clipboard
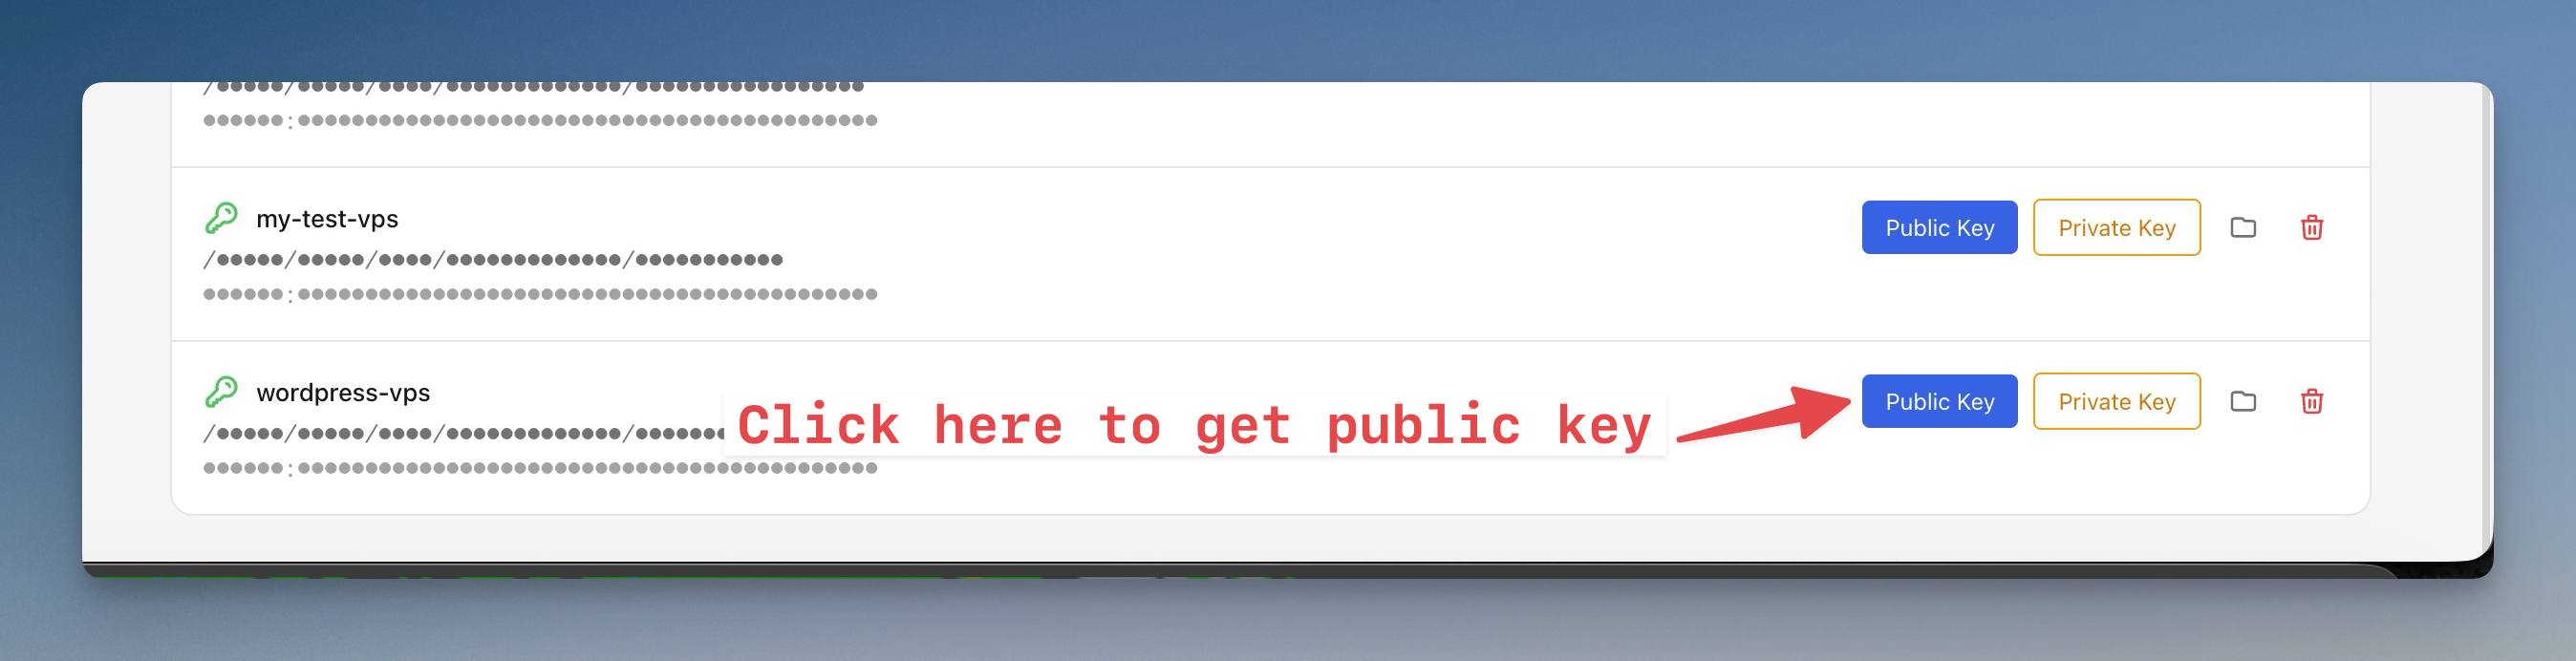
Server Compass generates a key pair and saves it securely on your computer. Keep Server Compass open — you'll need it again soon.
Step 1.3 - Sign up for Hetzner Cloud
If you don't already have an account:
- Go to console.hetzner.cloud
- Click "Register" and create your account
- Complete the verification process
Step 1.4 - Choose your server size
The server size depends on how many WordPress sites you plan to host:
Sites
Server Type
RAM
Monthly Cost
1-3
CX12
4 GB
€4.35
4-7
CX32
8 GB
€7.59
8-12
CX42
16 GB
€14.64
For this tutorial, we'll use CX12 which is perfect for getting started.
Step 1.5 - Create the server with your SSH key
- Log into the Hetzner Cloud Console
- Select your project (or create a new one by clicking "+ New Project")
- Click "Add Server"
- Configure with these settings:
Setting
Value
Location
Choose closest to your users (e.g., Falkenstein for Europe)
Image
Ubuntu 24.04
Type
CX12 (or higher based on site count)
Networking
Public IPv4 (enabled)
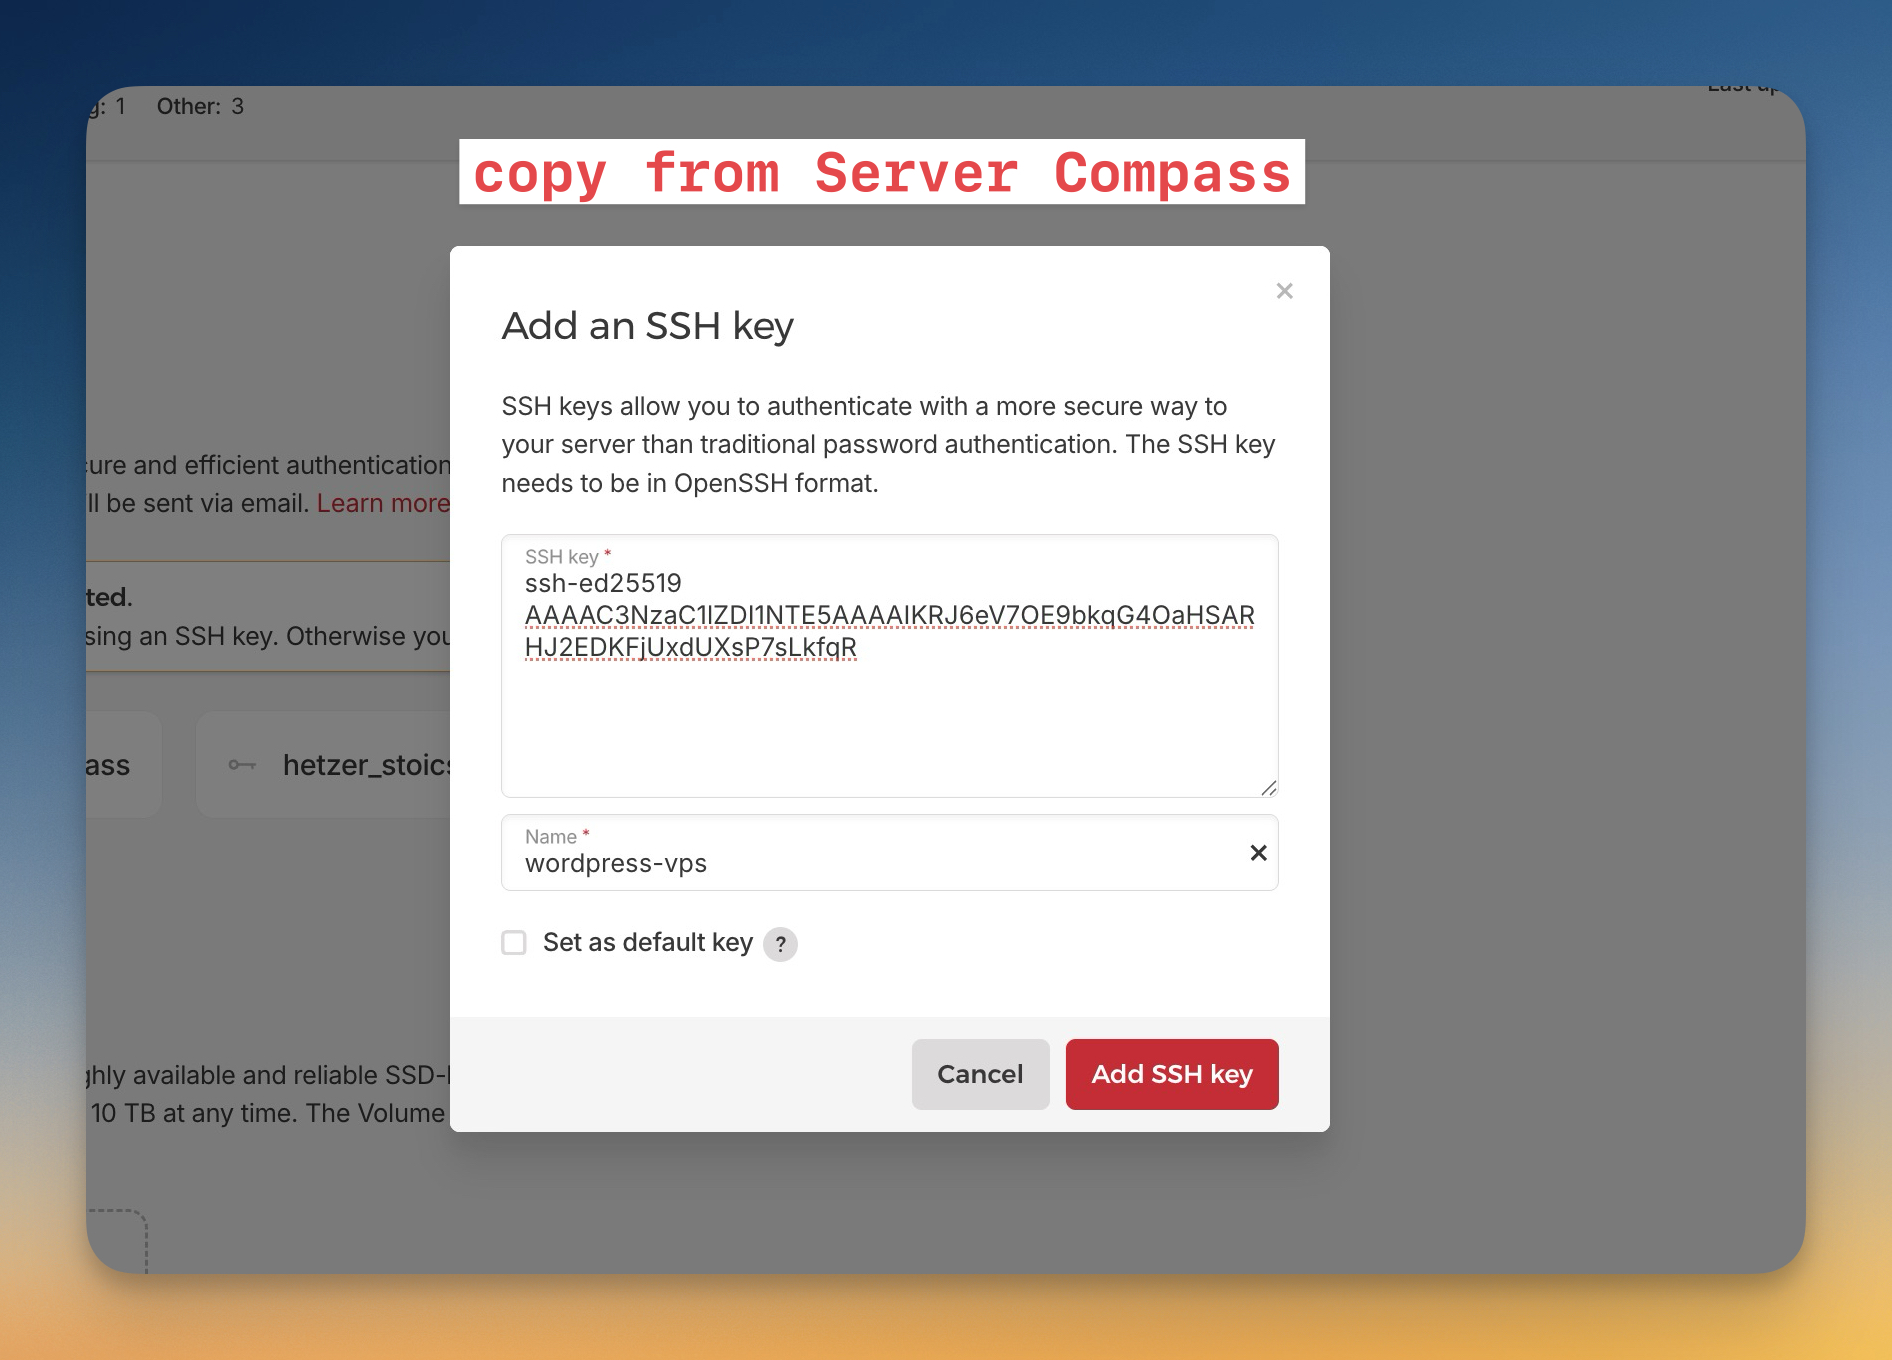
- In the SSH Keys section, click "+ Add SSH key"
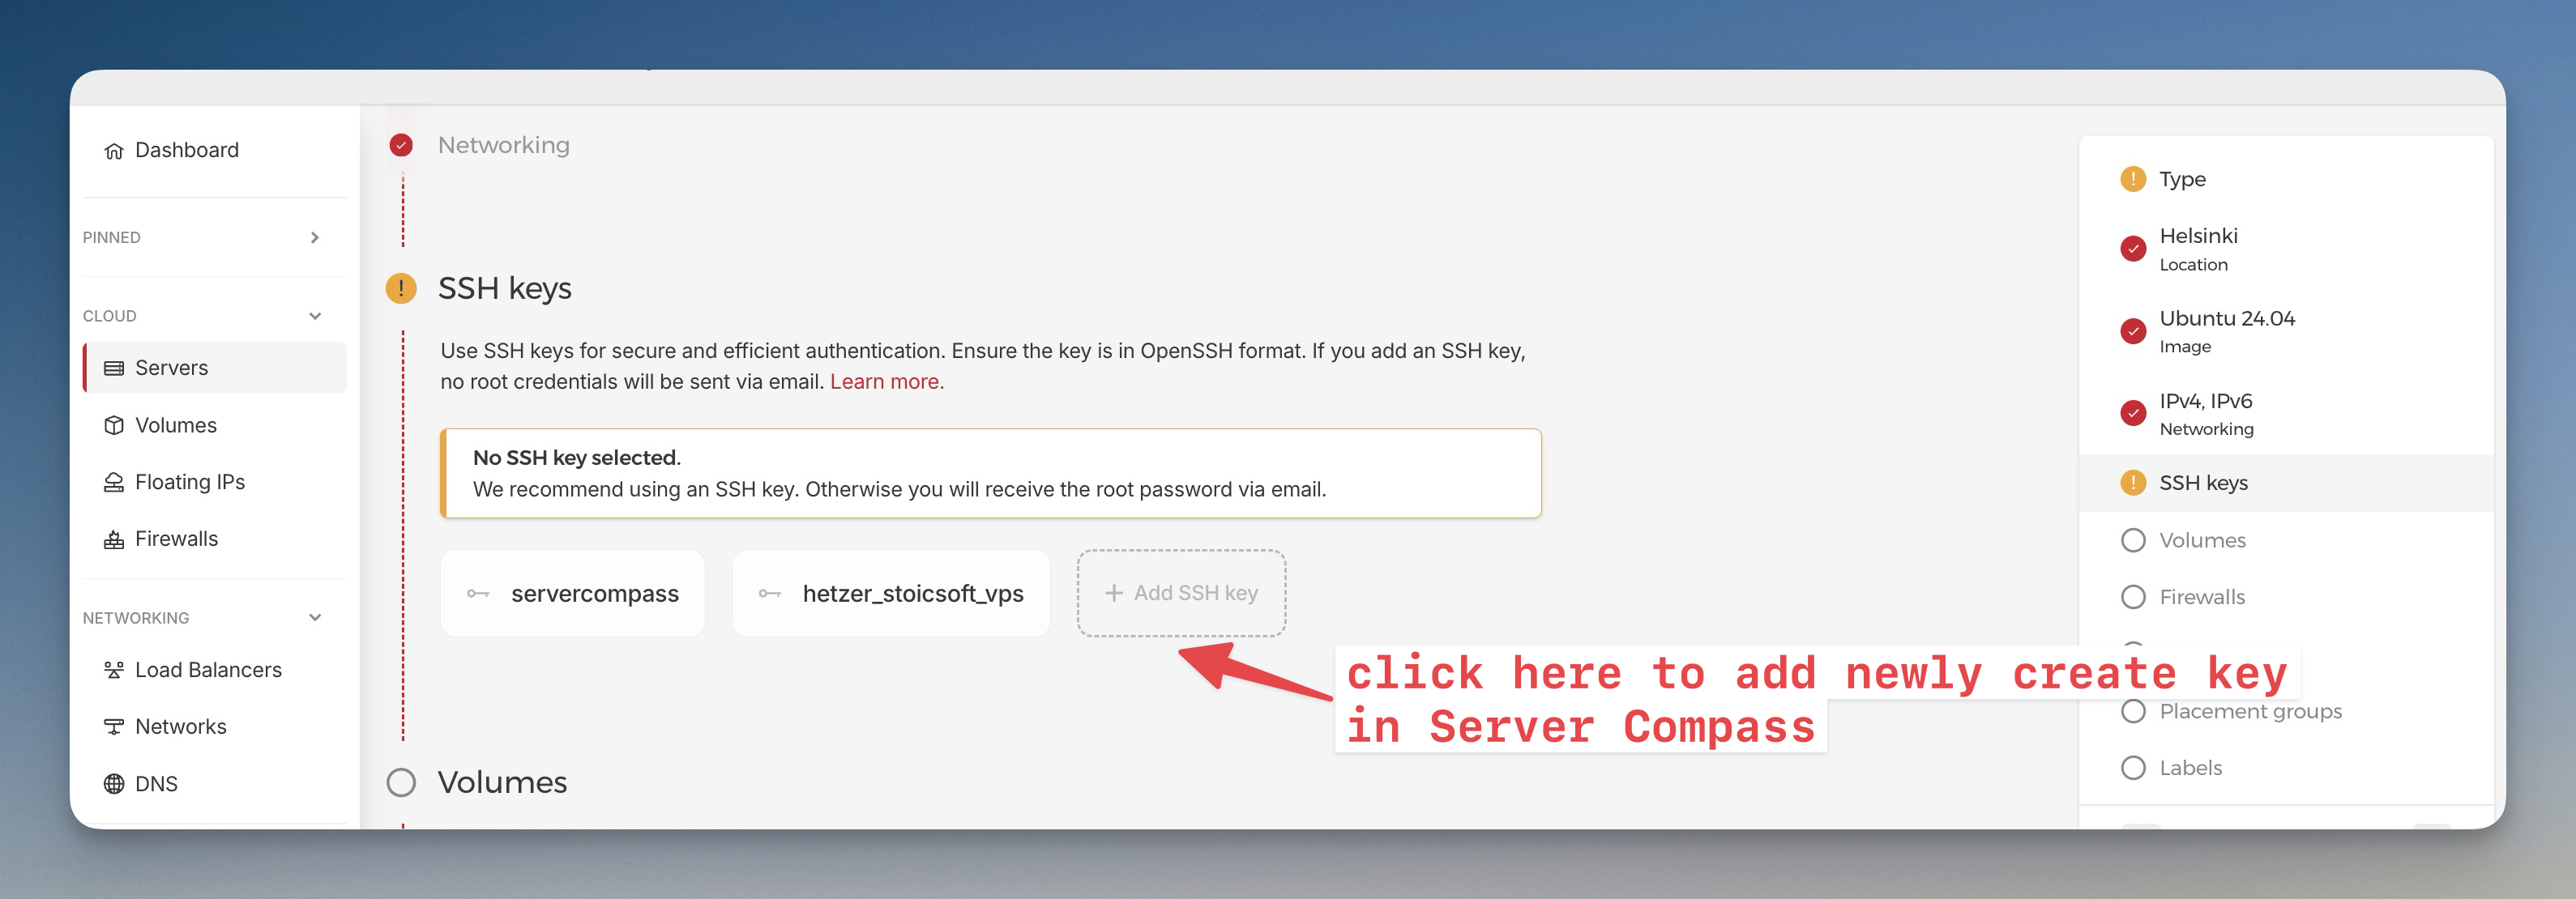
- Paste the public key you copied from Server Compass into the SSH key field
- Enter a name (e.g.,
wordpress-vps) - Click "Add SSH key"
- Set the server name to
wordpress-production - Click "Create & Buy Now"
Your server will be ready in about 30 seconds. Important: Note the IPv4 address displayed — you'll need this in the next step.
Screenshot suggestion: Hetzner Cloud Console showing the newly created server with IP address highlighted
Step 1.6 - Connect Server Compass to your server
- In Server Compass, click "Add Server"
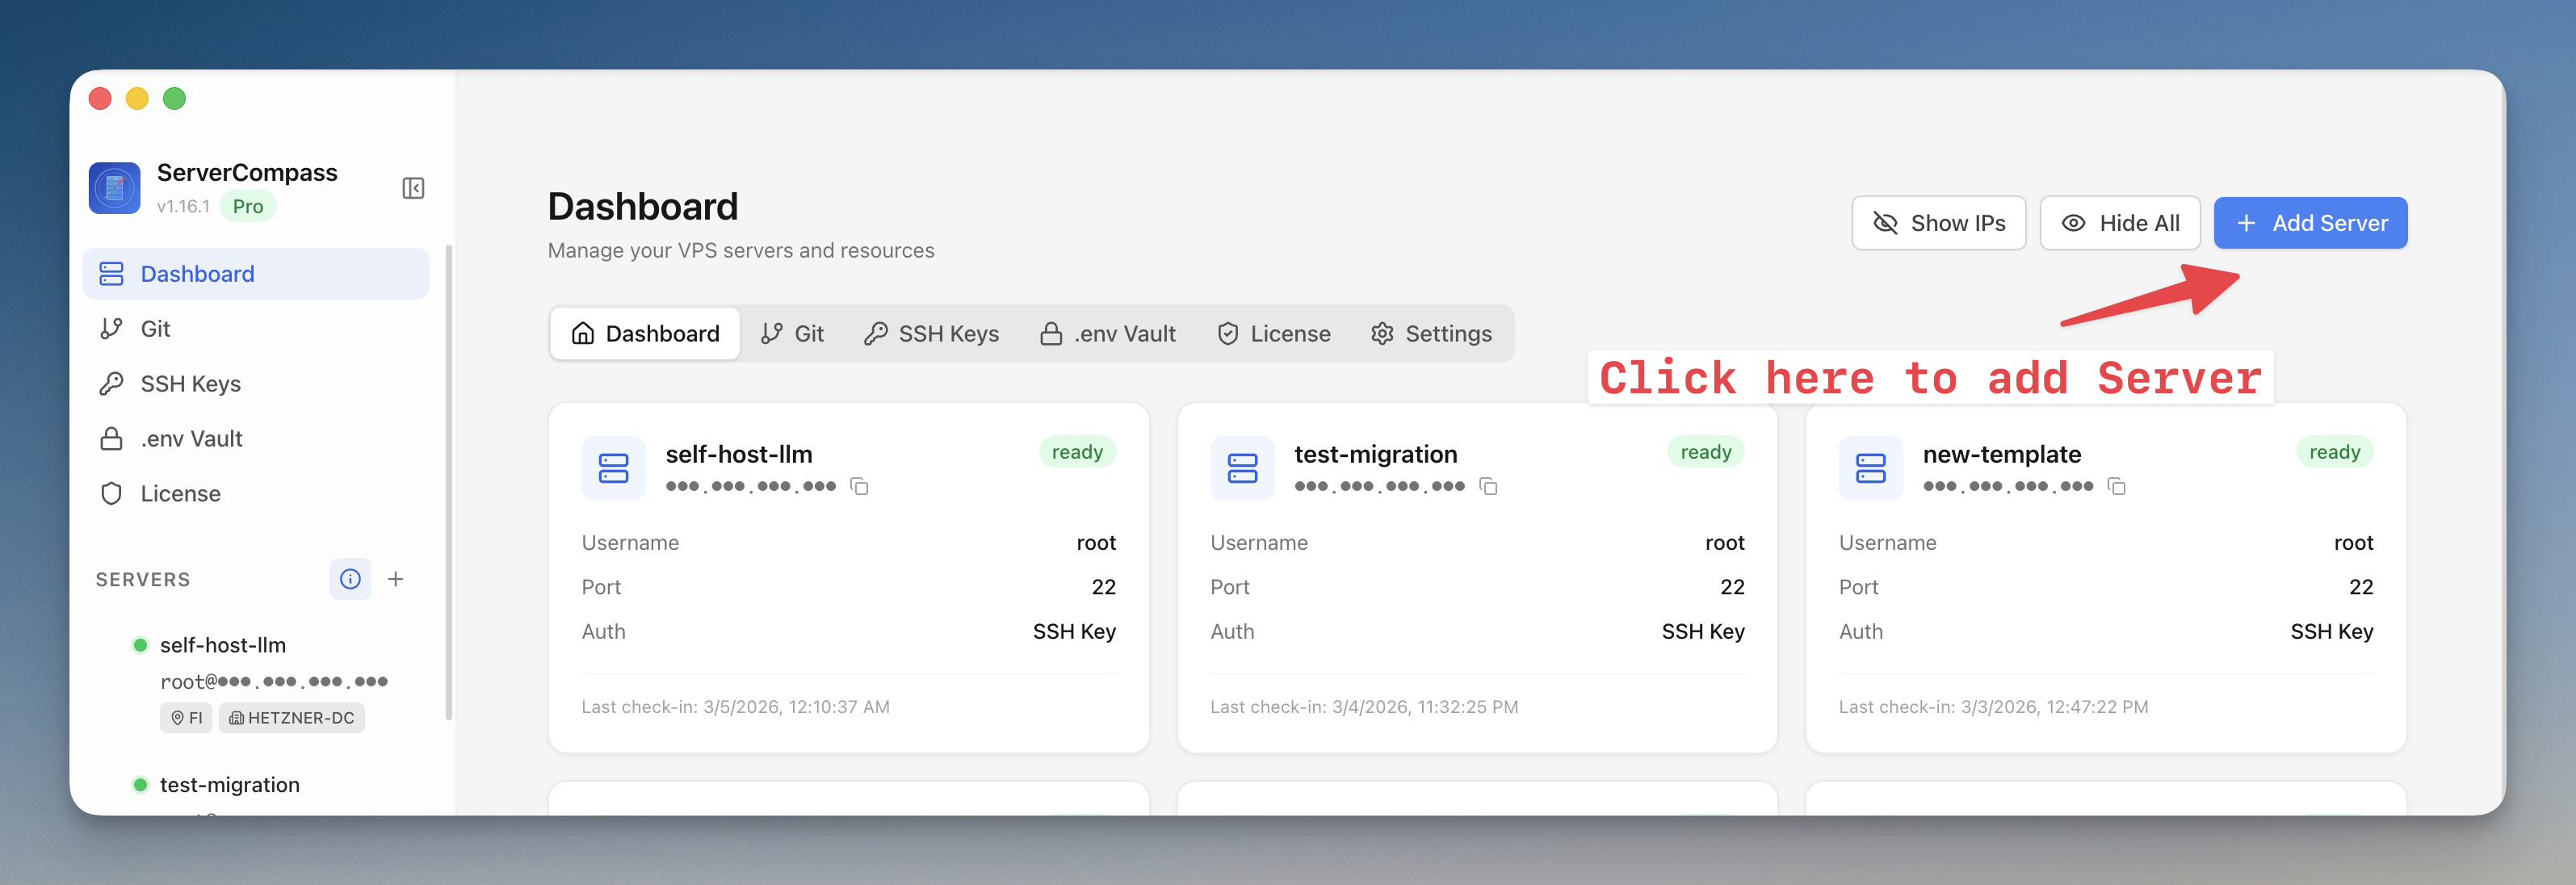
- Fill in your server details:
Field
Value
Display Name
Hetzner Production (or any name you prefer)
Server IP / Hostname
Your server's IPv4 address from Step 1.5
Username
root
Port
22
- Under "Choose your authentication method", select SSH Key
- Select the key you created in Step 1.2 from the dropdown
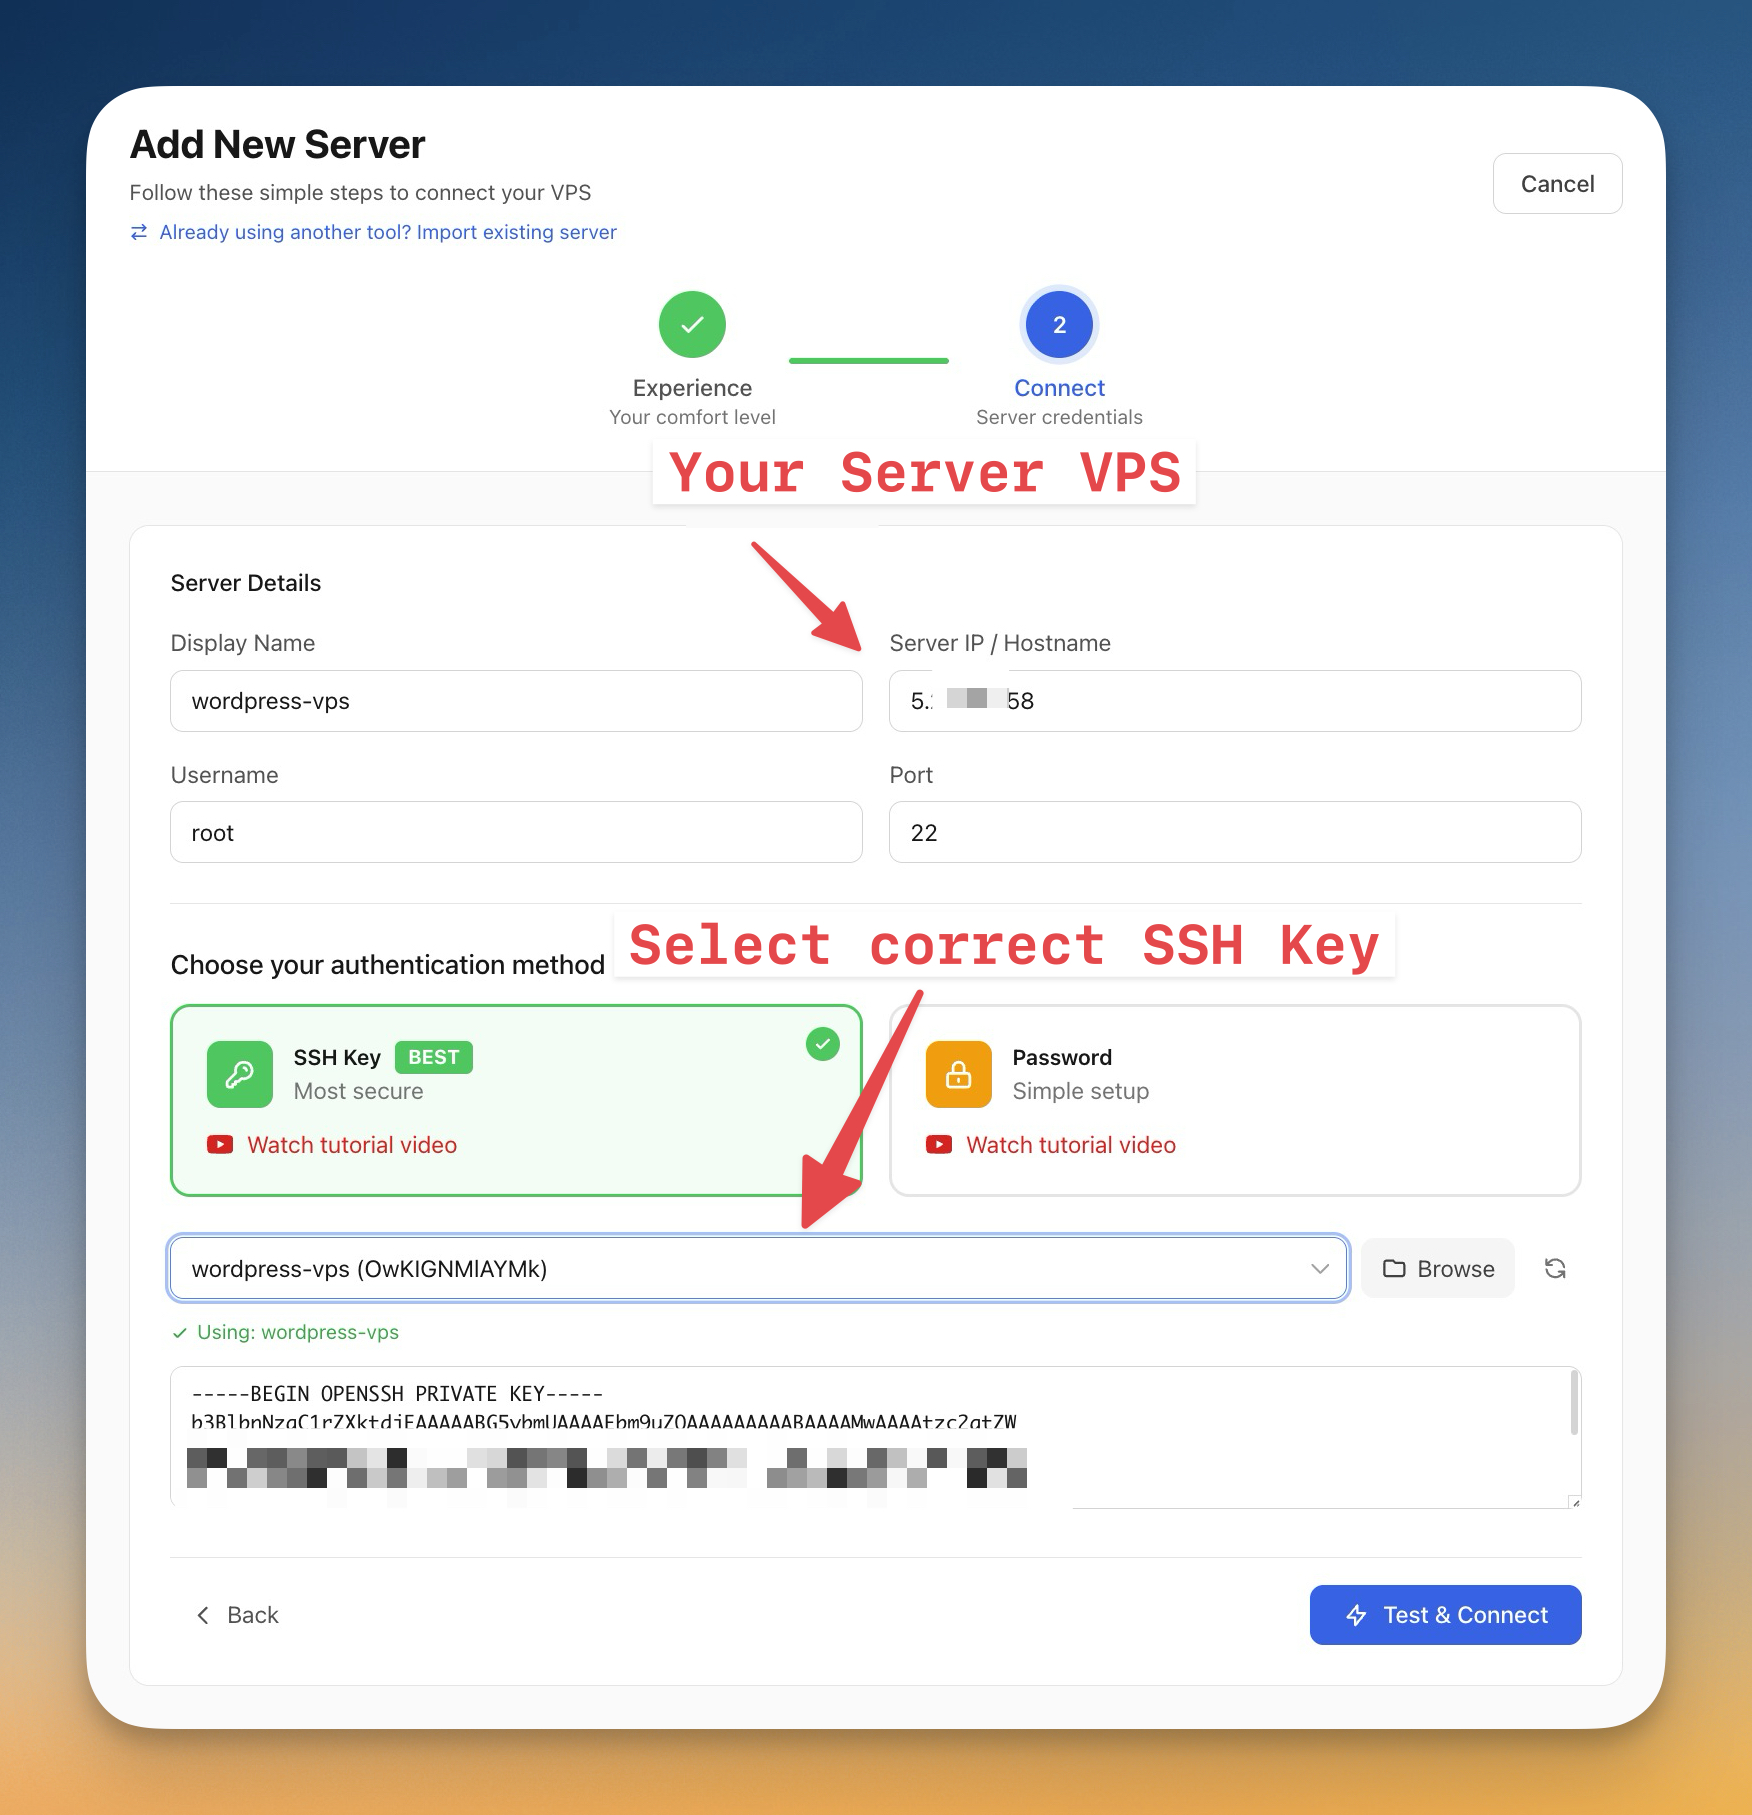
- Click "Test & Connect"
Server Compass will establish a secure connection using your SSH key — no password needed.
Step 1.7 - Install Docker and Traefik
When connecting to a fresh server, Server Compass detects that Docker isn't installed and prompts you to set up the required infrastructure.
Screenshot suggestion: Server Compass installation prompt showing Docker and Traefik
- Server Compass shows: "This server needs Docker and Traefik to run applications"
- Click "Install"
- Watch the progress in the logs panel (takes 1-2 minutes)
What's being installed:
Component
Purpose
Docker Engine
Runs your WordPress sites in isolated containers
Docker Compose
Manages multiple containers together
Traefik
Routes traffic to the right site and handles SSL certificates
Once complete, you'll see a success message and your server is ready for deployments.
Screenshot suggestion: Server Compass dashboard showing connected server with green status
Step 2 - Create Your WordPress App
Now for the exciting part — deploying your first WordPress site. Server Compass makes this simple with a built-in WordPress template.
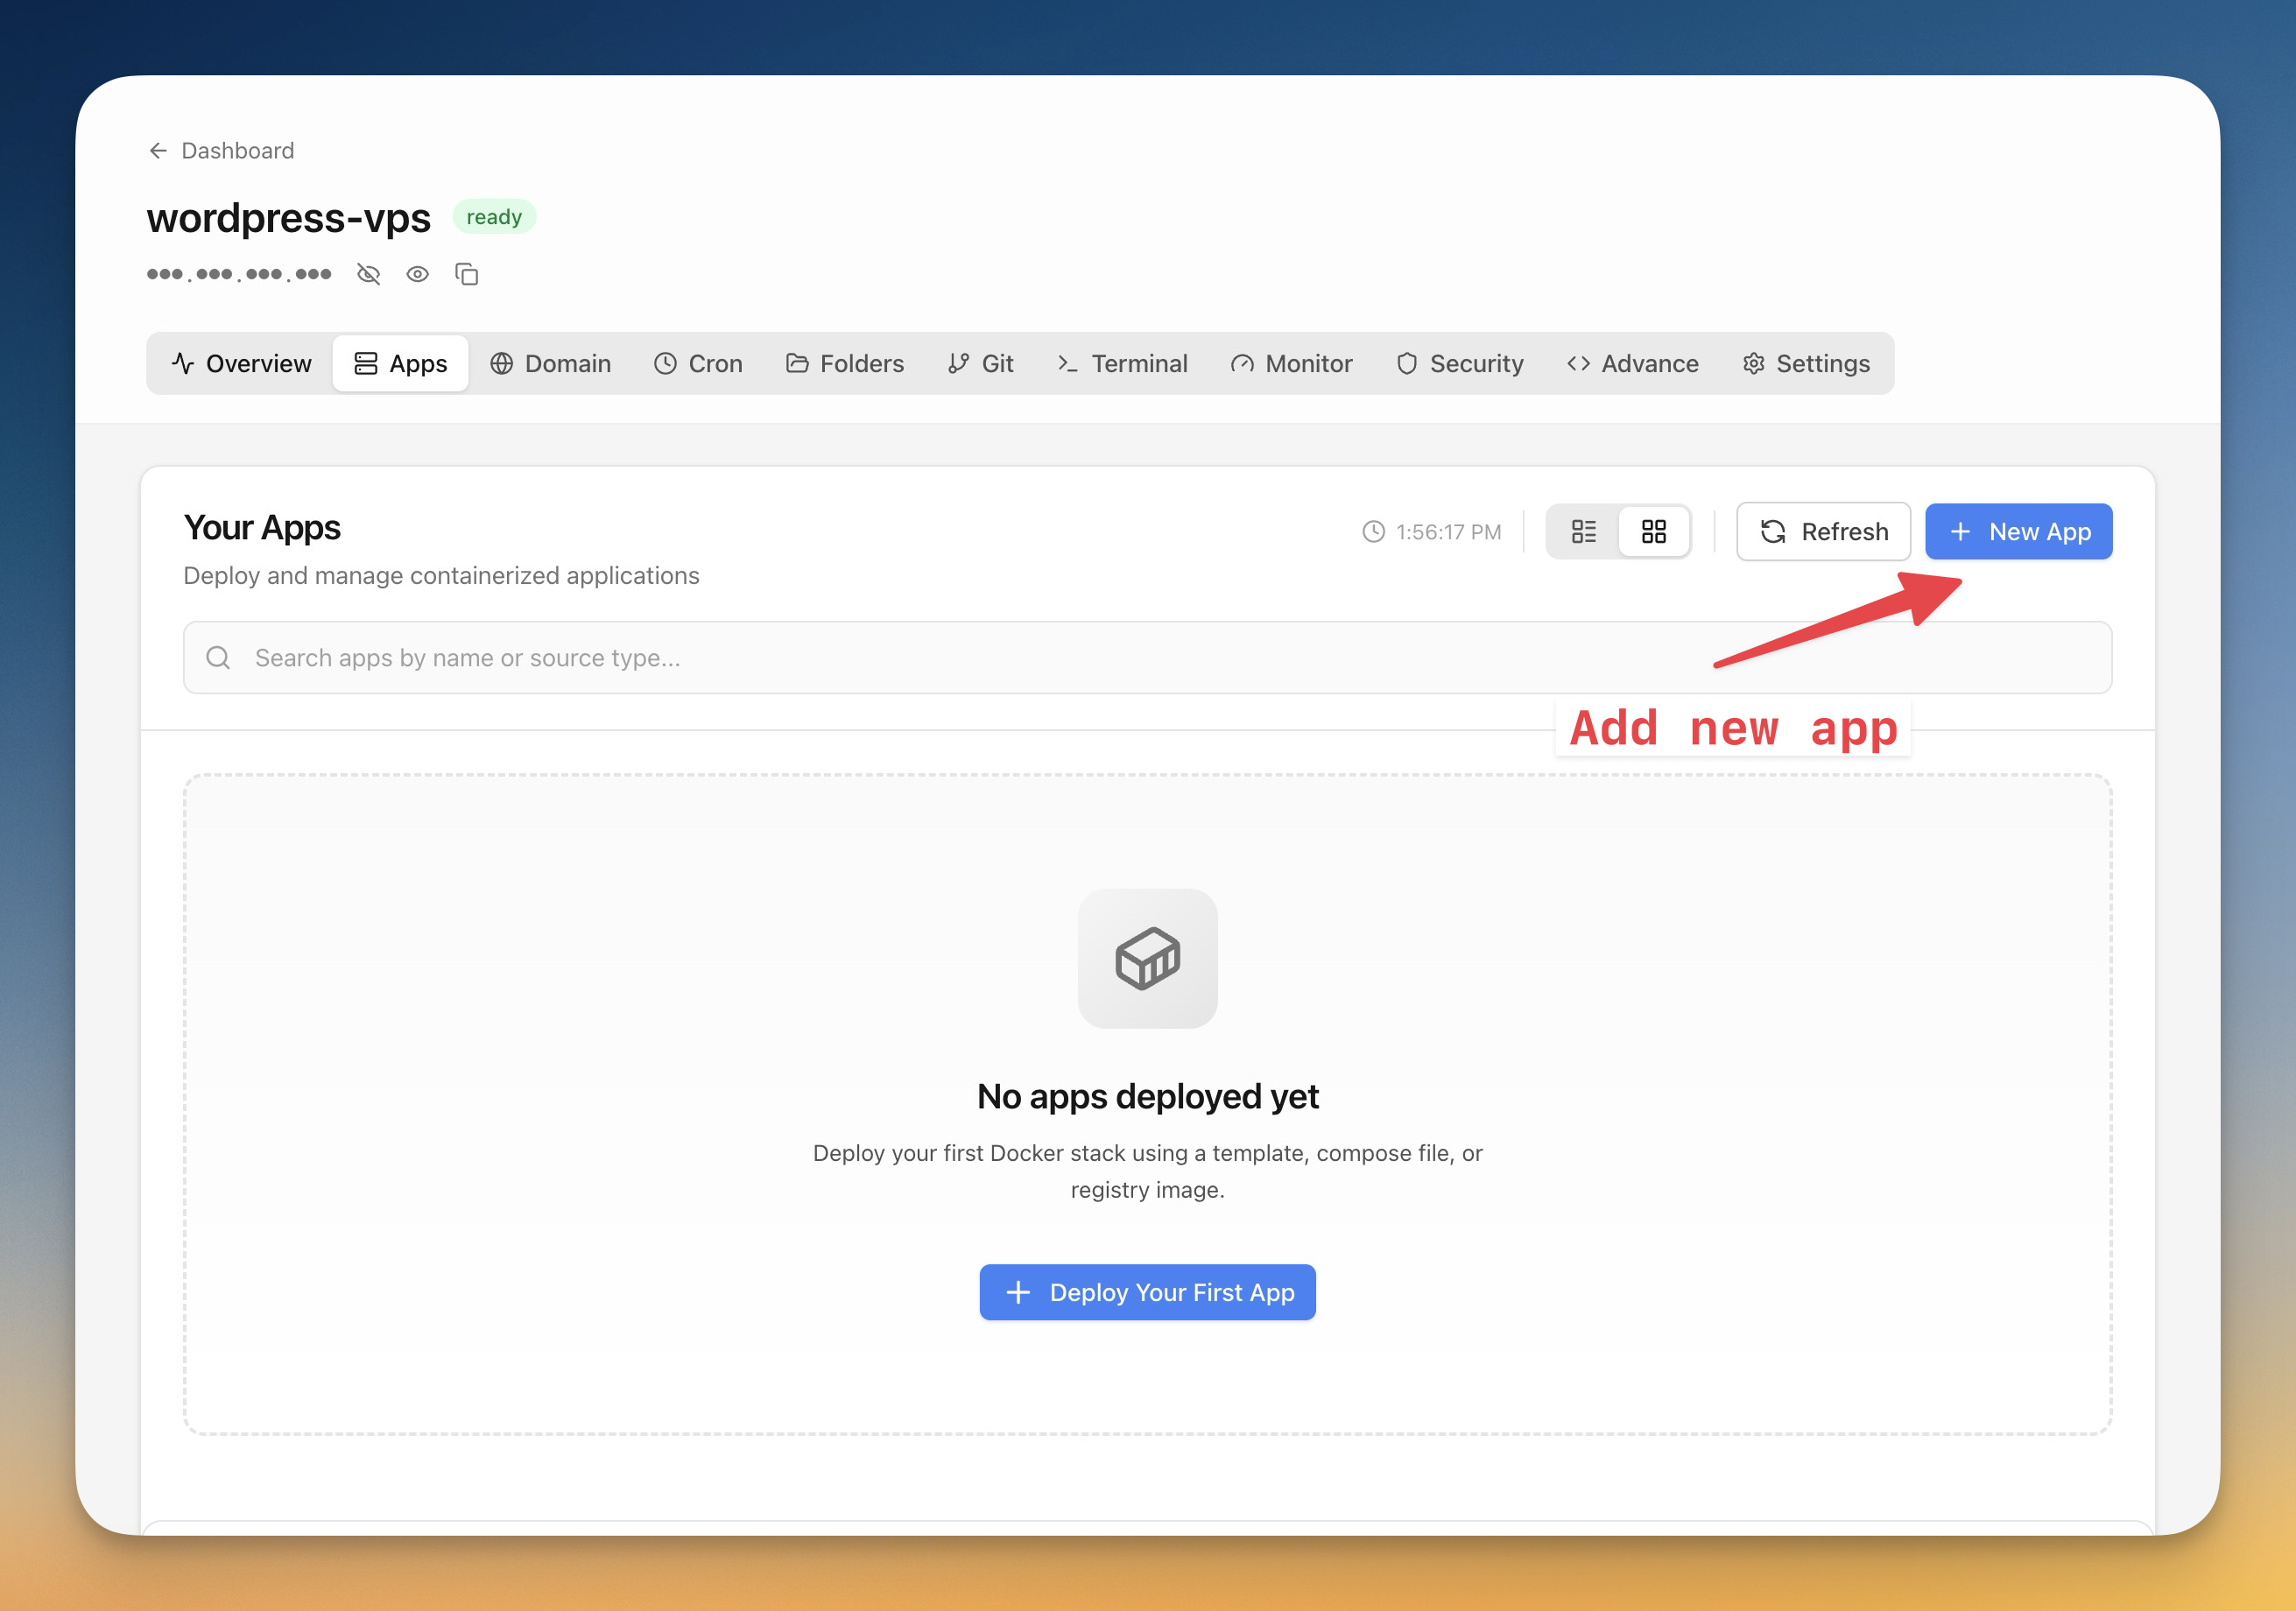
Step 2.1 - Create the WordPress app
- In Server Compass, click on your server to open its detail page
- Click the "Apps" tab
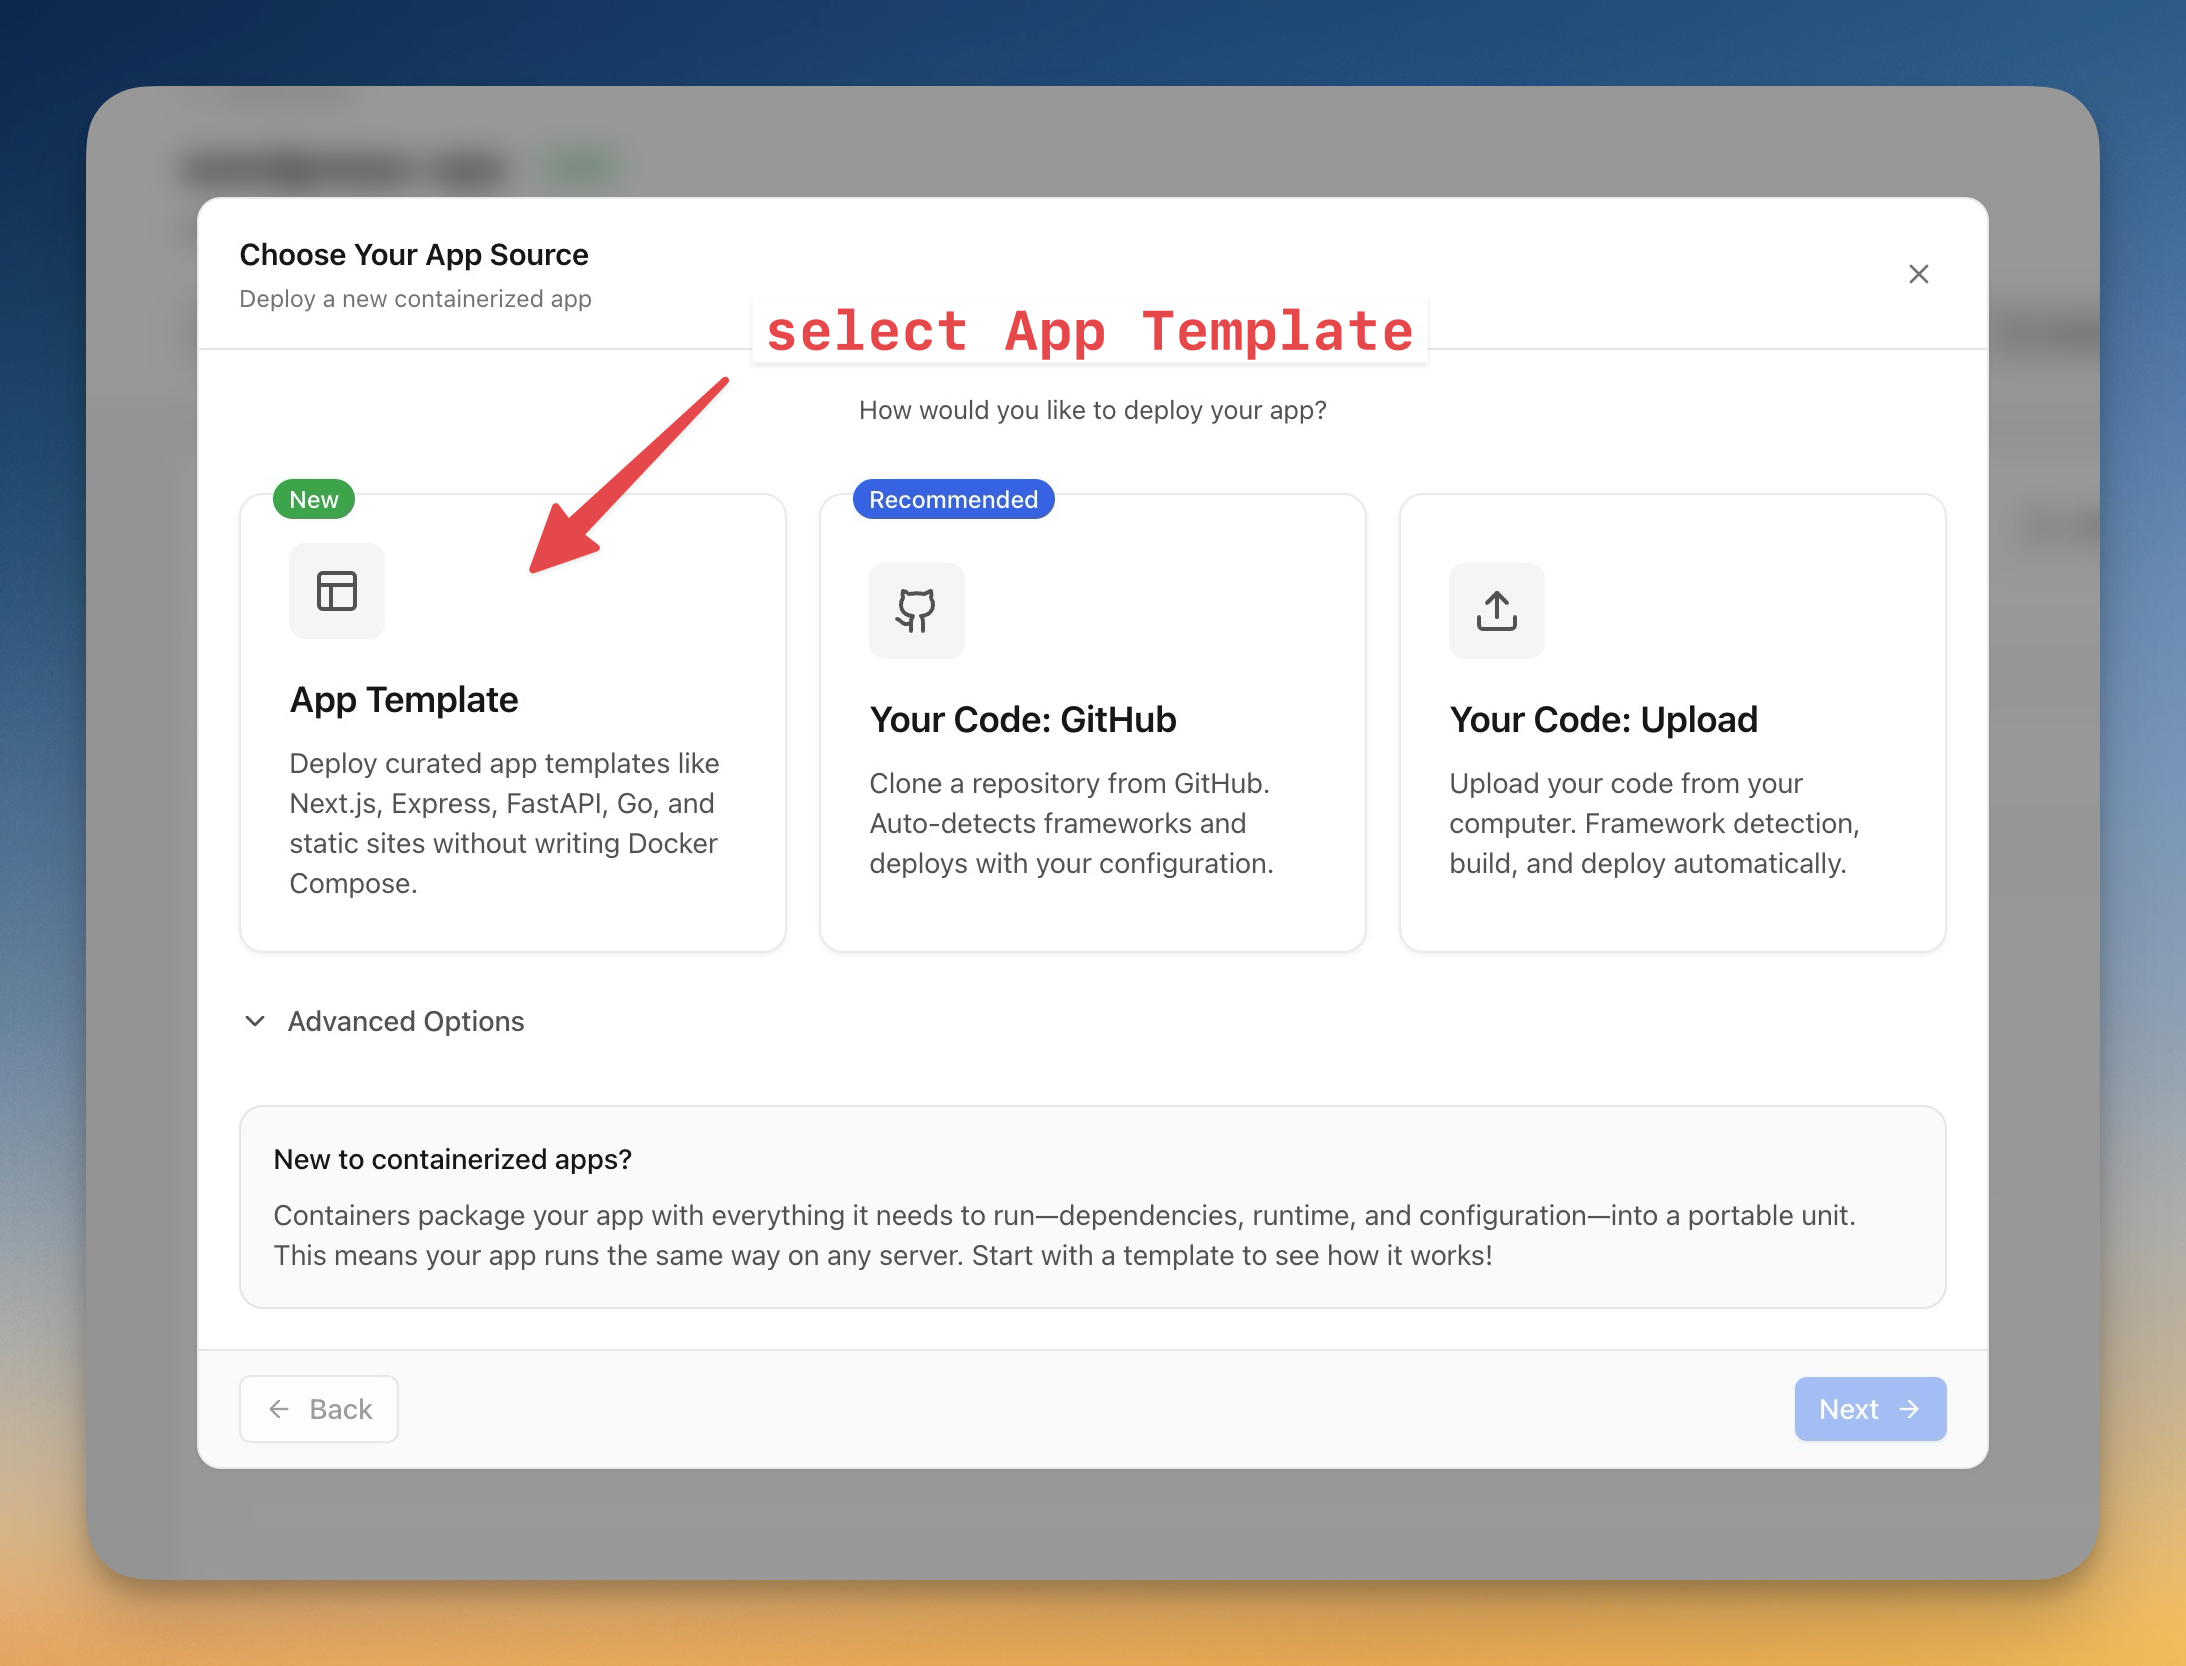
- Click "+ New App" in the top right
- Select "App Template" to deploy from a curated template
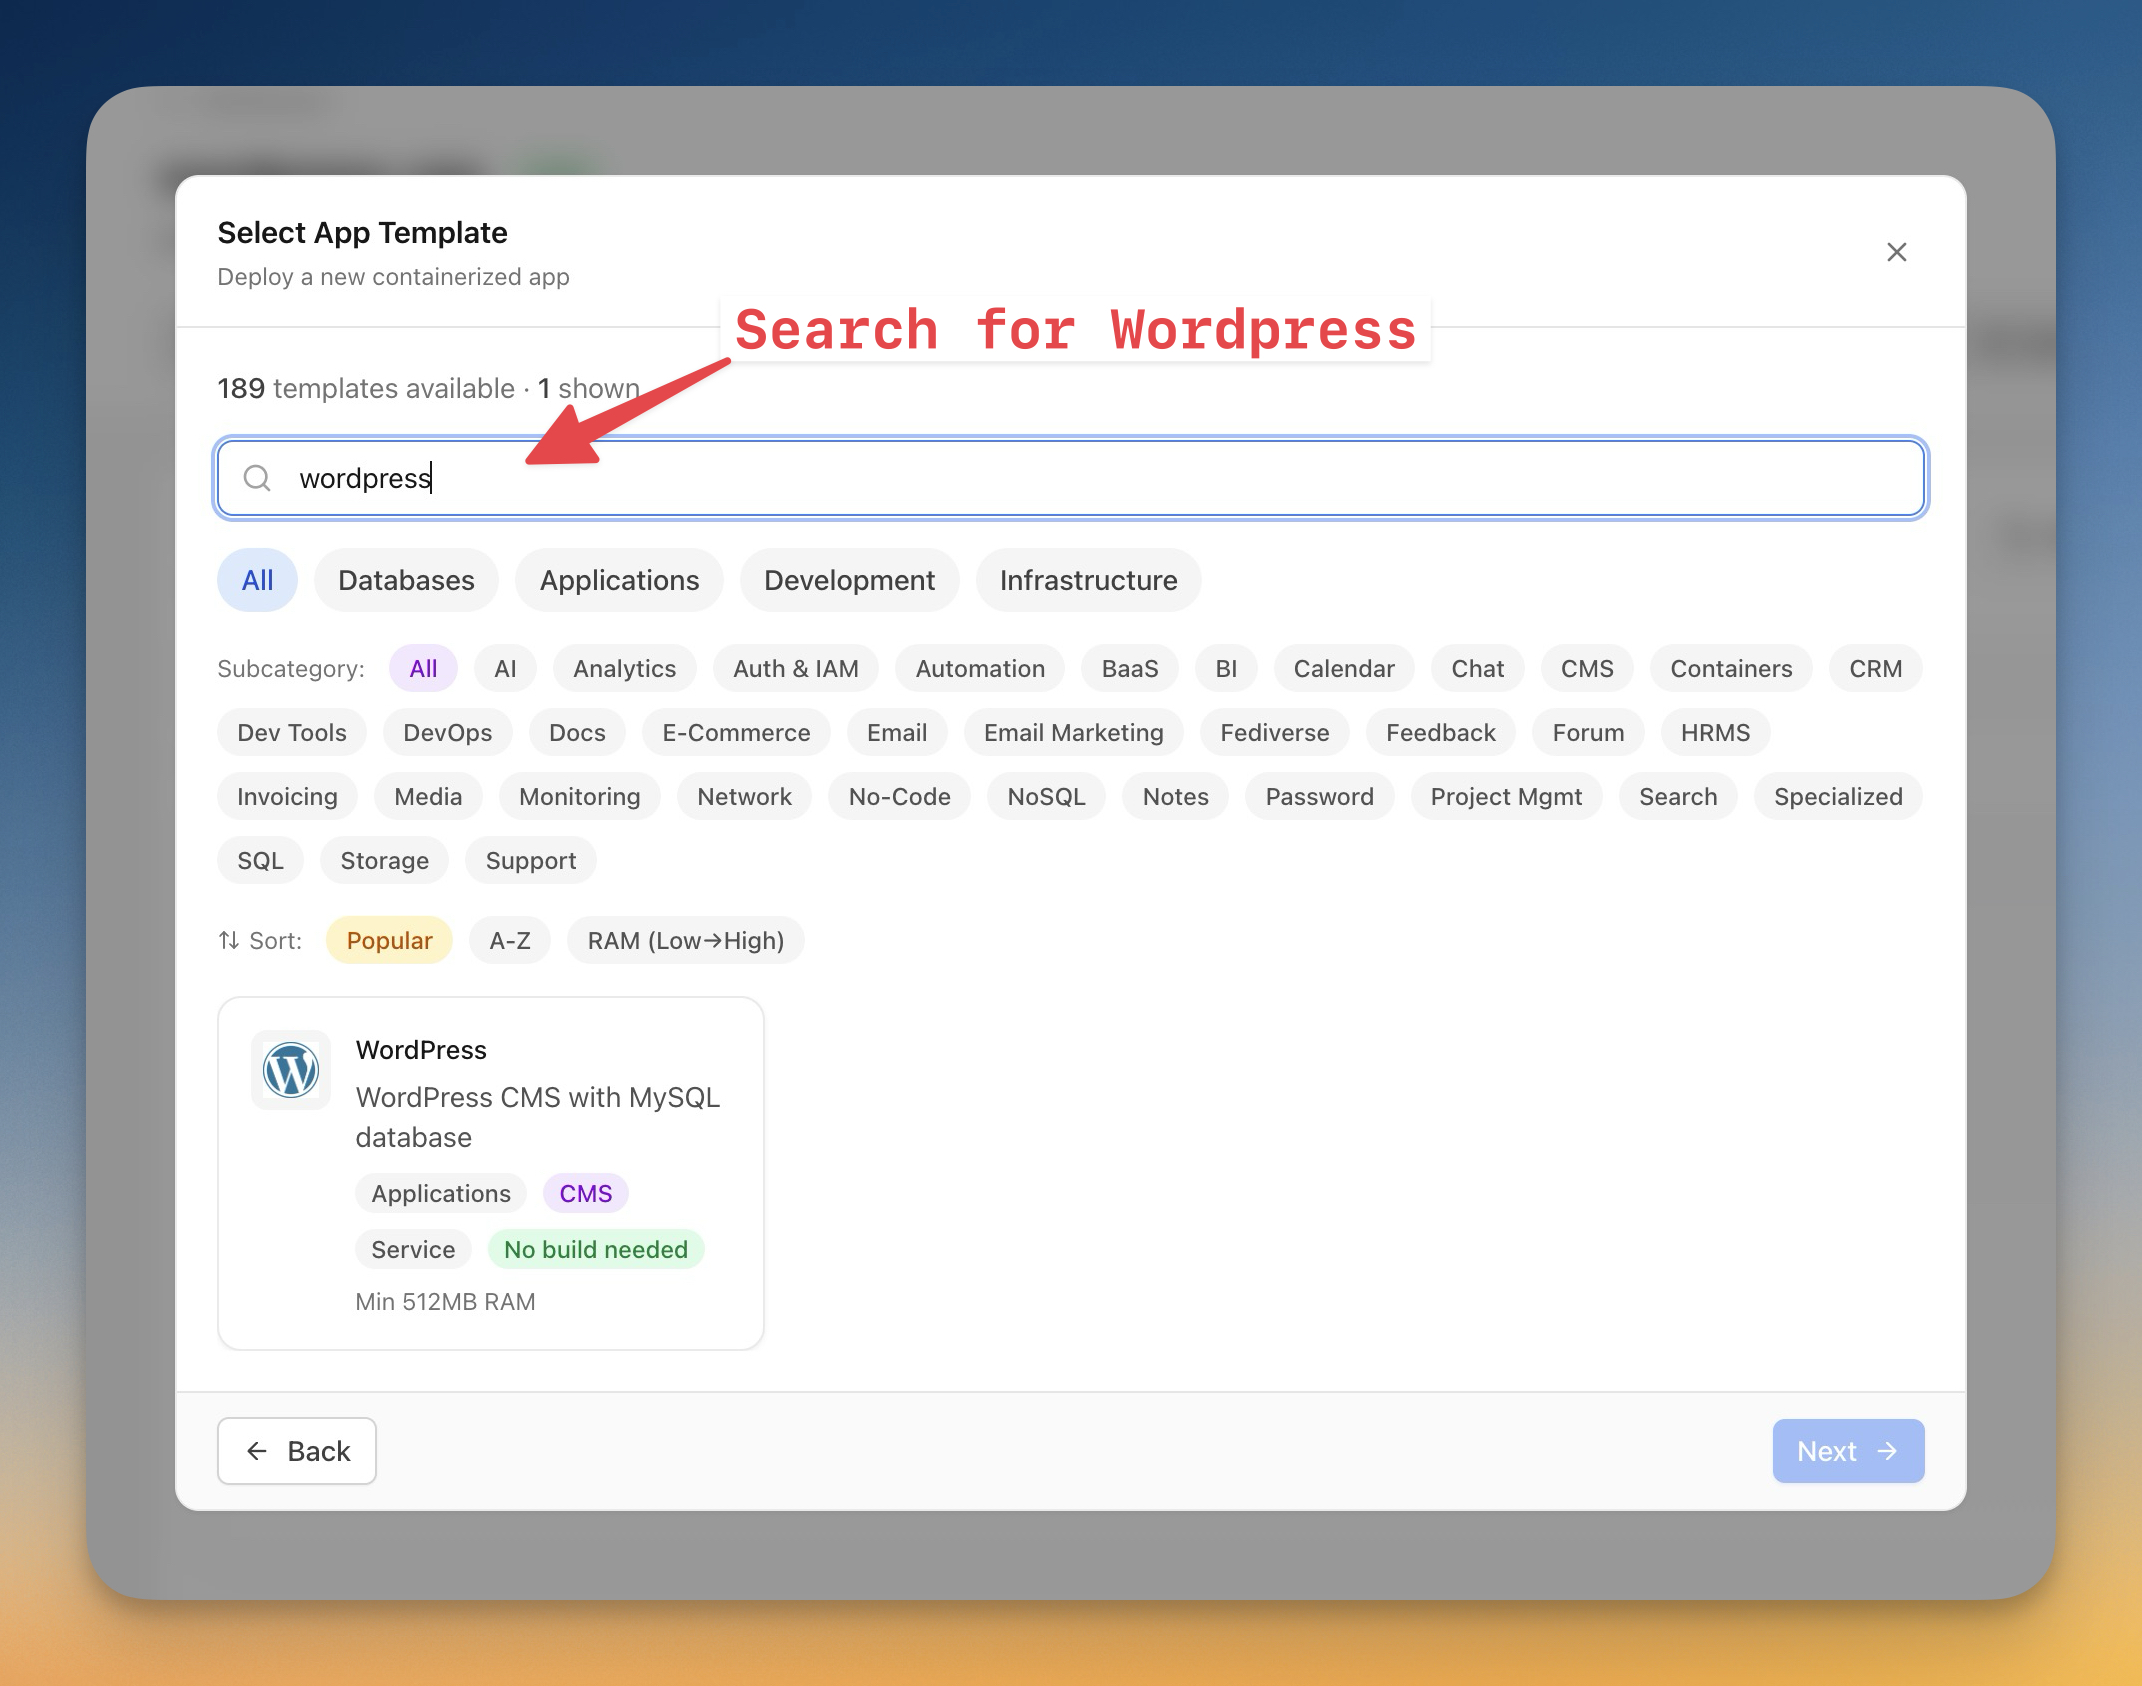
- Search for "wordpress" in the search box
- Select the WordPress template (WordPress CMS with MySQL database)
- Click "Next"
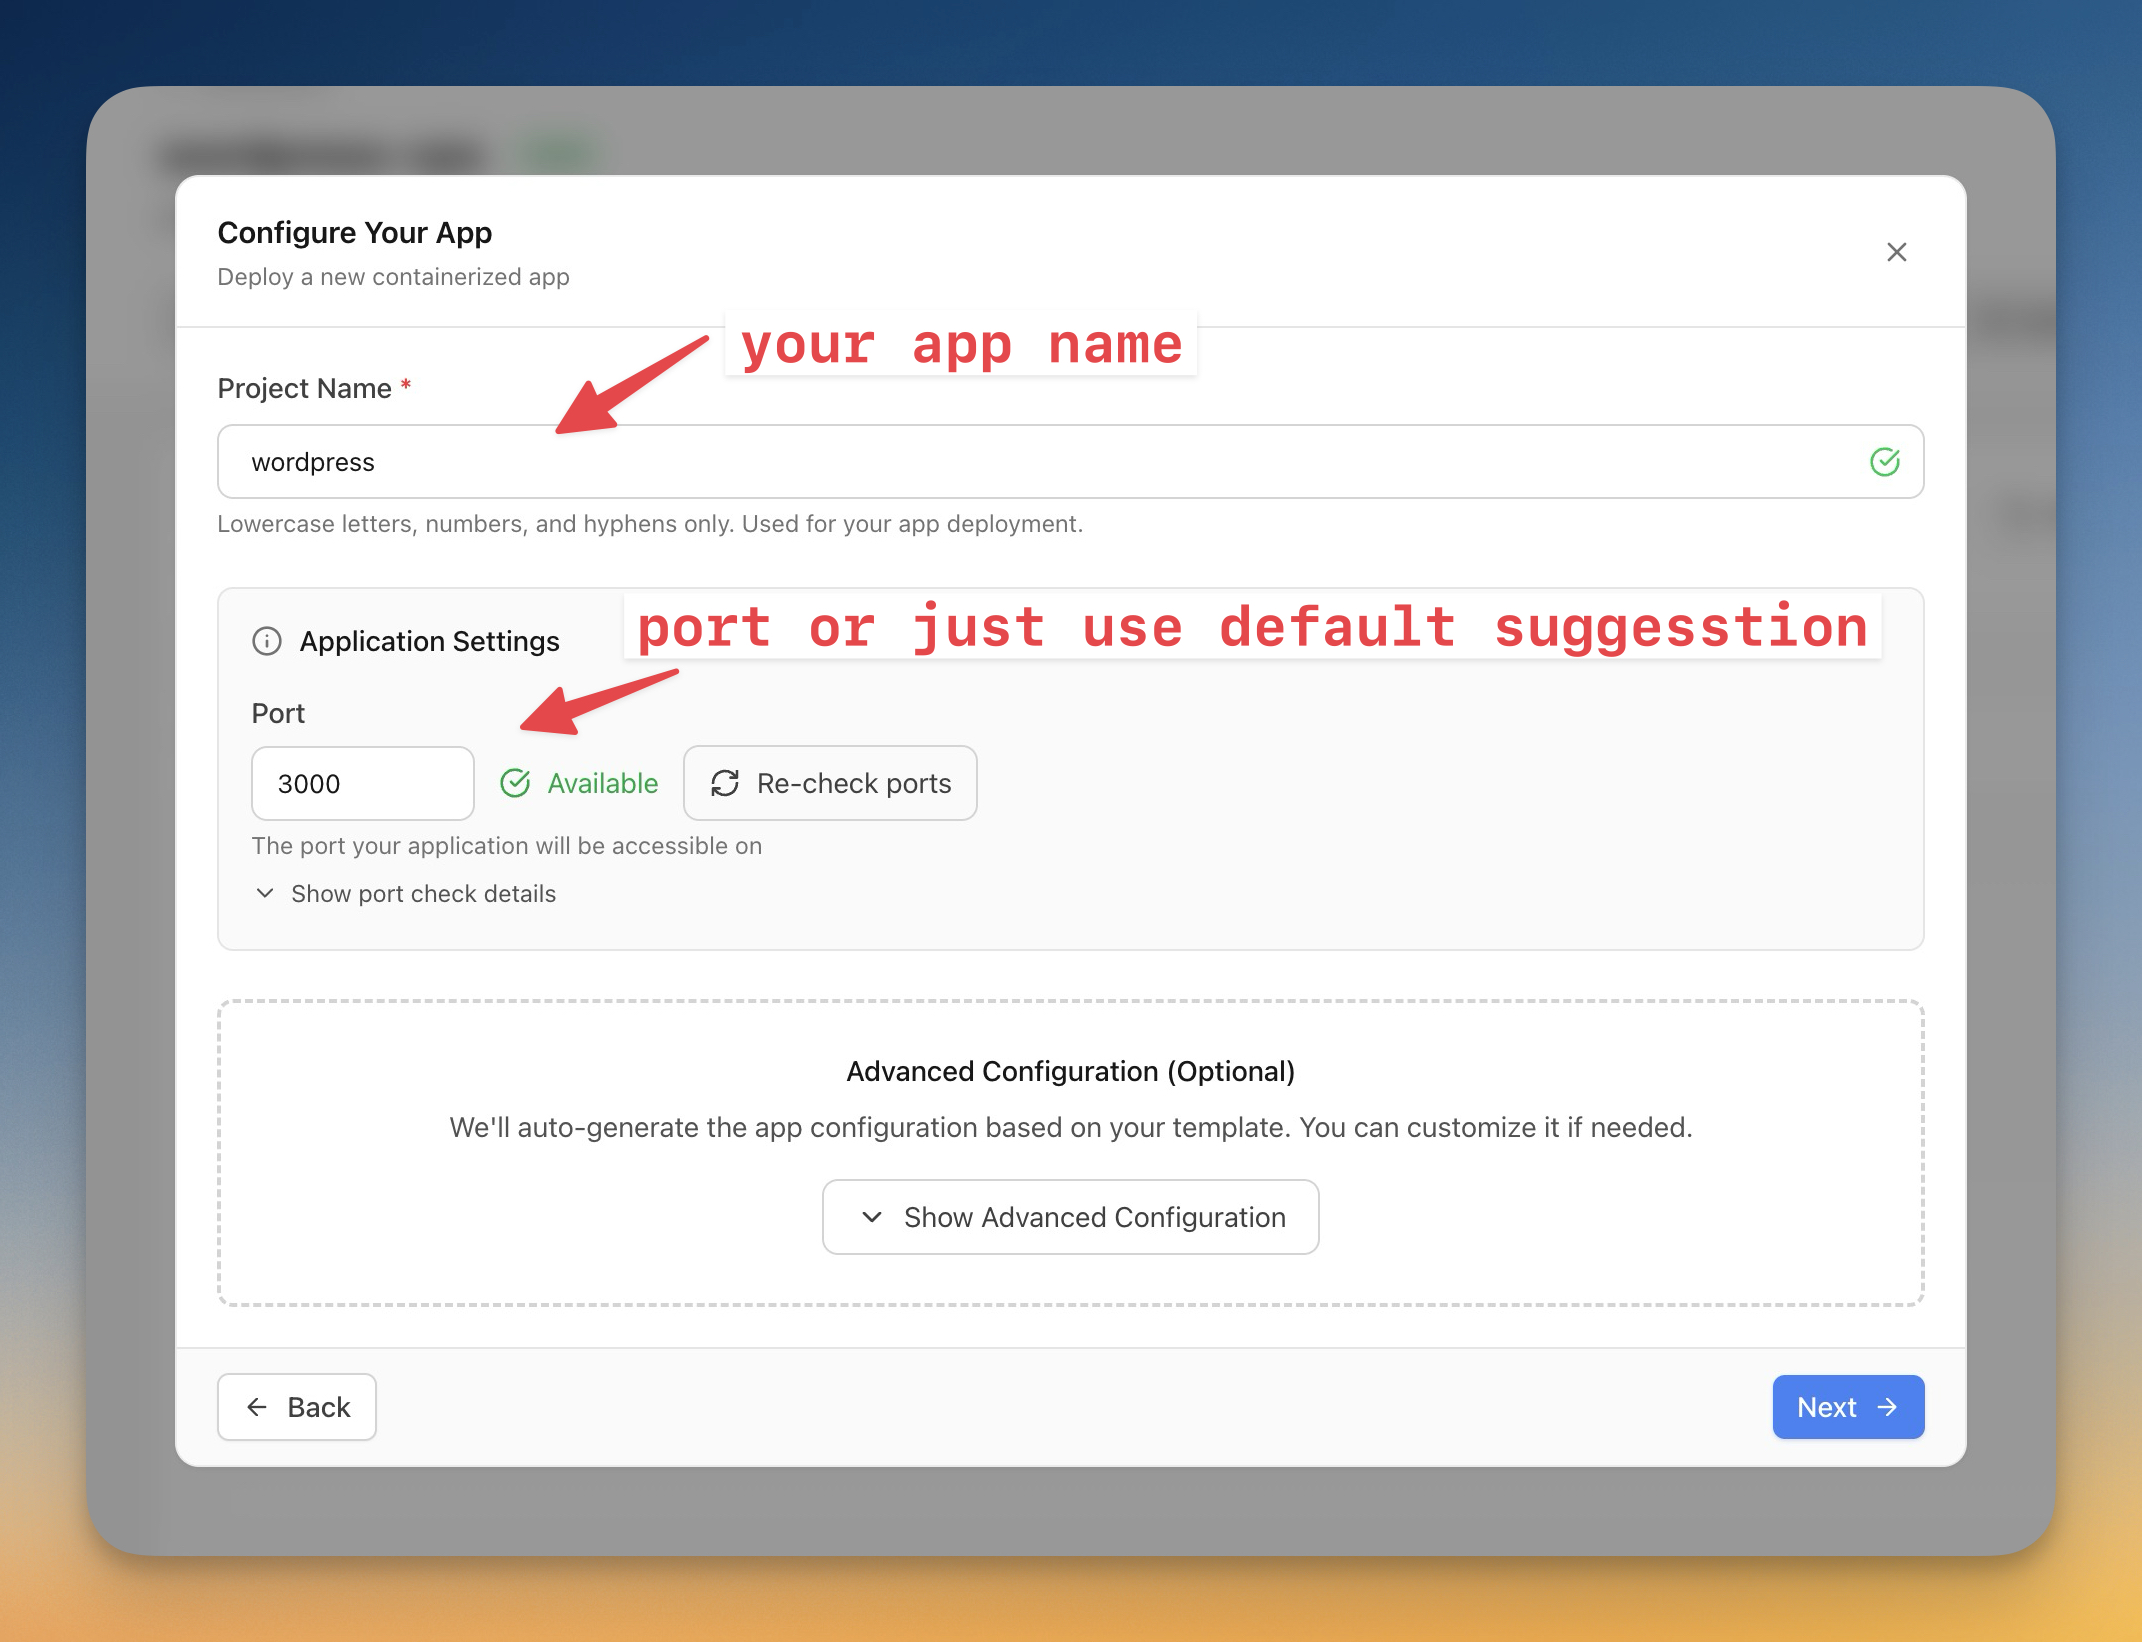
- Enter your Project Name (e.g.,
wordpress) - The Port will be auto-assigned (default 3000) — you can keep the default
- Click "Next"
- Review the Environment Variables — you can customize or use the defaults:
Variable
Description
DB_NAME
WordPress database name
DB_USER
WordPress database user
DB_PASSWORD
Database password (click "Generate Password")
DB_ROOT_PASSWORD
MySQL root password (click "Generate Password")
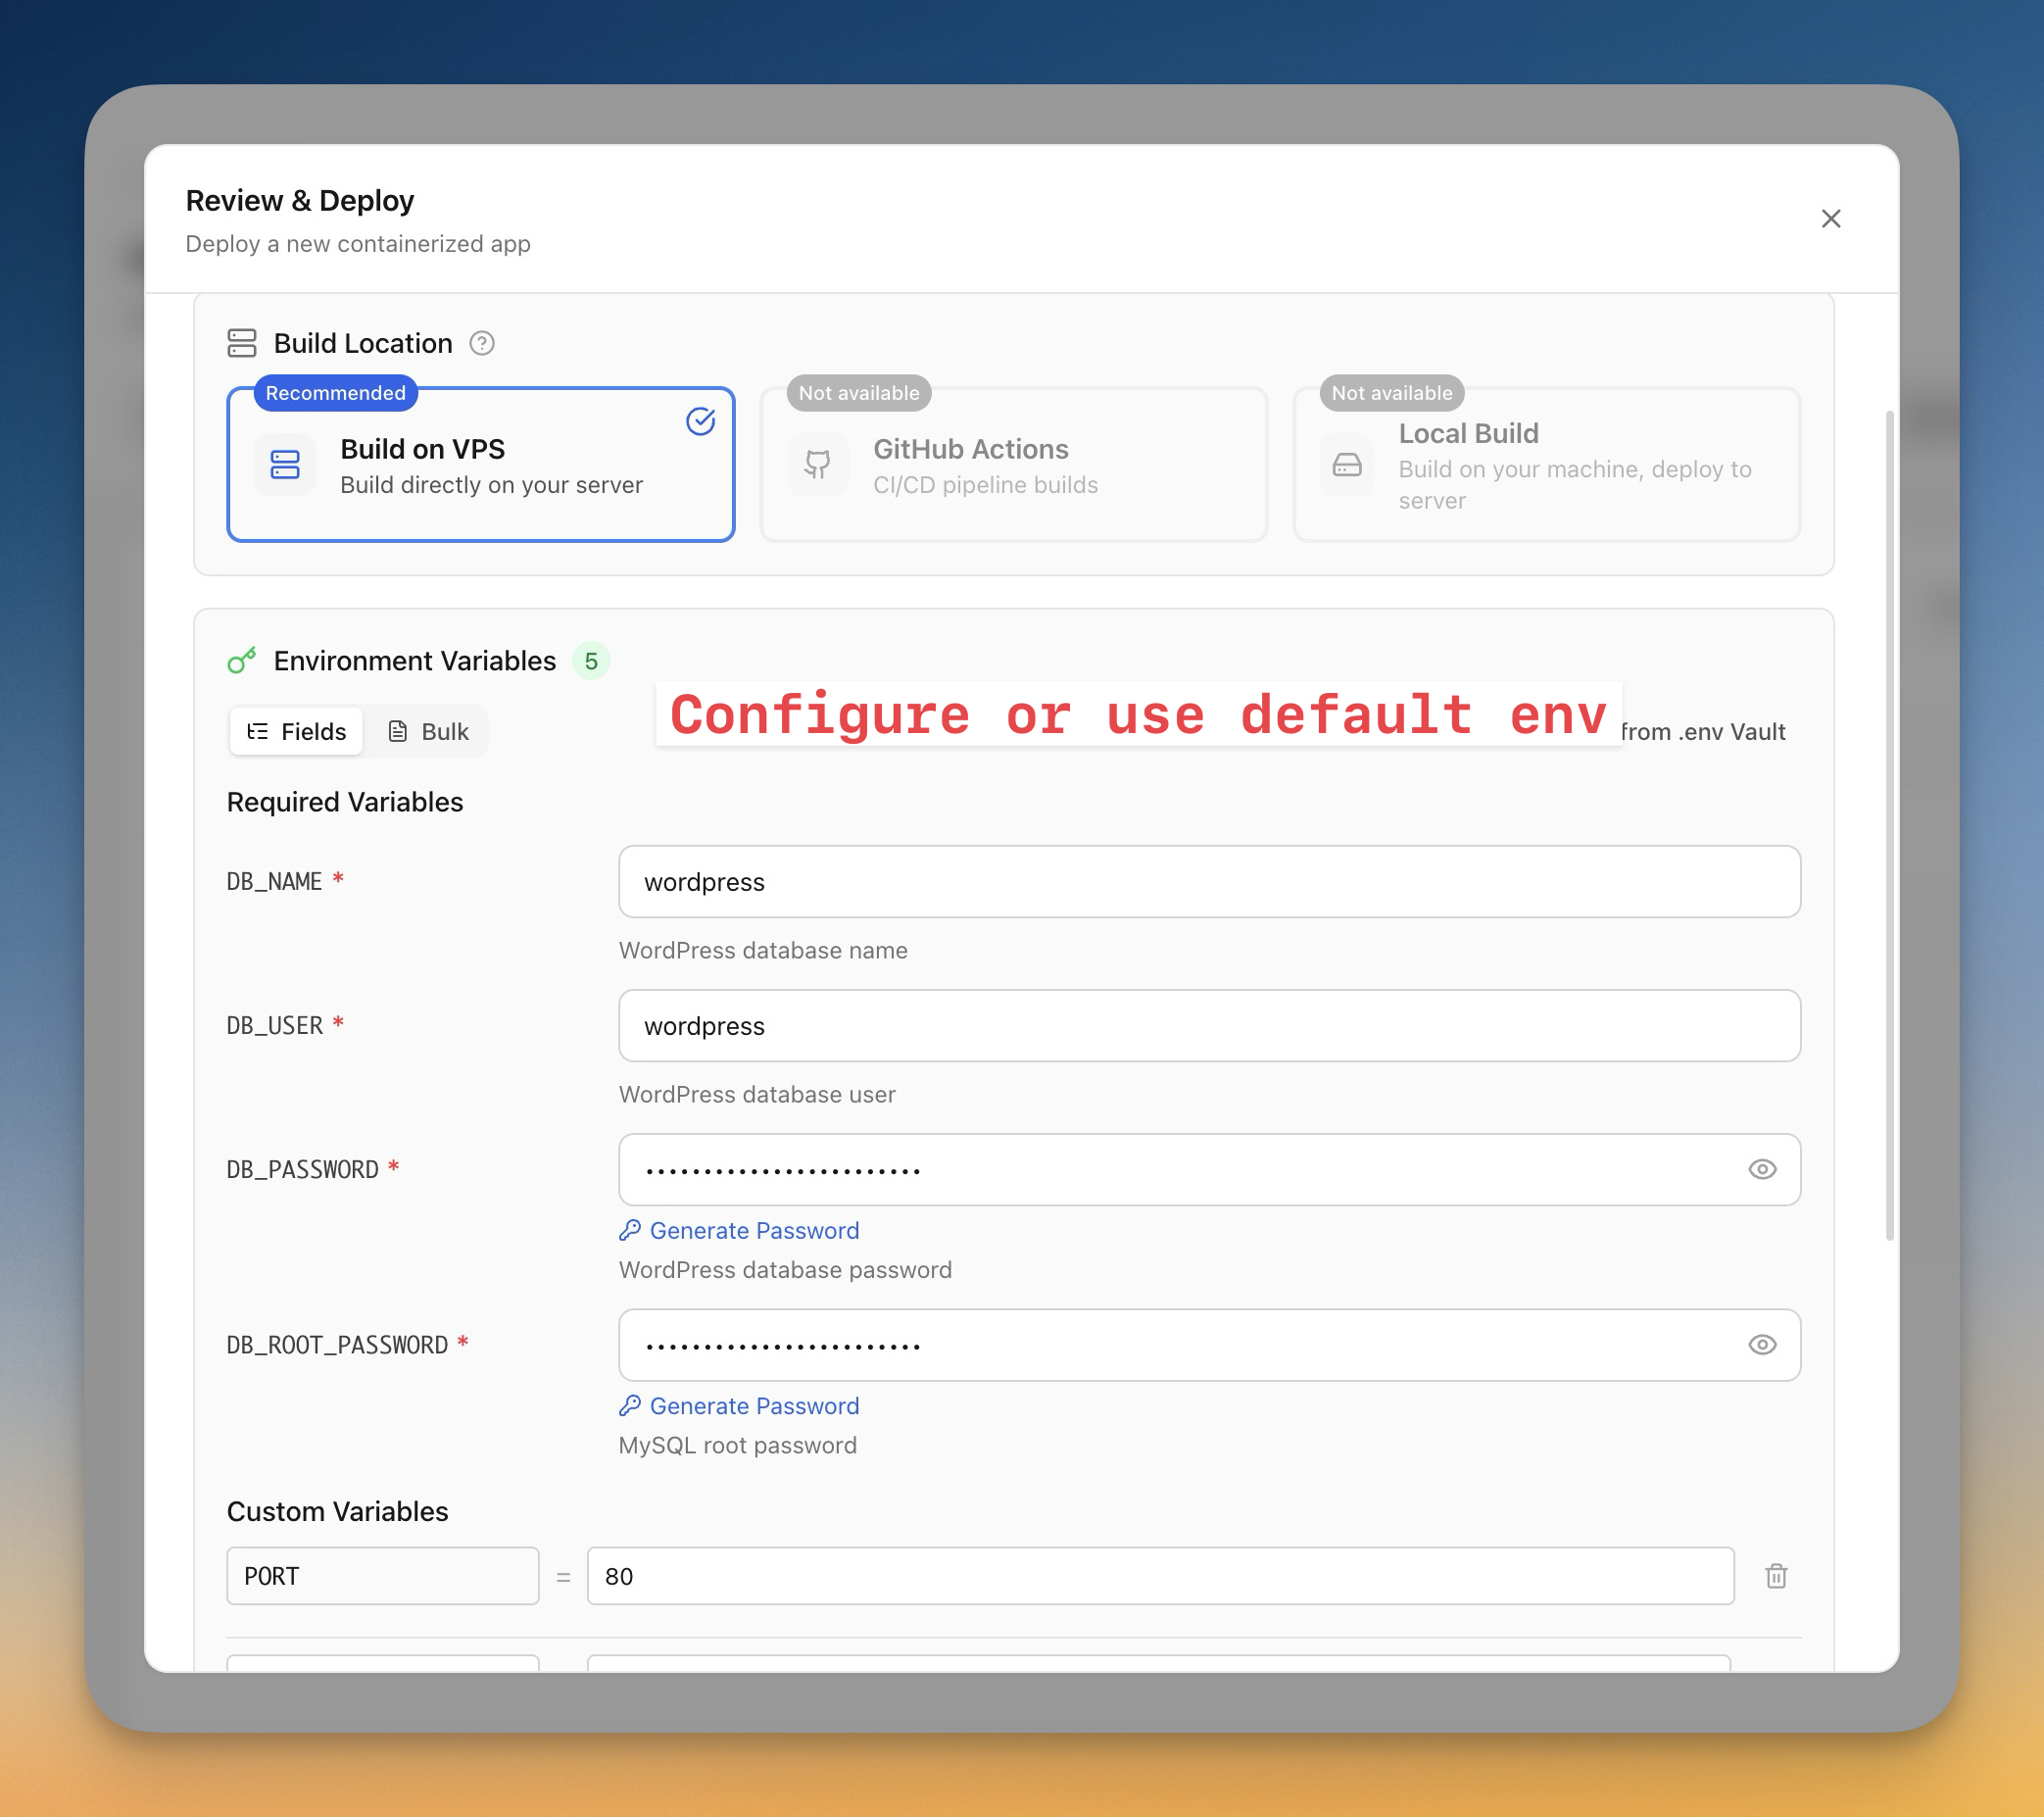
- Click "Deploy" to start the deployment
Step 2.2 - Watch the deployment progress
Server Compass shows you exactly what's happening in real-time:
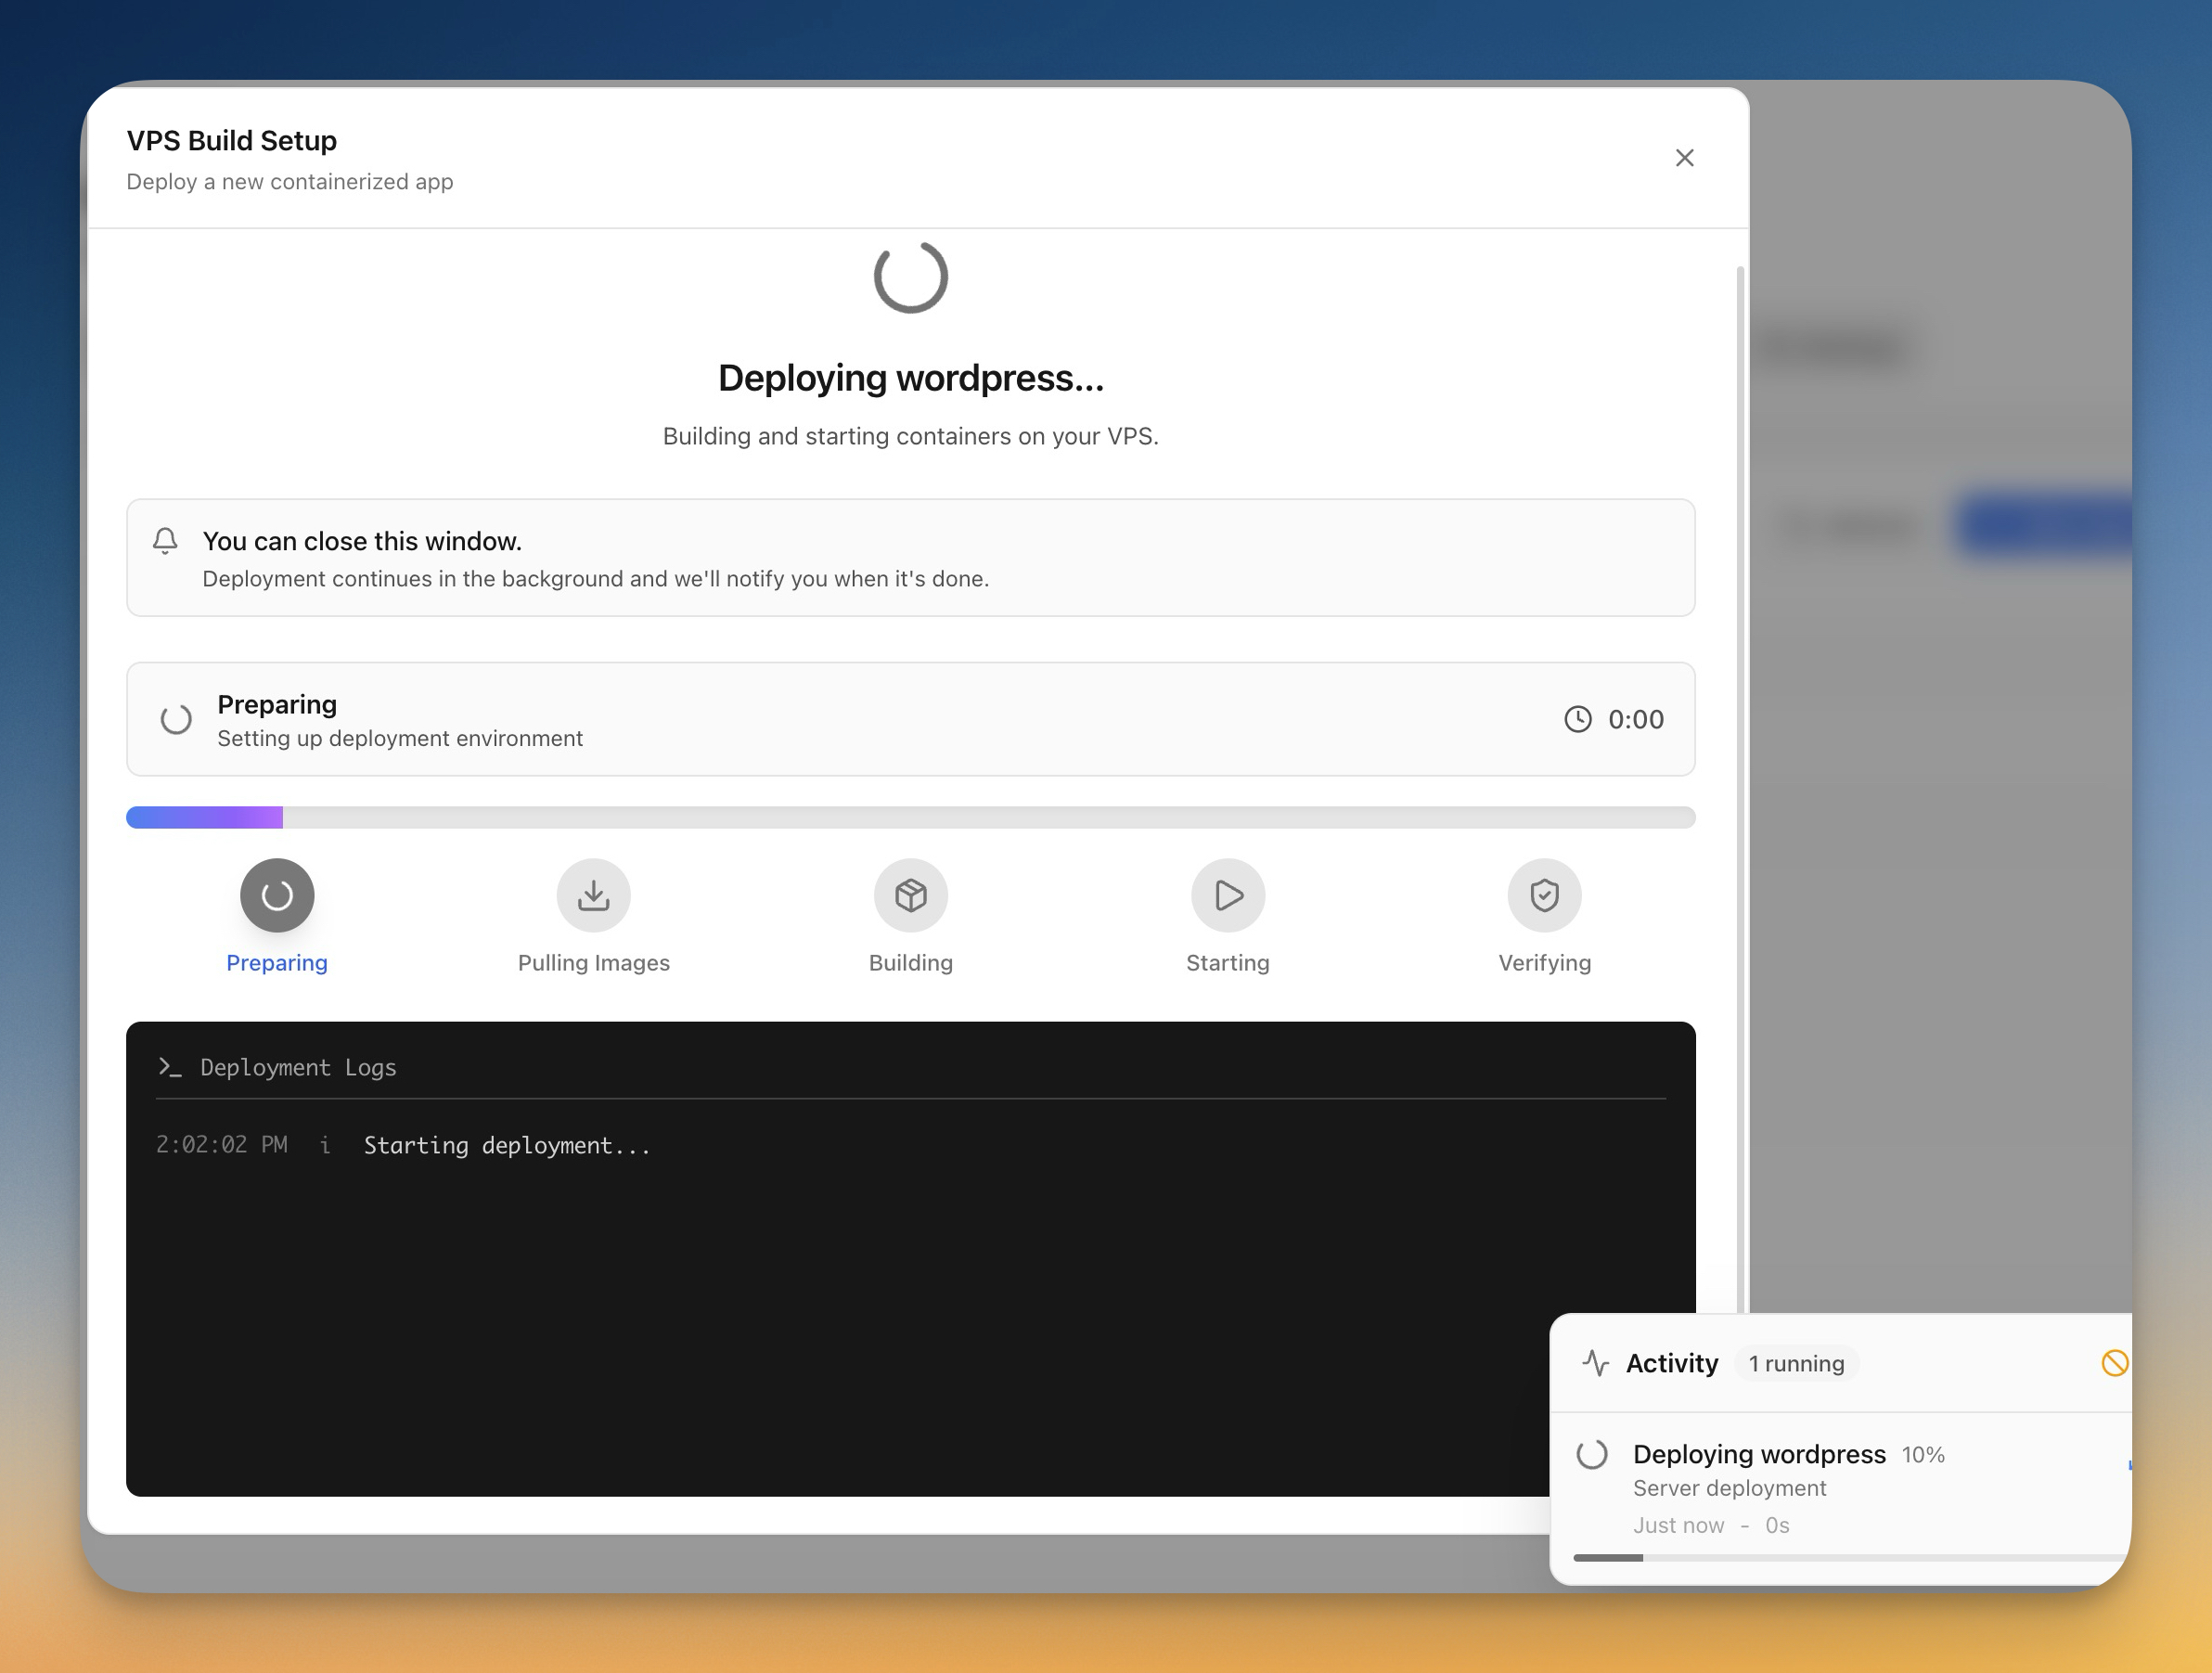
The deployment goes through these steps:
- Preparing — Setting up deployment environment
- Pulling Images — Downloads WordPress and MySQL containers
- Building — Configures the application
- Starting — Launches the containers
- Verifying — Confirms everything is running
The entire process takes 1-3 minutes. You can close this window — Server Compass will notify you when it's done.
Once complete, you'll see your WordPress app with a green "Running" status:
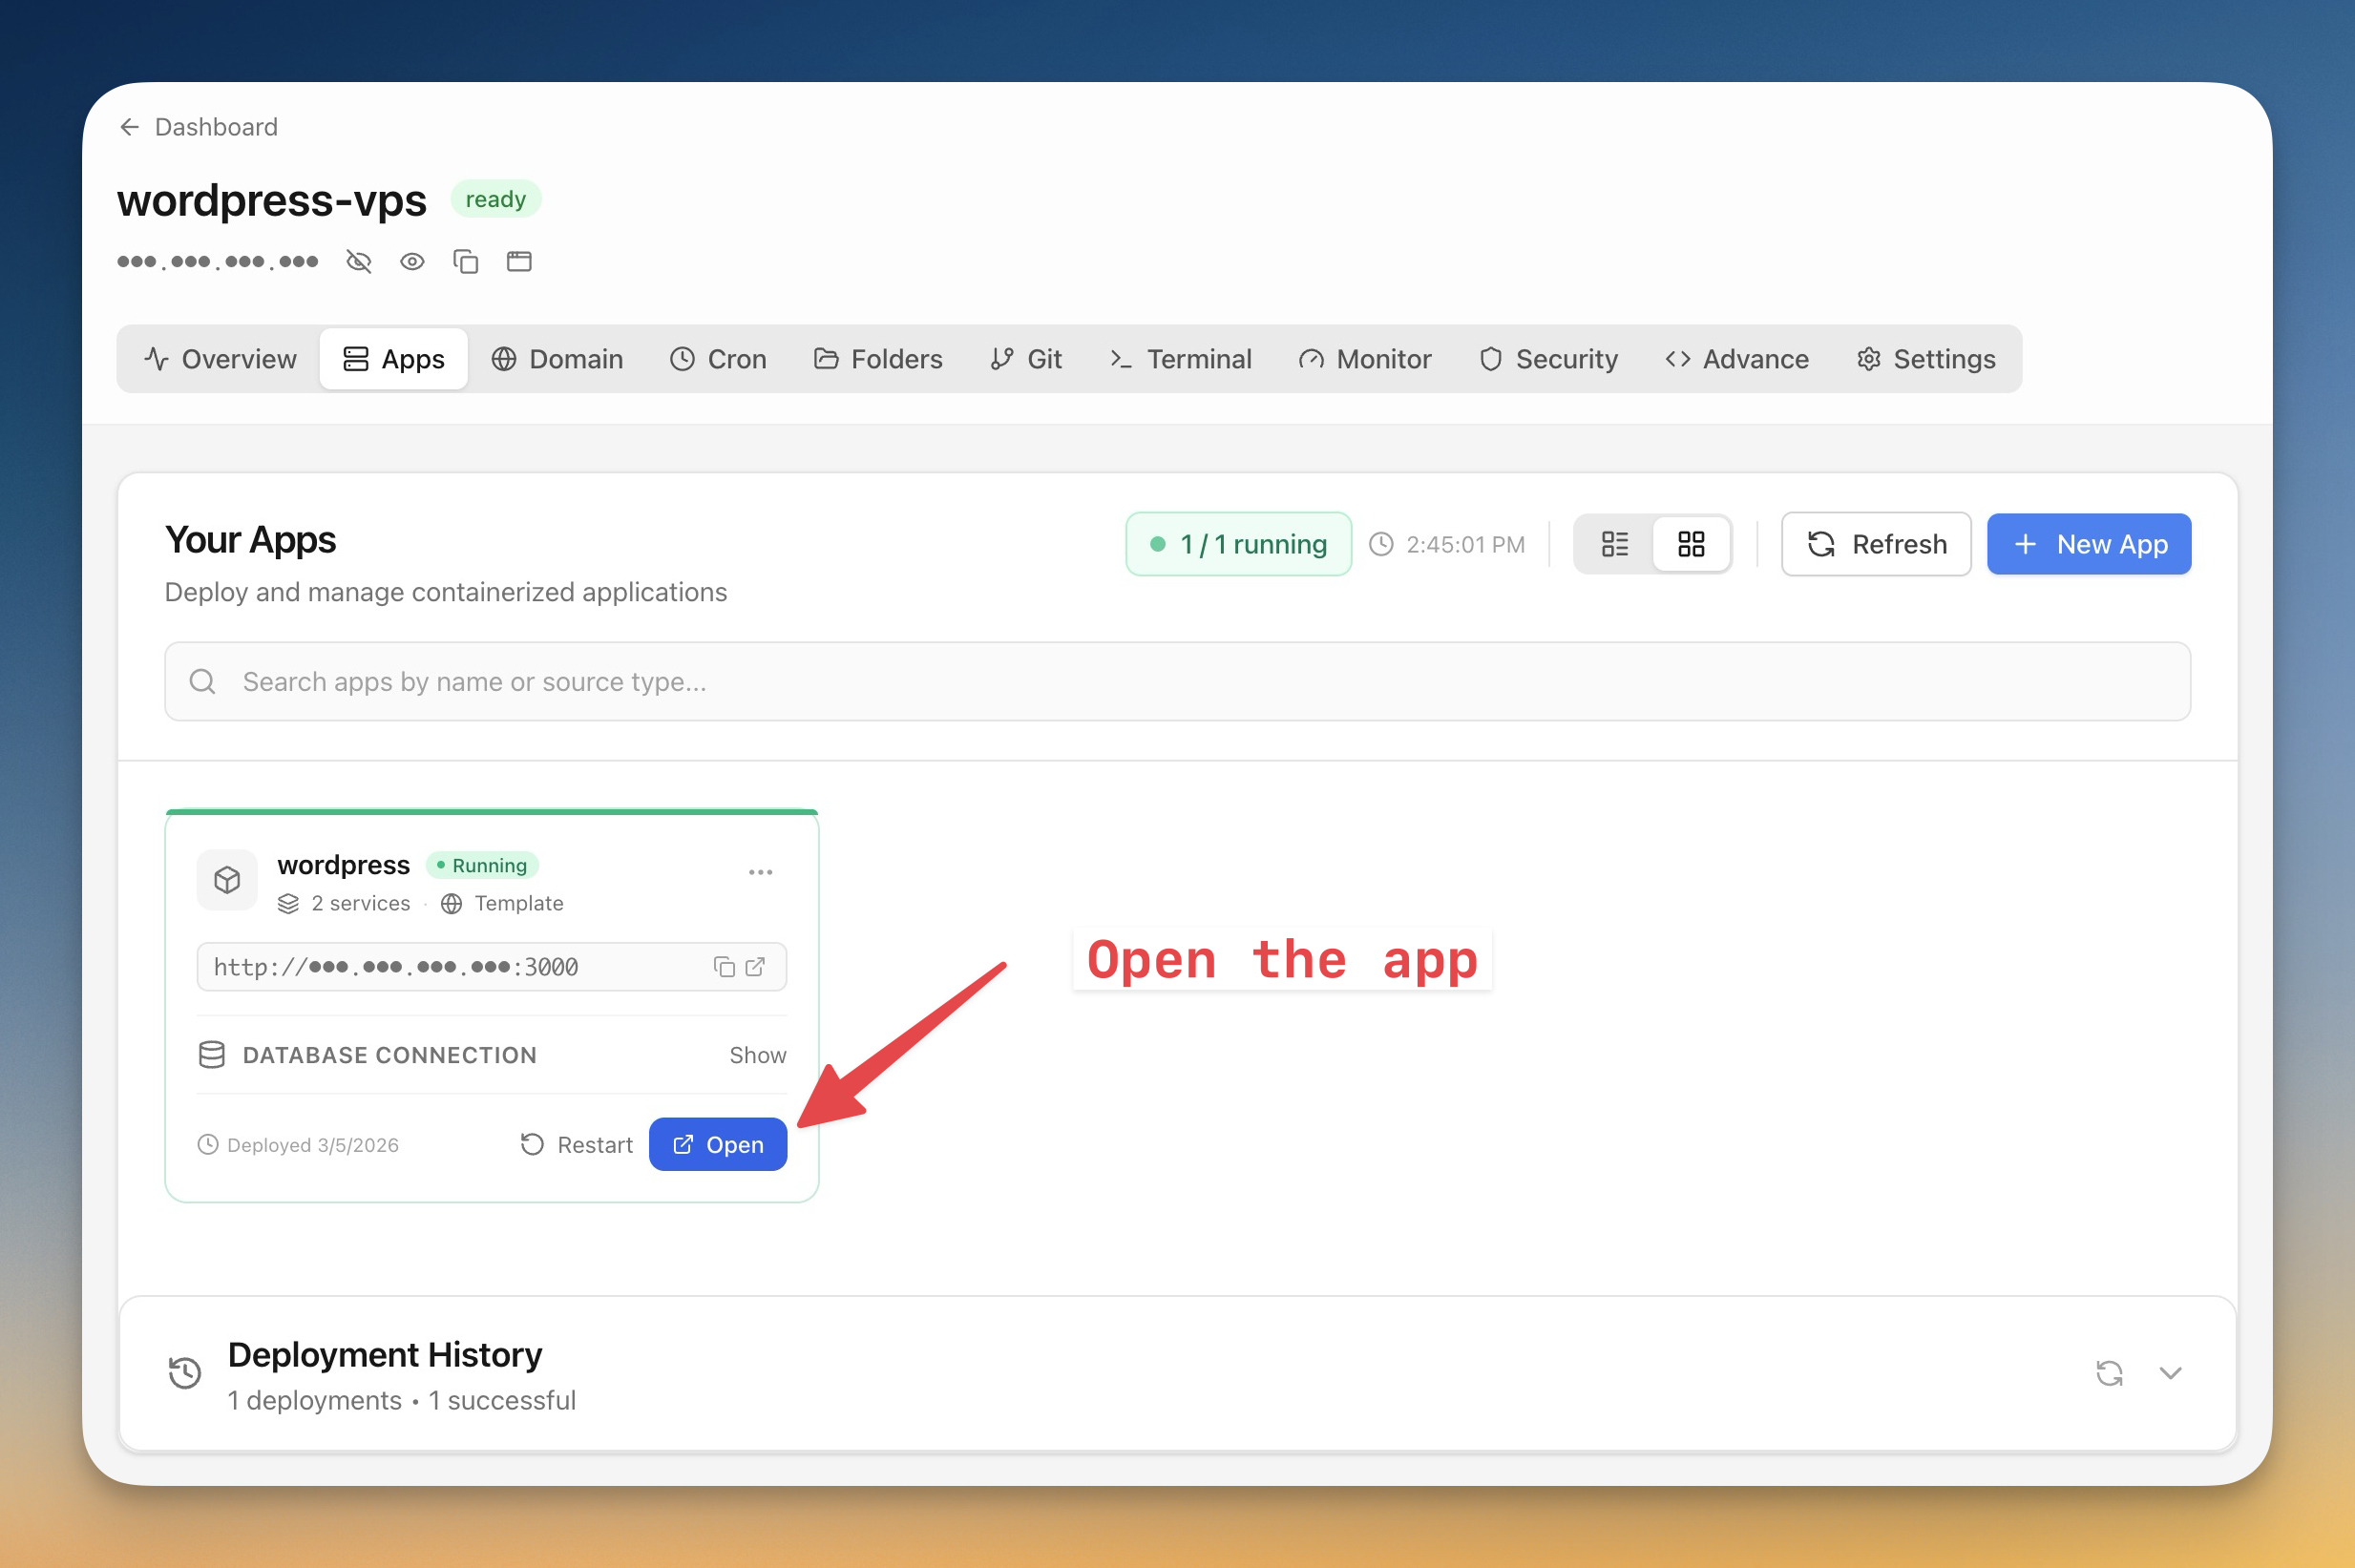
Your WordPress app is now running. But before you can access it with a domain, you need to configure DNS (Step 3).
What's happening behind the scenes
Server Compass creates a clean folder structure on your server. If you're curious, you can explore it via the Terminal tab:
root@demo-vps:~# ls
server-compass

root@demo-vps:~# cd server-compass/apps/
root@demo-vps:~/server-compass/apps# ls
second-wordpress  wordpress  wordpress-site3
Each app has its own folder with a docker-compose.yml file that Server Compass manages:
root@demo-vps:~/server-compass/apps/wordpress# cat docker-compose.yml
{`services:
  wordpress:
    image: wordpress:latest
    ports:
      - 3000:80
    environment:
      - WORDPRESS_DB_HOST=db:3306
      - WORDPRESS_DB_USER=wordpress
      - WORDPRESS_DB_PASSWORD=Dm8LFDuYsKoQ63ENvLByD4gE
      - WORDPRESS_DB_NAME=wordpress
    volumes:
      - wordpress_data:/var/www/html
    restart: unless-stopped
    depends_on:
      db:
        condition: service_healthy
    labels:
      - traefik.enable=true
      - traefik.http.routers.yourdomain-com.rule=Host(\`yourdomain.com\`)
      - traefik.http.routers.yourdomain-com.entrypoints=websecure
      - traefik.http.routers.yourdomain-com.tls.certresolver=letsencrypt
      # ... more Traefik labels for HTTPS and www redirect
    networks:
      - default
      - traefik-public

  db:
    image: mysql:8.0
    environment:
      - MYSQL_DATABASE=wordpress
      - MYSQL_USER=wordpress
      - MYSQL_PASSWORD=Dm8LFDuYsKoQ63ENvLByD4gE
      - MYSQL_ROOT_PASSWORD=9QHmK4mGoIJb6etmF9dk0xVo
    volumes:
      - db_data:/var/lib/mysql
    restart: unless-stopped
    healthcheck:
      test: ["CMD-SHELL", "mysqladmin ping -h localhost"]
      interval: 10s
      timeout: 5s
      retries: 5

volumes:
  wordpress_data:
  db_data:

networks:
  traefik-public:
    external: true`}
Key things Server Compass handles for you:
Feature
How it works
SSL Certificates
Traefik labels automatically request Let's Encrypt certificates
HTTPS Redirect
HTTP requests are redirected to HTTPS
WWW Redirect
www.yourdomain.com redirects to yourdomain.com
Database Health
MySQL waits until healthy before WordPress starts
Persistent Data
Docker volumes keep your data safe across restarts
You don't need to edit these files — Server Compass manages everything. But it's helpful to understand what's running on your server.
Step 2.3 - Complete the WordPress setup wizard
After connecting your domain (Step 3), click "Open" to visit your WordPress site:
- You should see a green padlock (HTTPS is working) and the WordPress installation wizard
- Select your language and click "Continue"
- Enter your site details:
Field
Recommendation
Site Title
Your website name
Username
Something other than "admin" (for security)
Password
Use the strong password WordPress suggests
Your email address
- Click "Install WordPress"
Congratulations! Your WordPress site is now live with HTTPS.
Step 3 - Connect Your Domain
Now let's connect your domain to your WordPress site. Server Compass handles SSL certificates automatically through Traefik and Let's Encrypt.
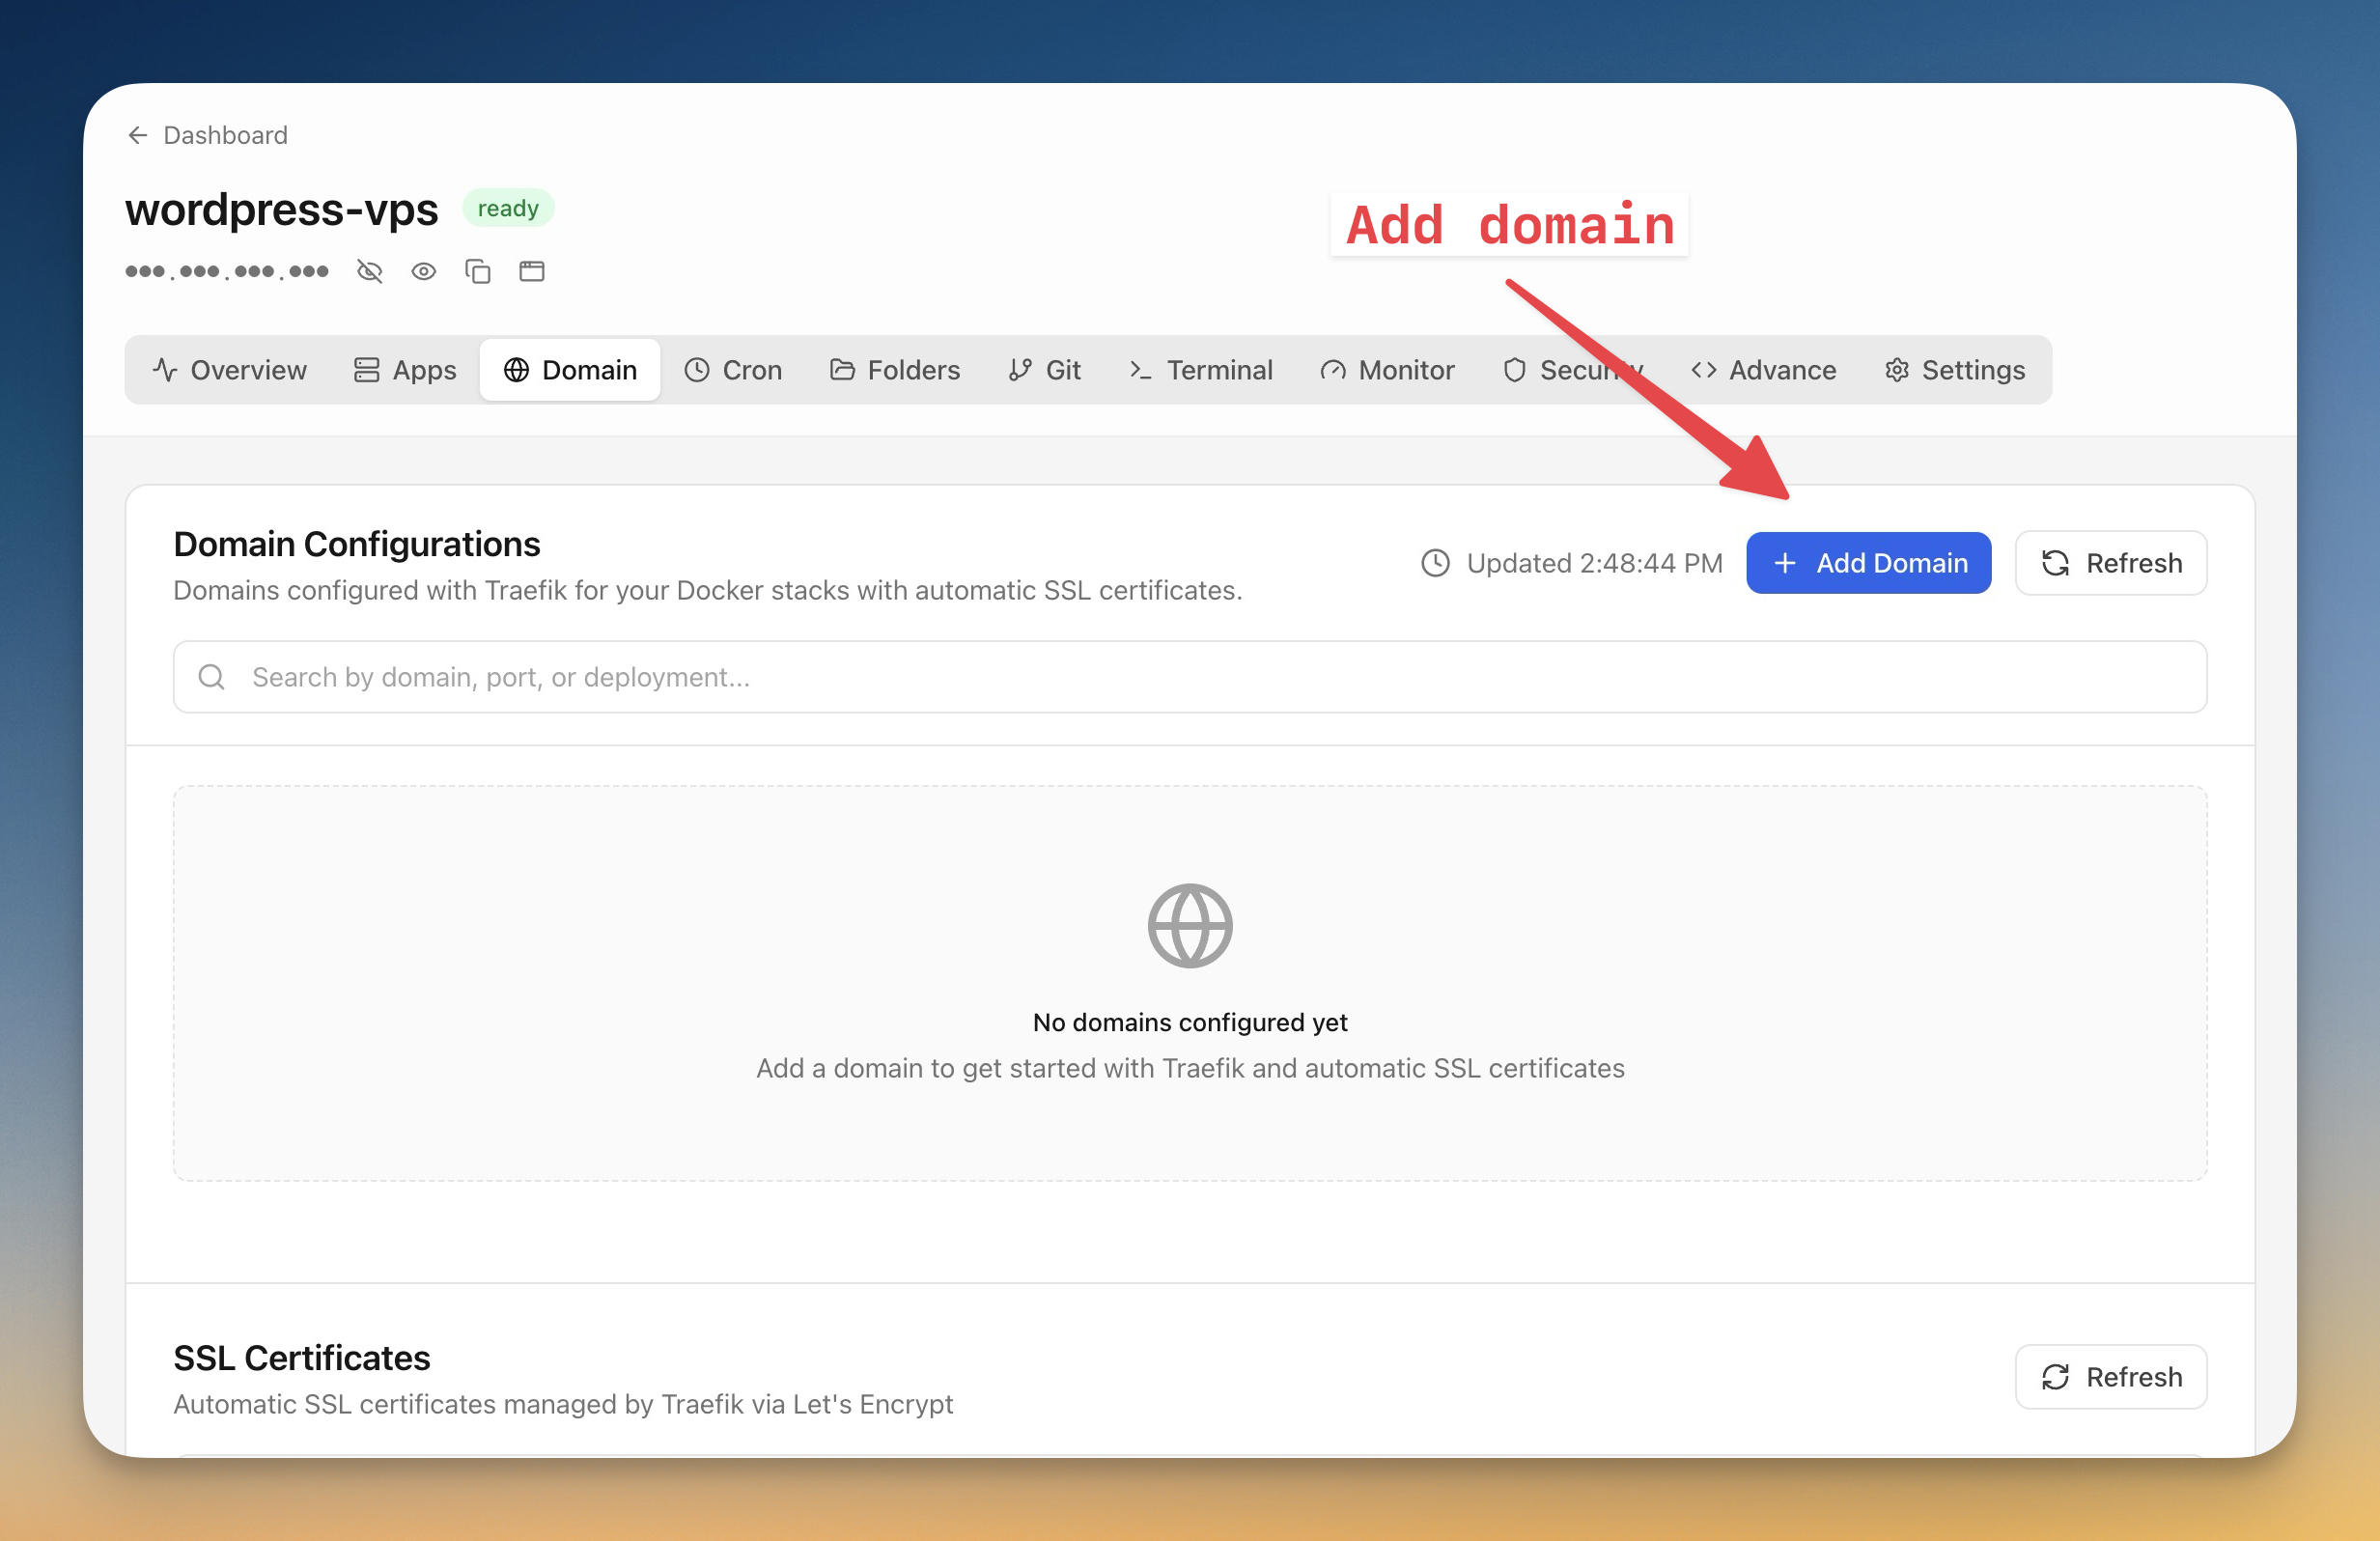
Step 3.1 - Open the Domain tab
- Click on your server to open its detail page
- Click the "Domain" tab
- Click "+ Add Domain"
Step 3.2 - Configure domain settings
Fill in the domain configuration:
- Traefik Setup Required — Enter your email for Let's Encrypt SSL certificate notifications, then click "Install Traefik" (first time only)
- Domain Name — Enter your domain (e.g.,
yourdomain.com) - Application Port — Select your WordPress container (
wordpress-wordpress-1) from the list - Enable SSL certificate — Keep this checked for automatic HTTPS
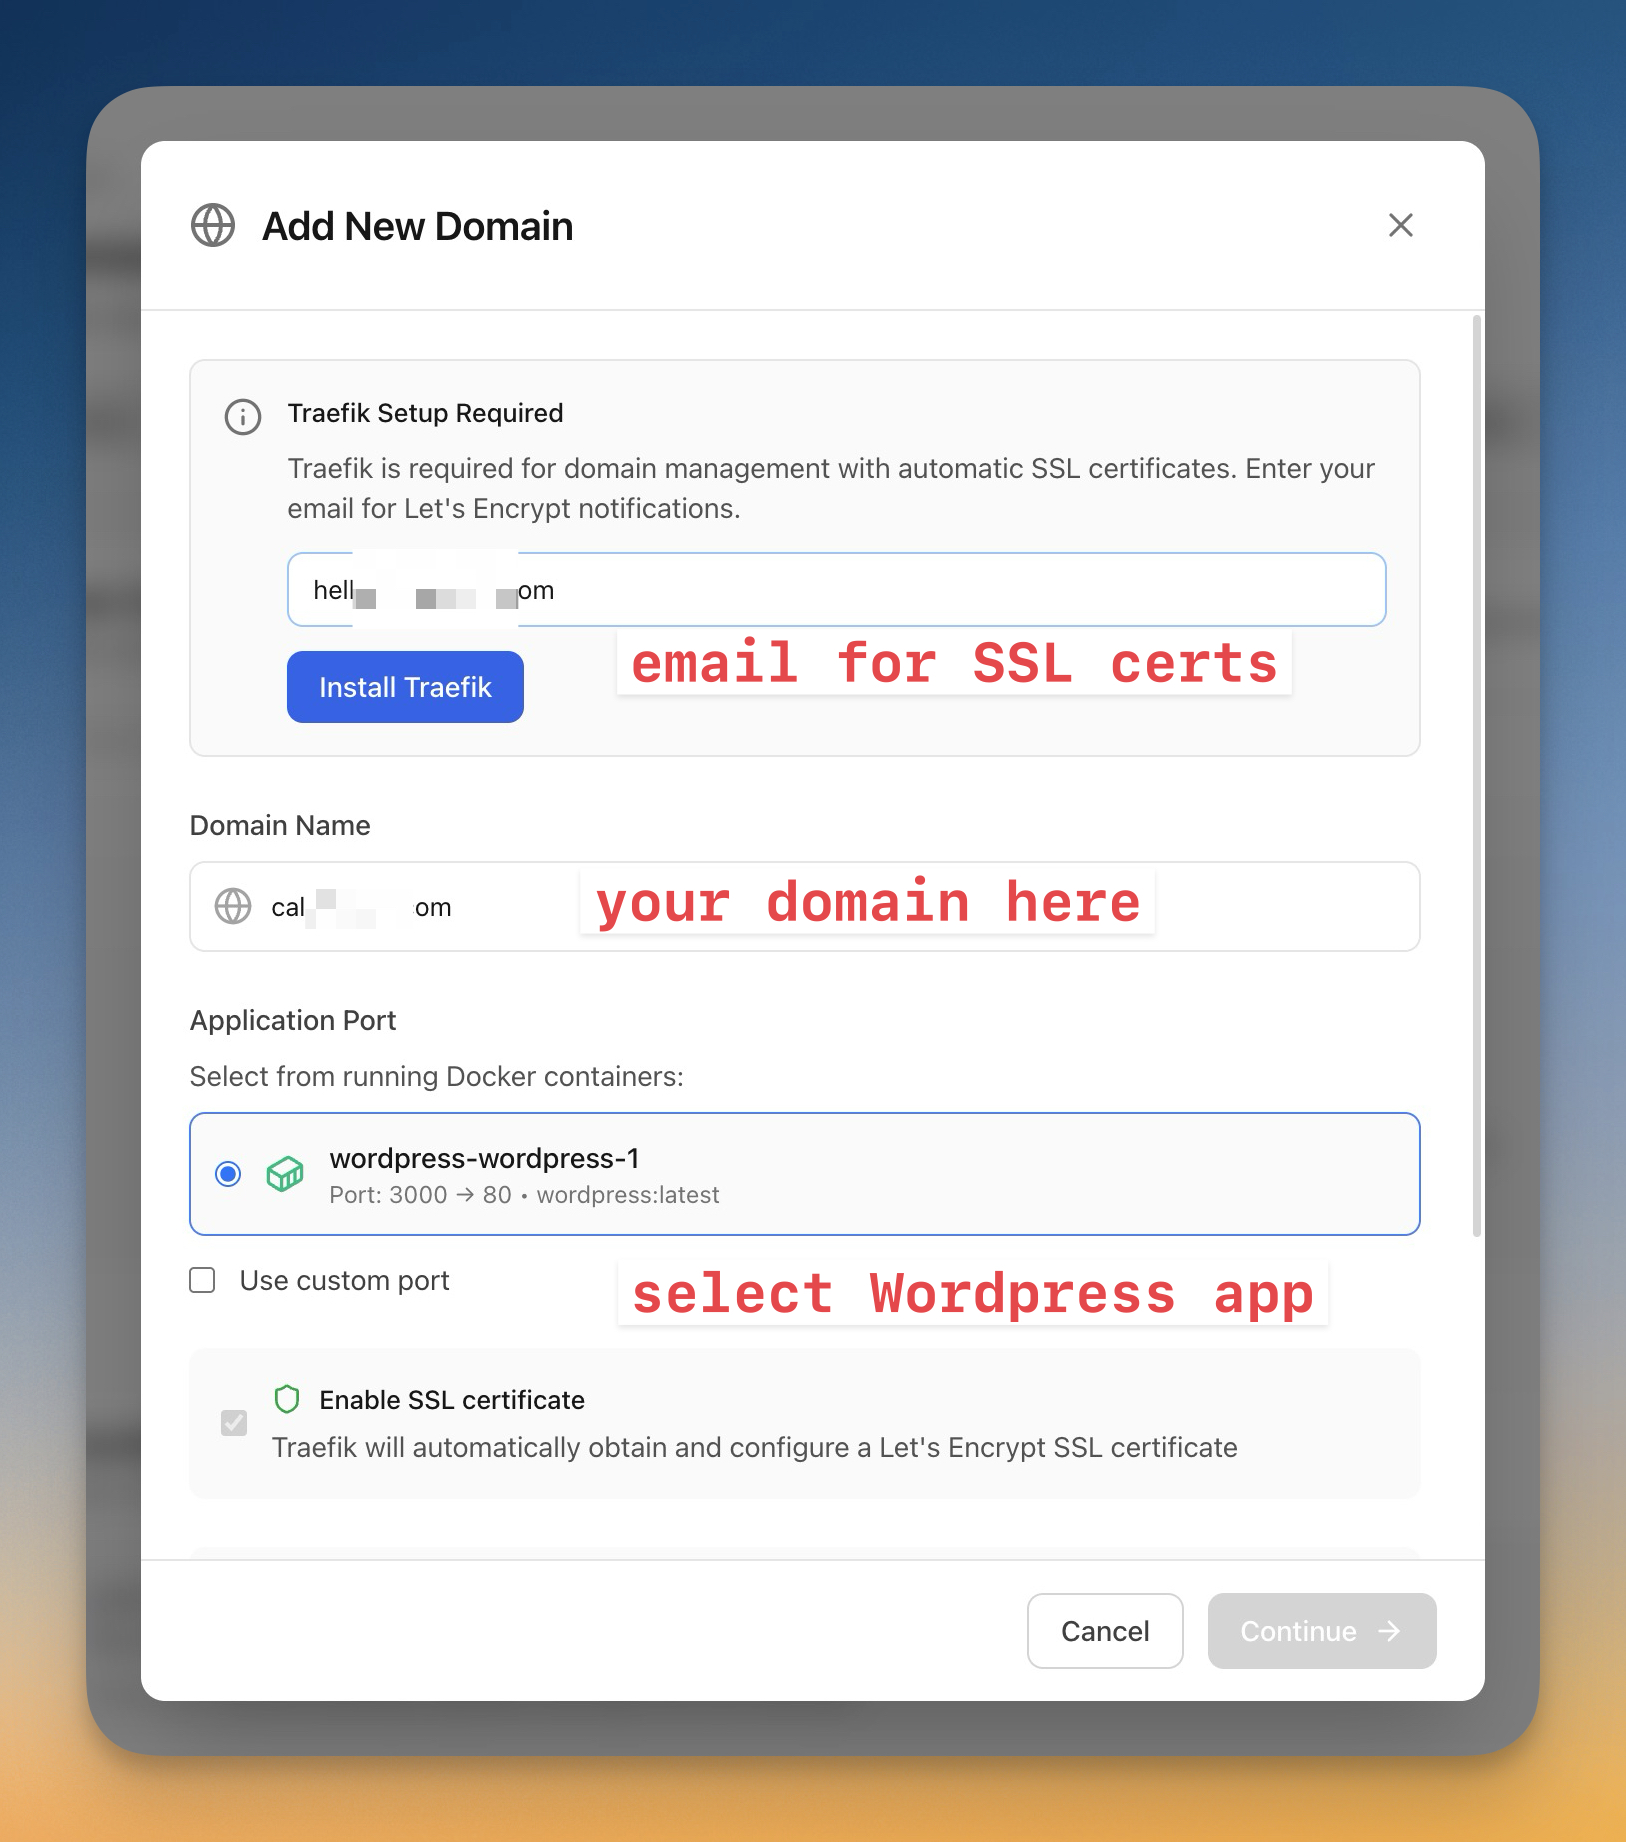
Click "Continue" to proceed.
Step 3.3 - Configure DNS at your registrar
Server Compass shows you your VPS IP address and verifies your DNS configuration:
- Copy your VPS IP address shown on screen
- Go to your domain registrar's DNS settings
- Create an A record pointing to your server's IP:
Type
Host
Value
TTL
A
@
Your VPS IP (shown in Server Compass)
300
A
www
Your VPS IP
300
Important: If using Cloudflare, turn off the proxy (orange cloud -> grey cloud) before verifying. You can enable it again after SSL is configured.
Once DNS is configured correctly, you'll see "Domain verified successfully" and "DNS Configuration Verified!":
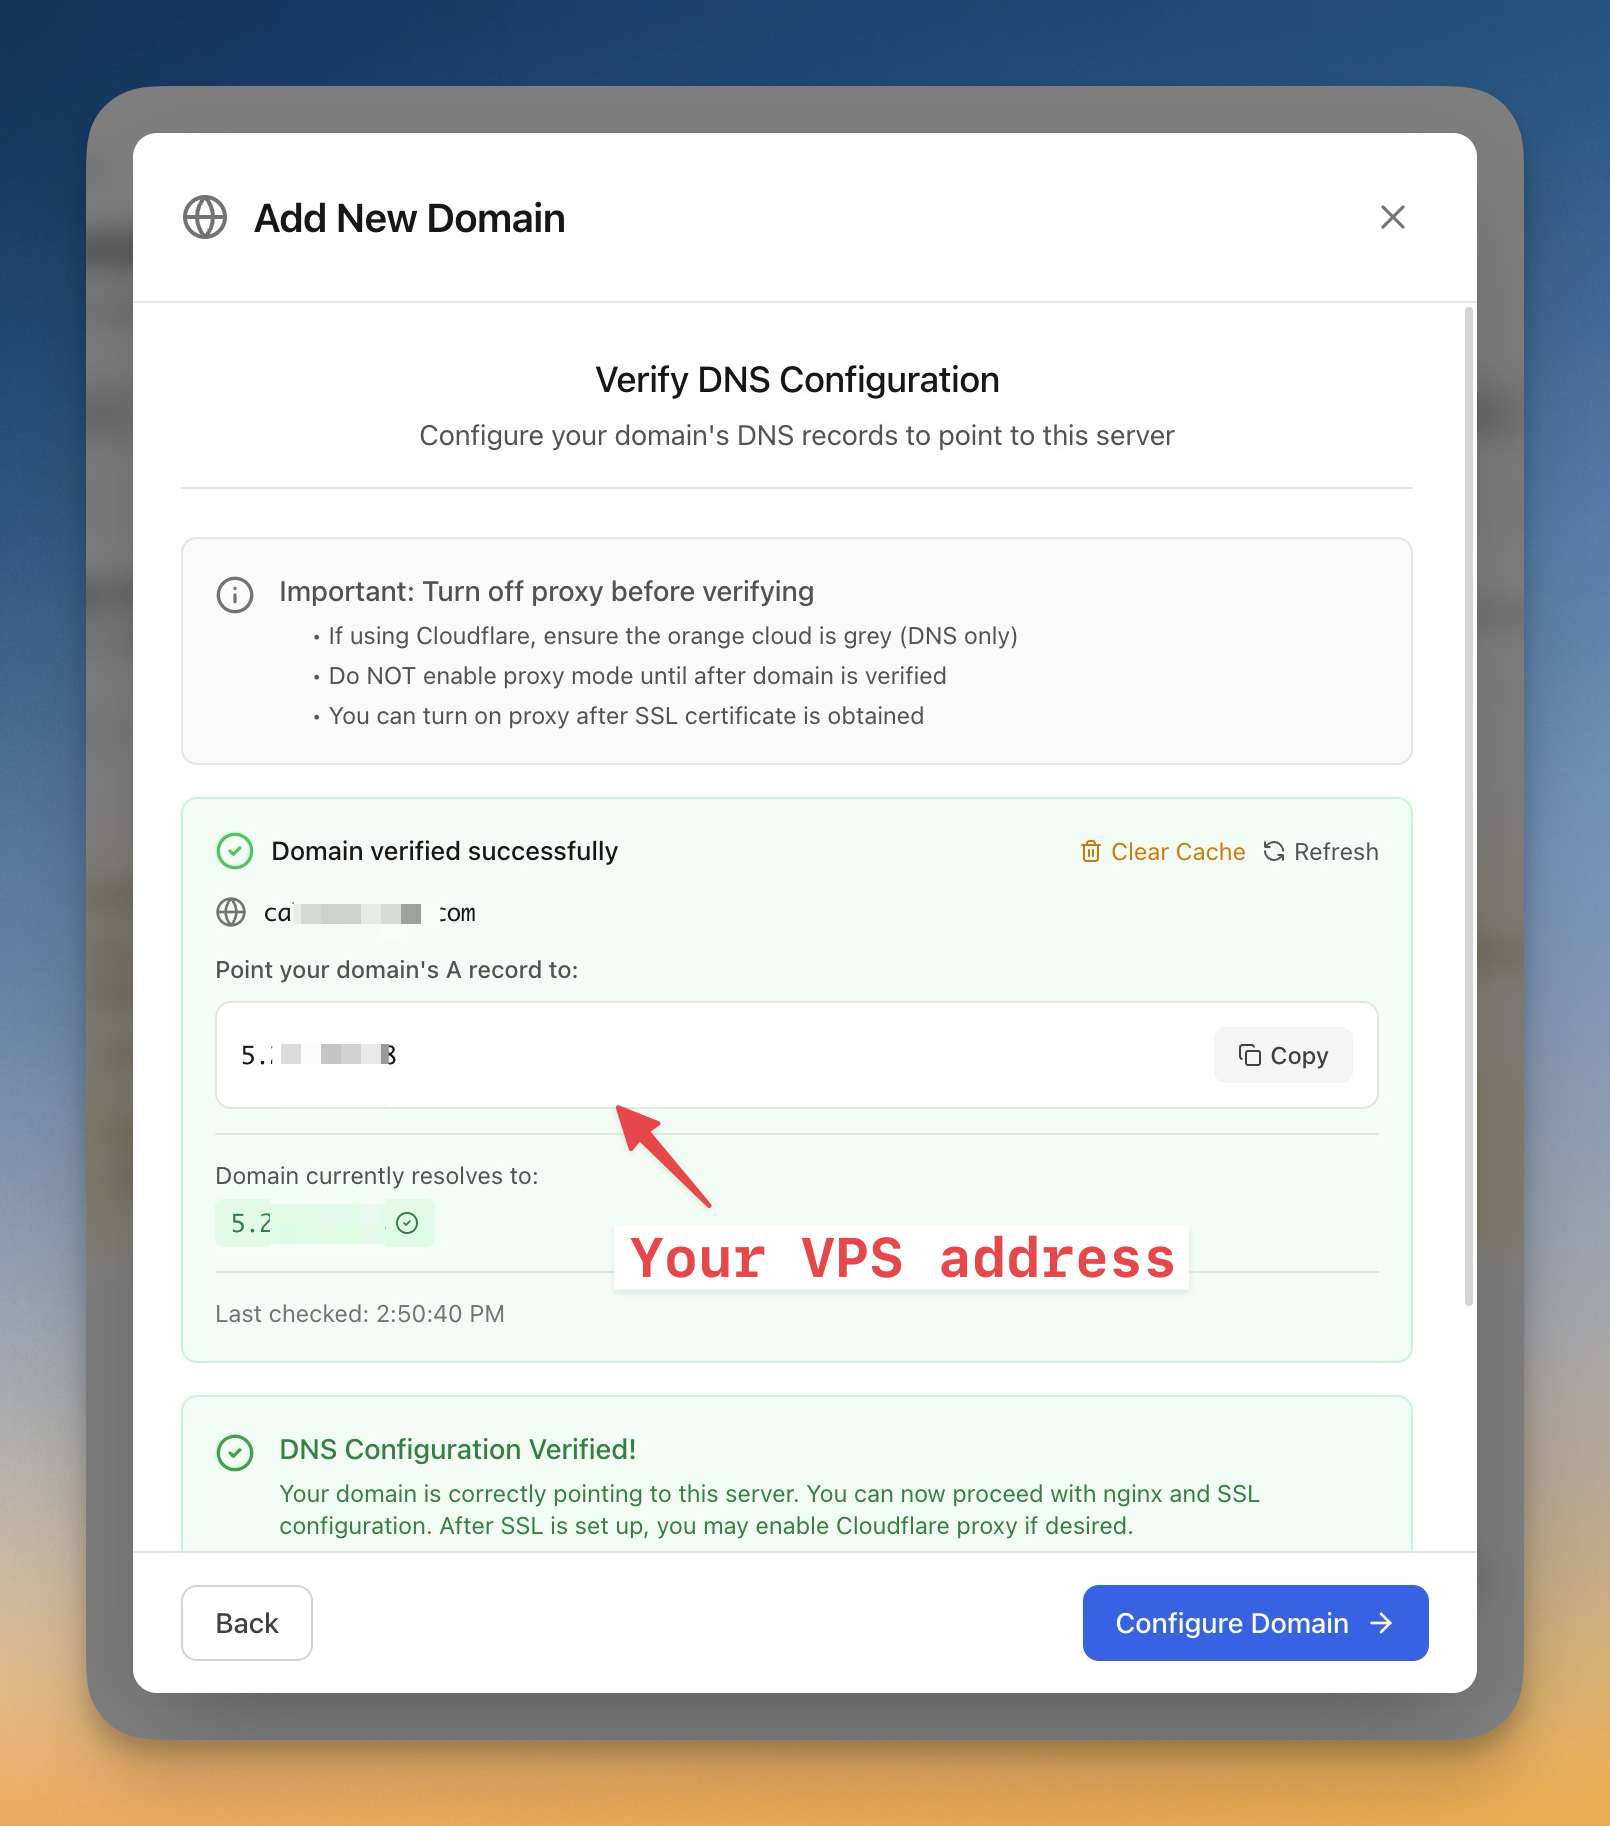
Click "Configure Domain" to complete the setup.
Step 3.4 - Domain connected with SSL
Your domain is now connected. Back on the Apps tab, you'll see your WordPress app now shows the HTTPS domain:
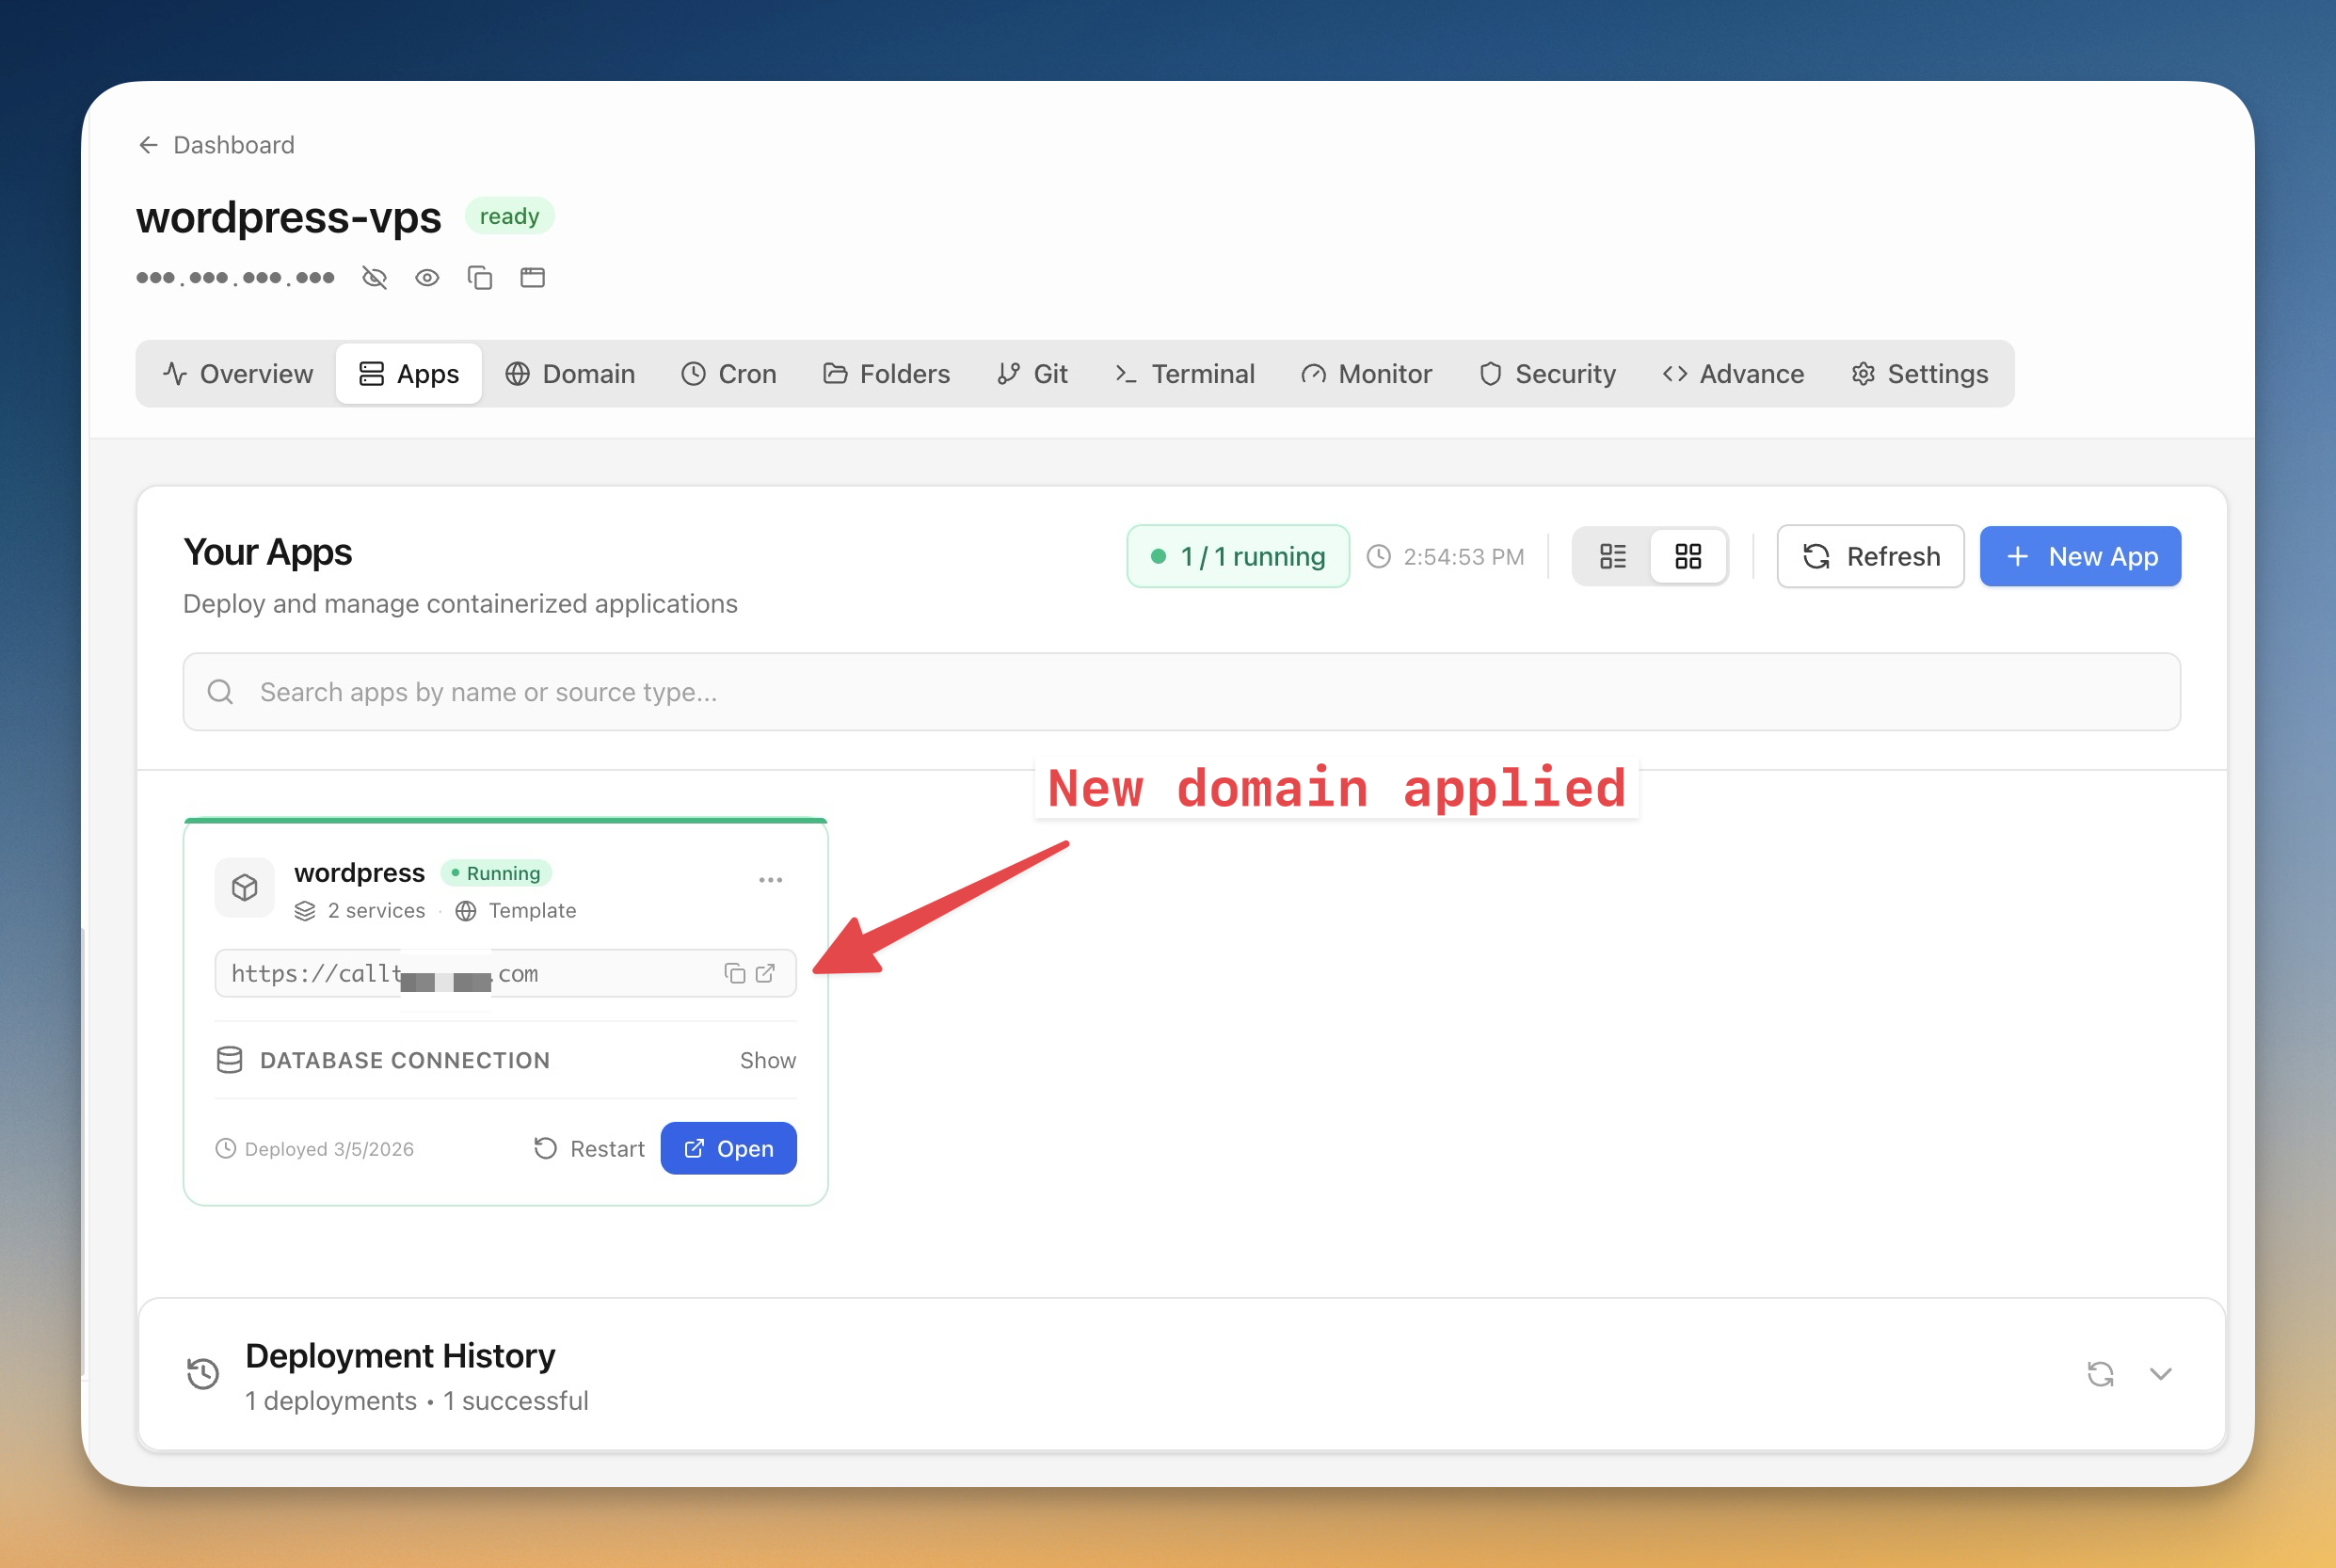
Server Compass automatically:
- Configured Traefik to route traffic to your WordPress app
- Obtained a free SSL certificate from Let's Encrypt
- Enabled HTTPS for your site
Click "Open" to visit your WordPress site with HTTPS enabled. You can now complete the WordPress setup wizard (Step 2.3).
Step 4 - WordPress Database Management & Backup
Server Compass provides tools for managing your WordPress database and creating backups.
Step 4.1 - Access the database
- Click on your WordPress app to open its detail page
- Click the "Database" tab
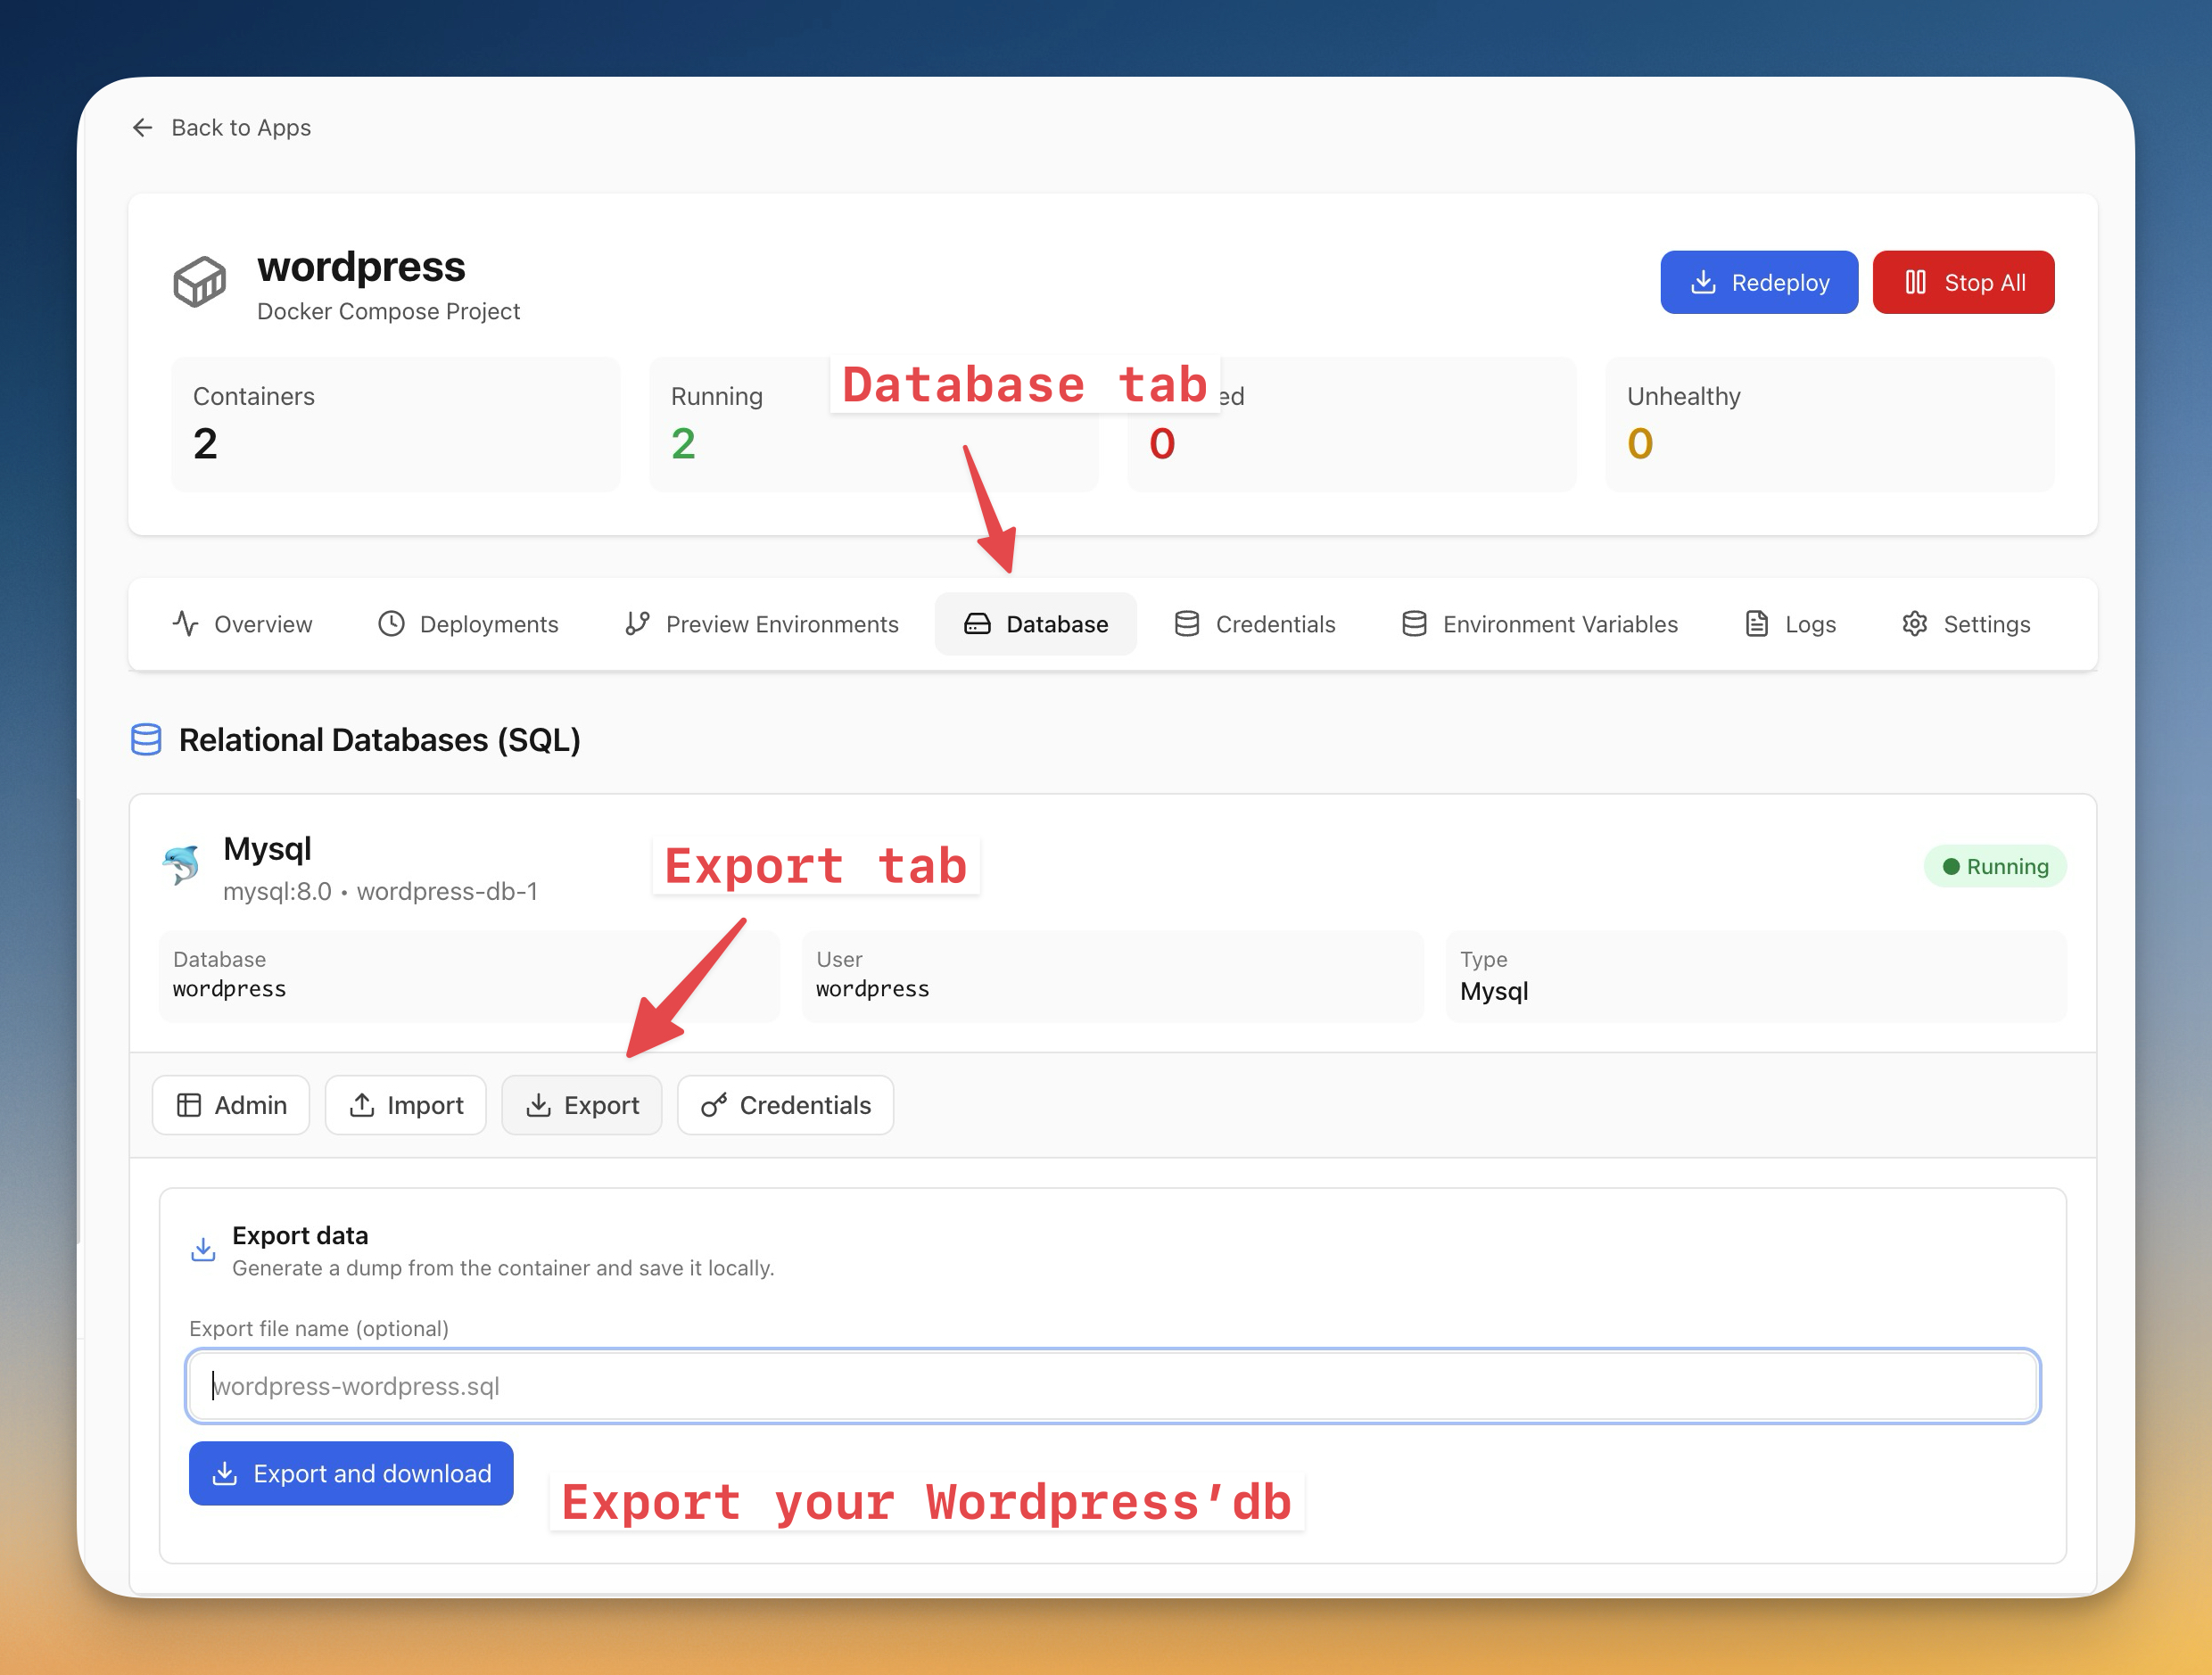
You'll see your MySQL database with these options:
Button
Function
Admin
Open database admin interface
Import
Import a SQL dump file
Export
Export/backup your database
Credentials
View database connection details
Step 4.2 - Export your database (backup)
To create a database backup:
- Click the "Export" tab
- Enter a filename (e.g.,
wordpress-backup.sql) - Click "Export and download"
This downloads a SQL dump file to your computer — save it somewhere safe.
Step 4.3 - Import a database
To restore or migrate a database:
- Click the "Import" tab
- Select your SQL dump file
- Click "Import"
This is useful for:
- Restoring from a backup
- Migrating from another WordPress installation
- Bulk-updating URLs after a domain change
Step 4.4 - Update WordPress
- Click on your WordPress app
- Click "Redeploy" to pull the latest image
Your data persists because it's stored in Docker volumes, not inside the container.
Tip: Always export your database before updating.
Step 5 - Host Multiple WordPress Sites
The power of this setup is running multiple sites efficiently on one server. Simply repeat the process.
Step 5.1 - Add another WordPress site
- On your server's Apps tab, click "+ New App"
- Select "App Template" — search for WordPress
- Configure with a different project name:
Field
Site 1
Site 2
Project Name
wordpress
portfolio
- Click "Deploy"
- Once deployed, go to the Domain tab and add a domain for the new site (same as Step 3)
Server Compass handles everything automatically — Traefik detects the new container, routes traffic for the second domain, and obtains a new SSL certificate.
Step 5.2 - How multiple sites work together
Traefik inspects incoming requests and routes them based on the domain:
Request to site1.com -> WordPress container "wordpress"
Request to site2.com -> WordPress container "second-wordpress"
Request to site3.com -> WordPress container "wordpress-site3"
Each site is completely isolated with its own:
- WordPress installation
- MySQL database
- SSL certificate
- Docker volumes
You can host 10+ sites on a single server (given adequate RAM).
Step 5.3 - Verify your sites
In Server Compass, you'll see all your WordPress apps listed with their domains and status:
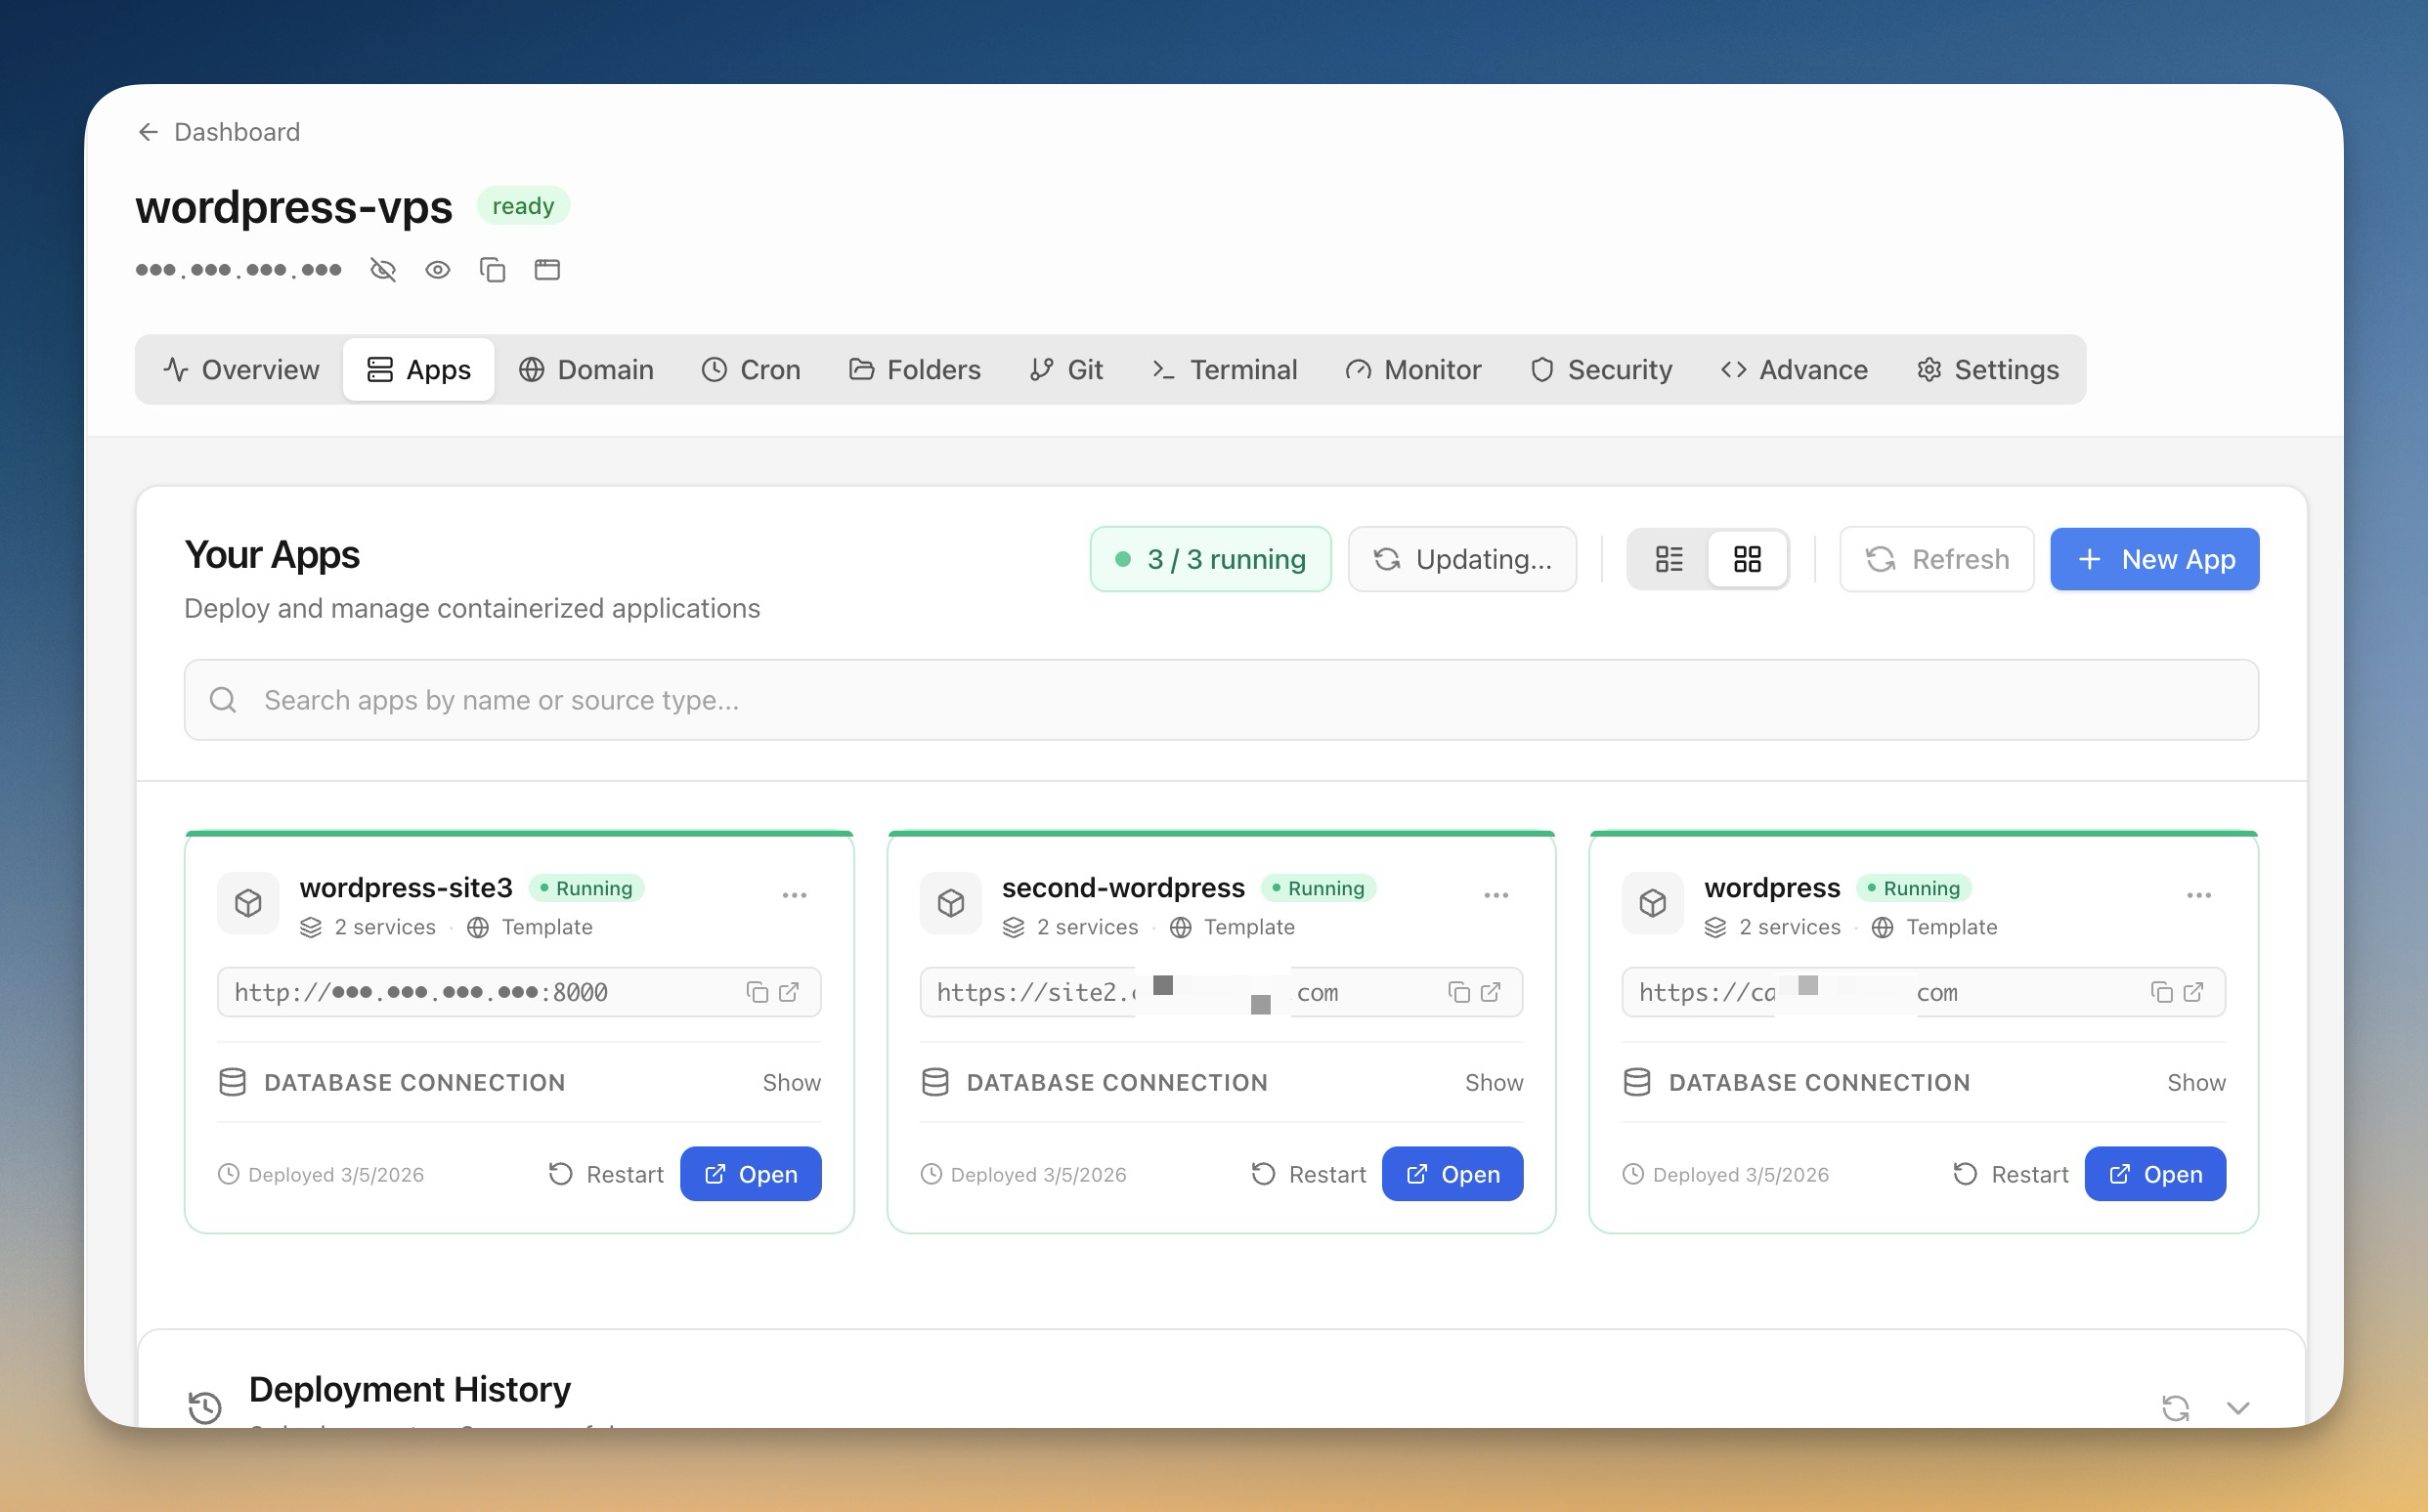
Each app shows:
- Running status (green indicator)
- 2 services (WordPress + MySQL)
- HTTPS domain configured
- Open button to visit the site
Visit each domain in your browser to confirm HTTPS is working.
Conclusion
You now have a production-ready setup for hosting multiple WordPress sites on a single Hetzner Cloud server. Each site runs in isolated Docker containers with automatic SSL certificates from Let's Encrypt.
What you've accomplished:
- Set up Server Compass with SSH key authentication
- Created a Hetzner Cloud server
- Installed Docker and Traefik with one click
- Deployed WordPress with automatic SSL
- Connected your domain
- Learned how to manage, backup, and host multiple sites
Cost comparison:
Hosting Approach
3 WordPress Sites
Annual Cost
Managed WordPress Hosting
$15-30/site/month
$540-1,080
This setup (Hetzner CX12)
€4.35/month total
€52.20 (~$57)
That's roughly 90% savings while maintaining full control over your infrastructure.
Next steps:
- Add more WordPress sites by repeating Step 2
- Set up automated backups
- Configure email sending with an SMTP plugin
- Add uptime monitoring with a service like UptimeRobot
Related in the StoicSoft network
If you're self-hosting on a VPS or working through a deployment guide like the one above, DeployToVPS is the StoicSoft network's handbook for VPS deployment recipes — docker-compose, nginx, traefik, and common app self-hosts.
From across the StoicSoft network
Hand-curated reads on the same topic from sister sites in the StoicSoft family.
 1DevTool11 min read
Self-Hosted AI Coding Assistant Workflow: Practical Setup Guide
A self-hosted AI coding workflow needs more than model hosting. You need environment control, connector governance, and reproducible operations. This guide covers the practical stack.
Read on 1devtool.com 1DevTool10 min read
Docker Desktop Alternatives for Developers in 2026
Developers want a Docker workflow that stays close to code, logs, and AI agents. This comparison breaks down Docker Desktop alternatives by performance, observability, and daily usability.
Read on 1devtool.com