March 6, 2026
Deploy Docker Containers to VPS Without Kubernetes (Simple Guide)
Learn how to deploy Docker containers to your VPS without the complexity of Kubernetes. This comprehensive guide covers Docker installation, Dockerfile creation, Docker Compose, Traefik reverse proxy, and container management for production workloads.

Kubernetes is powerful, but for most projects it's overkill. If you're deploying a web app, API, or side project to a VPS, you don't need a container orchestration platform designed for thousands of nodes. You need Docker, Docker Compose, and maybe a reverse proxy.
This guide shows you how to deploy Docker containers to your VPS the simple way — no Kubernetes, no complex YAML manifests, no steep learning curve. Just straightforward container deployment that scales from side projects to production workloads.
By the end of this guide, you'll know how to install Docker, write Dockerfiles, use Docker Compose for multi-container apps, set up Traefik for automatic SSL, manage persistent data, and keep your containers running reliably.
Why Docker on VPS Beats Kubernetes for Most Projects
Before we dive in, let's address the elephant in the room: when does Kubernetes actually make sense?
Kubernetes shines when you need:
- Horizontal auto-scaling across multiple nodes
- Automated failover between physical machines
- Multi-region deployments with complex networking
- Teams of 10+ engineers managing hundreds of microservices
For everyone else — indie developers, small teams, agencies, and most startups — Docker on a single VPS (or a few VPS instances) is simpler, cheaper, and faster to set up.
Here's the reality: a $20/month VPS with 4 CPUs and 8GB RAM can handle more traffic than most applications will ever see. Add Docker Compose for container orchestration and Traefik for SSL termination, and you have a production-ready stack in under an hour.
With Kubernetes, you'd spend days learning concepts like Pods, Deployments, Services, Ingress Controllers, ConfigMaps, Secrets, and PersistentVolumeClaims — all before deploying your first container.
Prerequisites
Before you start, make sure you have:
- A VPS with Ubuntu 22.04 or 24.04 — Hetzner, DigitalOcean, Linode, Vultr, or any provider works. Minimum 1GB RAM, 2GB+ recommended.
- SSH access — You should be able to connect via
ssh root@your-server-ipor with a sudo-enabled user. - A domain name (optional but recommended) — Required for SSL certificates. Point an A record to your VPS IP.
- Basic terminal knowledge — You should be comfortable running commands and editing files.
Don't have a VPS yet? Hetzner offers excellent value at $4-6/month for capable servers. DigitalOcean and Vultr are also solid choices starting at $5-6/month.
Step 1: Install Docker on Ubuntu VPS
First, SSH into your server and update the package list:
ssh root@your-server-ip

# Update packages
apt update && apt upgrade -y
The easiest way to install Docker is using the official convenience script:
# Install Docker using the official script
curl -fsSL https://get.docker.com -o get-docker.sh
sh get-docker.sh

# Verify installation
docker --version
# Docker version 26.x.x, build xxxxx

# Check Docker is running
systemctl status docker
If you're using a non-root user, add them to the docker group:
# Add your user to docker group (replace 'username' with your actual username)
usermod -aG docker username

# Log out and back in for group changes to take effect
exit
ssh username@your-server-ip

# Verify you can run docker without sudo
docker ps
Docker Compose comes bundled with modern Docker installations as a plugin. Verify it's available:
# Check Docker Compose version
docker compose version
# Docker Compose version v2.x.x
Step 2: Basic Docker Commands
Before deploying your app, let's cover the essential Docker commands you'll use daily:
# Pull an image from Docker Hub
docker pull nginx:alpine

# Run a container
docker run -d --name my-nginx -p 80:80 nginx:alpine

# List running containers
docker ps

# List all containers (including stopped)
docker ps -a

# View container logs
docker logs my-nginx
docker logs -f my-nginx  # Follow logs in real-time

# Stop a container
docker stop my-nginx

# Start a stopped container
docker start my-nginx

# Remove a container
docker rm my-nginx

# Remove a container forcefully (even if running)
docker rm -f my-nginx

# List images
docker images

# Remove an image
docker rmi nginx:alpine

# Execute a command inside a running container
docker exec -it my-nginx /bin/sh

# View container resource usage
docker stats
These commands form the foundation of Docker operations. You'll use them constantly for debugging, monitoring, and managing containers.
Step 3: Create a Dockerfile for Your App
A Dockerfile tells Docker how to build your application into a container image. Here are optimized Dockerfiles for common frameworks:
Node.js / Express Dockerfile
# Use official Node.js LTS image
FROM node:20-alpine AS builder

WORKDIR /app

# Copy package files first (better layer caching)
COPY package*.json ./

# Install dependencies
RUN npm ci --only=production

# Copy application code
COPY . .

# Production stage
FROM node:20-alpine AS runner

WORKDIR /app

# Create non-root user for security
RUN addgroup -g 1001 -S nodejs && adduser -S nodejs -u 1001

# Copy from builder
COPY --from=builder --chown=nodejs:nodejs /app ./

USER nodejs

EXPOSE 3000

CMD ["node", "server.js"]
Next.js Dockerfile
FROM node:20-alpine AS deps
WORKDIR /app
COPY package.json pnpm-lock.yaml* ./
RUN corepack enable && pnpm install --frozen-lockfile

FROM node:20-alpine AS builder
WORKDIR /app
COPY --from=deps /app/node_modules ./node_modules
COPY . .
RUN corepack enable && pnpm run build

FROM node:20-alpine AS runner
WORKDIR /app

ENV NODE_ENV=production

RUN addgroup -g 1001 -S nodejs && adduser -S nextjs -u 1001

COPY --from=builder /app/public ./public
COPY --from=builder --chown=nextjs:nodejs /app/.next/standalone ./
COPY --from=builder --chown=nextjs:nodejs /app/.next/static ./.next/static

USER nextjs

EXPOSE 3000

CMD ["node", "server.js"]
Note: For Next.js, add output: 'standalone' to your next.config.js to enable the standalone build mode used above.
Python (Flask/FastAPI) Dockerfile
FROM python:3.12-slim AS builder

WORKDIR /app

# Install dependencies
COPY requirements.txt .
RUN pip install --no-cache-dir --user -r requirements.txt

# Production stage
FROM python:3.12-slim

WORKDIR /app

# Create non-root user
RUN useradd -m -u 1001 appuser

# Copy dependencies from builder
COPY --from=builder /root/.local /home/appuser/.local

# Copy application code
COPY --chown=appuser:appuser . .

USER appuser

ENV PATH=/home/appuser/.local/bin:$PATH

EXPOSE 8000

# For FastAPI with Uvicorn
CMD ["uvicorn", "main:app", "--host", "0.0.0.0", "--port", "8000"]

# For Flask with Gunicorn
# CMD ["gunicorn", "--bind", "0.0.0.0:8000", "app:app"]
Go Dockerfile
FROM golang:1.22-alpine AS builder

WORKDIR /app

COPY go.mod go.sum ./
RUN go mod download

COPY . .
RUN CGO_ENABLED=0 GOOS=linux go build -o /app/main .

FROM alpine:3.19

RUN adduser -D -g '' appuser

COPY --from=builder /app/main /app/main

USER appuser

EXPOSE 8080

CMD ["/app/main"]
Need help generating a Dockerfile? Try our Dockerfile Generator — select your framework and get an optimized, production-ready Dockerfile instantly.
Step 4: Build and Run Your Container
With your Dockerfile ready, build and run your container:
# Navigate to your project directory
cd /var/www/myapp

# Build the Docker image
docker build -t myapp:latest .

# Run the container
docker run -d \\
  --name myapp \\
  -p 3000:3000 \\
  --restart unless-stopped \\
  myapp:latest

# Verify it's running
docker ps

# Check logs
docker logs myapp
The --restart unless-stopped flag ensures your container automatically restarts after server reboots or crashes.
Test your app by visiting http://your-server-ip:3000.
Step 5: Docker Compose for Multi-Container Apps
Docker Compose is where the magic happens for multi-container applications. Instead of running multiple docker run commands, you define everything in a single docker-compose.yml file.
Basic Example: Node.js + PostgreSQL + Redis
# docker-compose.yml
services:
  app:
    build: .
    ports:
      - "3000:3000"
    environment:
      - DATABASE_URL=postgresql://postgres:secretpassword@db:5432/myapp
      - REDIS_URL=redis://cache:6379
    depends_on:
      db:
        condition: service_healthy
      cache:
        condition: service_started
    restart: unless-stopped

  db:
    image: postgres:16-alpine
    environment:
      POSTGRES_USER: postgres
      POSTGRES_PASSWORD: secretpassword
      POSTGRES_DB: myapp
    volumes:
      - postgres_data:/var/lib/postgresql/data
    healthcheck:
      test: ["CMD-SHELL", "pg_isready -U postgres"]
      interval: 5s
      timeout: 5s
      retries: 5
    restart: unless-stopped

  cache:
    image: redis:7-alpine
    volumes:
      - redis_data:/data
    restart: unless-stopped

volumes:
  postgres_data:
  redis_data:
Full Stack Example: Next.js + PostgreSQL + MinIO (S3-compatible storage)
# docker-compose.yml
services:
  app:
    build:
      context: .
      dockerfile: Dockerfile
    ports:
      - "3000:3000"
    environment:
      - DATABASE_URL=postgresql://postgres:secretpassword@db:5432/myapp
      - S3_ENDPOINT=http://minio:9000
      - S3_ACCESS_KEY=minioadmin
      - S3_SECRET_KEY=minioadmin
      - S3_BUCKET=uploads
    depends_on:
      db:
        condition: service_healthy
    restart: unless-stopped

  db:
    image: postgres:16-alpine
    environment:
      POSTGRES_USER: postgres
      POSTGRES_PASSWORD: secretpassword
      POSTGRES_DB: myapp
    volumes:
      - postgres_data:/var/lib/postgresql/data
    healthcheck:
      test: ["CMD-SHELL", "pg_isready -U postgres"]
      interval: 5s
      timeout: 5s
      retries: 5
    restart: unless-stopped

  minio:
    image: minio/minio:latest
    command: server /data --console-address ":9001"
    ports:
      - "9000:9000"   # API
      - "9001:9001"   # Console
    environment:
      MINIO_ROOT_USER: minioadmin
      MINIO_ROOT_PASSWORD: minioadmin
    volumes:
      - minio_data:/data
    restart: unless-stopped

volumes:
  postgres_data:
  minio_data:
Essential Docker Compose Commands
# Start all services (build if necessary)
docker compose up -d

# Start and rebuild images
docker compose up -d --build

# Stop all services
docker compose down

# Stop and remove volumes (careful - destroys data!)
docker compose down -v

# View logs for all services
docker compose logs

# View logs for specific service
docker compose logs app

# Follow logs in real-time
docker compose logs -f

# Restart a specific service
docker compose restart app

# Scale a service (if stateless)
docker compose up -d --scale app=3

# Execute command in running container
docker compose exec app sh

# Pull latest images
docker compose pull

# View running services
docker compose ps
Step 6: Persistent Data with Volumes
Containers are ephemeral by default — when you remove a container, its data is gone. Volumes persist data outside the container lifecycle.
Named Volumes (Recommended)
services:
  db:
    image: postgres:16-alpine
    volumes:
      - postgres_data:/var/lib/postgresql/data

volumes:
  postgres_data:
    # Docker manages this volume automatically
Named volumes are managed by Docker and stored in /var/lib/docker/volumes/. They're portable, easy to backup, and survive container updates.
Bind Mounts (For Specific Use Cases)
services:
  app:
    image: nginx:alpine
    volumes:
      # Mount local directory into container
      - ./nginx.conf:/etc/nginx/nginx.conf:ro
      - ./html:/usr/share/nginx/html:ro
Bind mounts link a specific path on your host to a path in the container. Use them for config files or when you need direct host filesystem access.
Backing Up Volumes
# Backup a named volume to a tar file
docker run --rm \\
  -v postgres_data:/data \\
  -v $(pwd):/backup \\
  alpine tar cvf /backup/postgres_backup.tar /data

# Restore a volume from backup
docker run --rm \\
  -v postgres_data:/data \\
  -v $(pwd):/backup \\
  alpine tar xvf /backup/postgres_backup.tar -C /
Step 7: Networking and Port Mapping
Docker Compose automatically creates a network for your services. Containers can communicate using their service names as hostnames.
services:
  app:
    # Can connect to "db" and "cache" by name
    environment:
      - DATABASE_URL=postgresql://user:pass@db:5432/myapp
      - REDIS_URL=redis://cache:6379

  db:
    image: postgres:16-alpine
    # No ports exposed - only accessible within Docker network

  cache:
    image: redis:7-alpine
    # No ports exposed - only accessible within Docker network
Only expose ports you need for external access. In the example above, only the app is accessible from outside — the database and cache are isolated to the internal Docker network.
Port Mapping Explained
ports:
  - "3000:3000"     # host:container - accessible from anywhere
  - "127.0.0.1:5432:5432"  # Only accessible from localhost
  - "8080:80"       # Map host port 8080 to container port 80
Custom Networks
services:
  app:
    networks:
      - frontend
      - backend

  db:
    networks:
      - backend

  nginx:
    networks:
      - frontend

networks:
  frontend:
  backend:
Custom networks let you isolate services. In this example, nginx can talk to app, and app can talk to db, but nginx cannot directly access db.
Step 8: Traefik for Reverse Proxy and SSL
Traefik is a modern reverse proxy that automatically discovers Docker containers and provisions SSL certificates from Let's Encrypt. It's the easiest way to get HTTPS running.
For pre-built configurations, check out our Traefik template in the template gallery.
Basic Traefik Setup
Create a directory structure:
mkdir -p /opt/traefik
cd /opt/traefik
touch docker-compose.yml traefik.yml acme.json
chmod 600 acme.json
Create the Traefik configuration:
# traefik.yml
api:
  dashboard: true

entryPoints:
  web:
    address: ":80"
    http:
      redirections:
        entryPoint:
          to: websecure
          scheme: https

  websecure:
    address: ":443"

providers:
  docker:
    endpoint: "unix:///var/run/docker.sock"
    exposedByDefault: false
    network: traefik-public

certificatesResolvers:
  letsencrypt:
    acme:
      email: [email protected]
      storage: /acme.json
      httpChallenge:
        entryPoint: web
Traefik Docker Compose
{`# docker-compose.yml (in /opt/traefik)
services:
  traefik:
    image: traefik:v3.0
    container_name: traefik
    restart: unless-stopped
    ports:
      - "80:80"
      - "443:443"
    volumes:
      - /var/run/docker.sock:/var/run/docker.sock:ro
      - ./traefik.yml:/traefik.yml:ro
      - ./acme.json:/acme.json
    networks:
      - traefik-public
    labels:
      # Enable Traefik dashboard
      - "traefik.enable=true"
      - "traefik.http.routers.dashboard.rule=Host(\`traefik.yourdomain.com\`)"
      - "traefik.http.routers.dashboard.service=api@internal"
      - "traefik.http.routers.dashboard.entrypoints=websecure"
      - "traefik.http.routers.dashboard.tls.certresolver=letsencrypt"
      - "traefik.http.routers.dashboard.middlewares=auth"
      # Basic auth for dashboard (generate with: htpasswd -nb admin password)
      - "traefik.http.middlewares.auth.basicauth.users=admin:$$apr1$$xxxxx"

networks:
  traefik-public:
    external: true`}
Create the external network and start Traefik:
# Create the shared network
docker network create traefik-public

# Start Traefik
cd /opt/traefik
docker compose up -d
Connecting Your App to Traefik
Update your application's docker-compose.yml to use Traefik:
{`# docker-compose.yml (your app)
services:
  app:
    build: .
    restart: unless-stopped
    networks:
      - traefik-public
      - default
    labels:
      - "traefik.enable=true"
      - "traefik.http.routers.myapp.rule=Host(\`myapp.yourdomain.com\`)"
      - "traefik.http.routers.myapp.entrypoints=websecure"
      - "traefik.http.routers.myapp.tls.certresolver=letsencrypt"
      - "traefik.http.services.myapp.loadbalancer.server.port=3000"

  db:
    image: postgres:16-alpine
    # ... db config (no traefik labels needed)

networks:
  traefik-public:
    external: true
  default:`}
That's it! Traefik automatically discovers your container, routes traffic to it, and provisions an SSL certificate. Visit https://myapp.yourdomain.com.
Multiple Apps on Single Server
{`# App 1 - /opt/app1/docker-compose.yml
services:
  app:
    build: .
    networks:
      - traefik-public
    labels:
      - "traefik.enable=true"
      - "traefik.http.routers.app1.rule=Host(\`app1.yourdomain.com\`)"
      - "traefik.http.routers.app1.entrypoints=websecure"
      - "traefik.http.routers.app1.tls.certresolver=letsencrypt"
      - "traefik.http.services.app1.loadbalancer.server.port=3000"

networks:
  traefik-public:
    external: true

# App 2 - /opt/app2/docker-compose.yml
services:
  app:
    build: .
    networks:
      - traefik-public
    labels:
      - "traefik.enable=true"
      - "traefik.http.routers.app2.rule=Host(\`app2.yourdomain.com\`)"
      - "traefik.http.routers.app2.entrypoints=websecure"
      - "traefik.http.routers.app2.tls.certresolver=letsencrypt"
      - "traefik.http.services.app2.loadbalancer.server.port=8000"

networks:
  traefik-public:
    external: true`}
Each app gets its own domain and SSL certificate, all routed through a single Traefik instance.
Step 9: Container Management (Logs, Restart Policies, Health Checks)
Restart Policies
services:
  app:
    restart: unless-stopped   # Restart unless manually stopped
    # Other options:
    # restart: always         # Always restart
    # restart: on-failure     # Only restart on failure
    # restart: "no"           # Never restart (default)
Health Checks
services:
  app:
    build: .
    healthcheck:
      test: ["CMD", "curl", "-f", "http://localhost:3000/health"]
      interval: 30s
      timeout: 10s
      retries: 3
      start_period: 40s
Health checks let Docker know if your container is actually working. If a container becomes unhealthy, Docker can restart it automatically.
Resource Limits
services:
  app:
    deploy:
      resources:
        limits:
          cpus: '0.5'
          memory: 512M
        reservations:
          cpus: '0.25'
          memory: 256M
Viewing and Managing Logs
# View last 100 lines
docker compose logs --tail=100 app

# Follow logs with timestamps
docker compose logs -f --timestamps app

# View logs since specific time
docker compose logs --since 2h app

# Configure log rotation in compose
services:
  app:
    logging:
      driver: "json-file"
      options:
        max-size: "10m"
        max-file: "3"
Updating Containers
# Pull latest images and recreate containers
docker compose pull
docker compose up -d

# Rebuild and update your app
docker compose up -d --build

# Remove old images
docker image prune -f
Skip the CLI: Server Compass Visual Docker Deployment
If you've followed this guide, you now understand how Docker deployment works on a VPS. But let's be honest — running these commands every time you deploy gets tedious fast.
Server Compass automates everything you just learned into a visual interface:
- One-click Docker installation — Server Compass detects if Docker is missing and installs it automatically.
- Visual Docker Compose editor — Write and validate your compose files with syntax highlighting and error detection.
- Automatic Traefik setup — SSL certificates provisioned automatically, zero configuration required.
- Framework detection — Point Server Compass at your GitHub repo and it generates an optimized Dockerfile for 16+ frameworks.
- GitHub Actions builds — Build Docker images on GitHub's infrastructure, not your VPS. Perfect for small servers.
- Real-time container monitoring — See CPU, memory, and status for all containers in one dashboard.
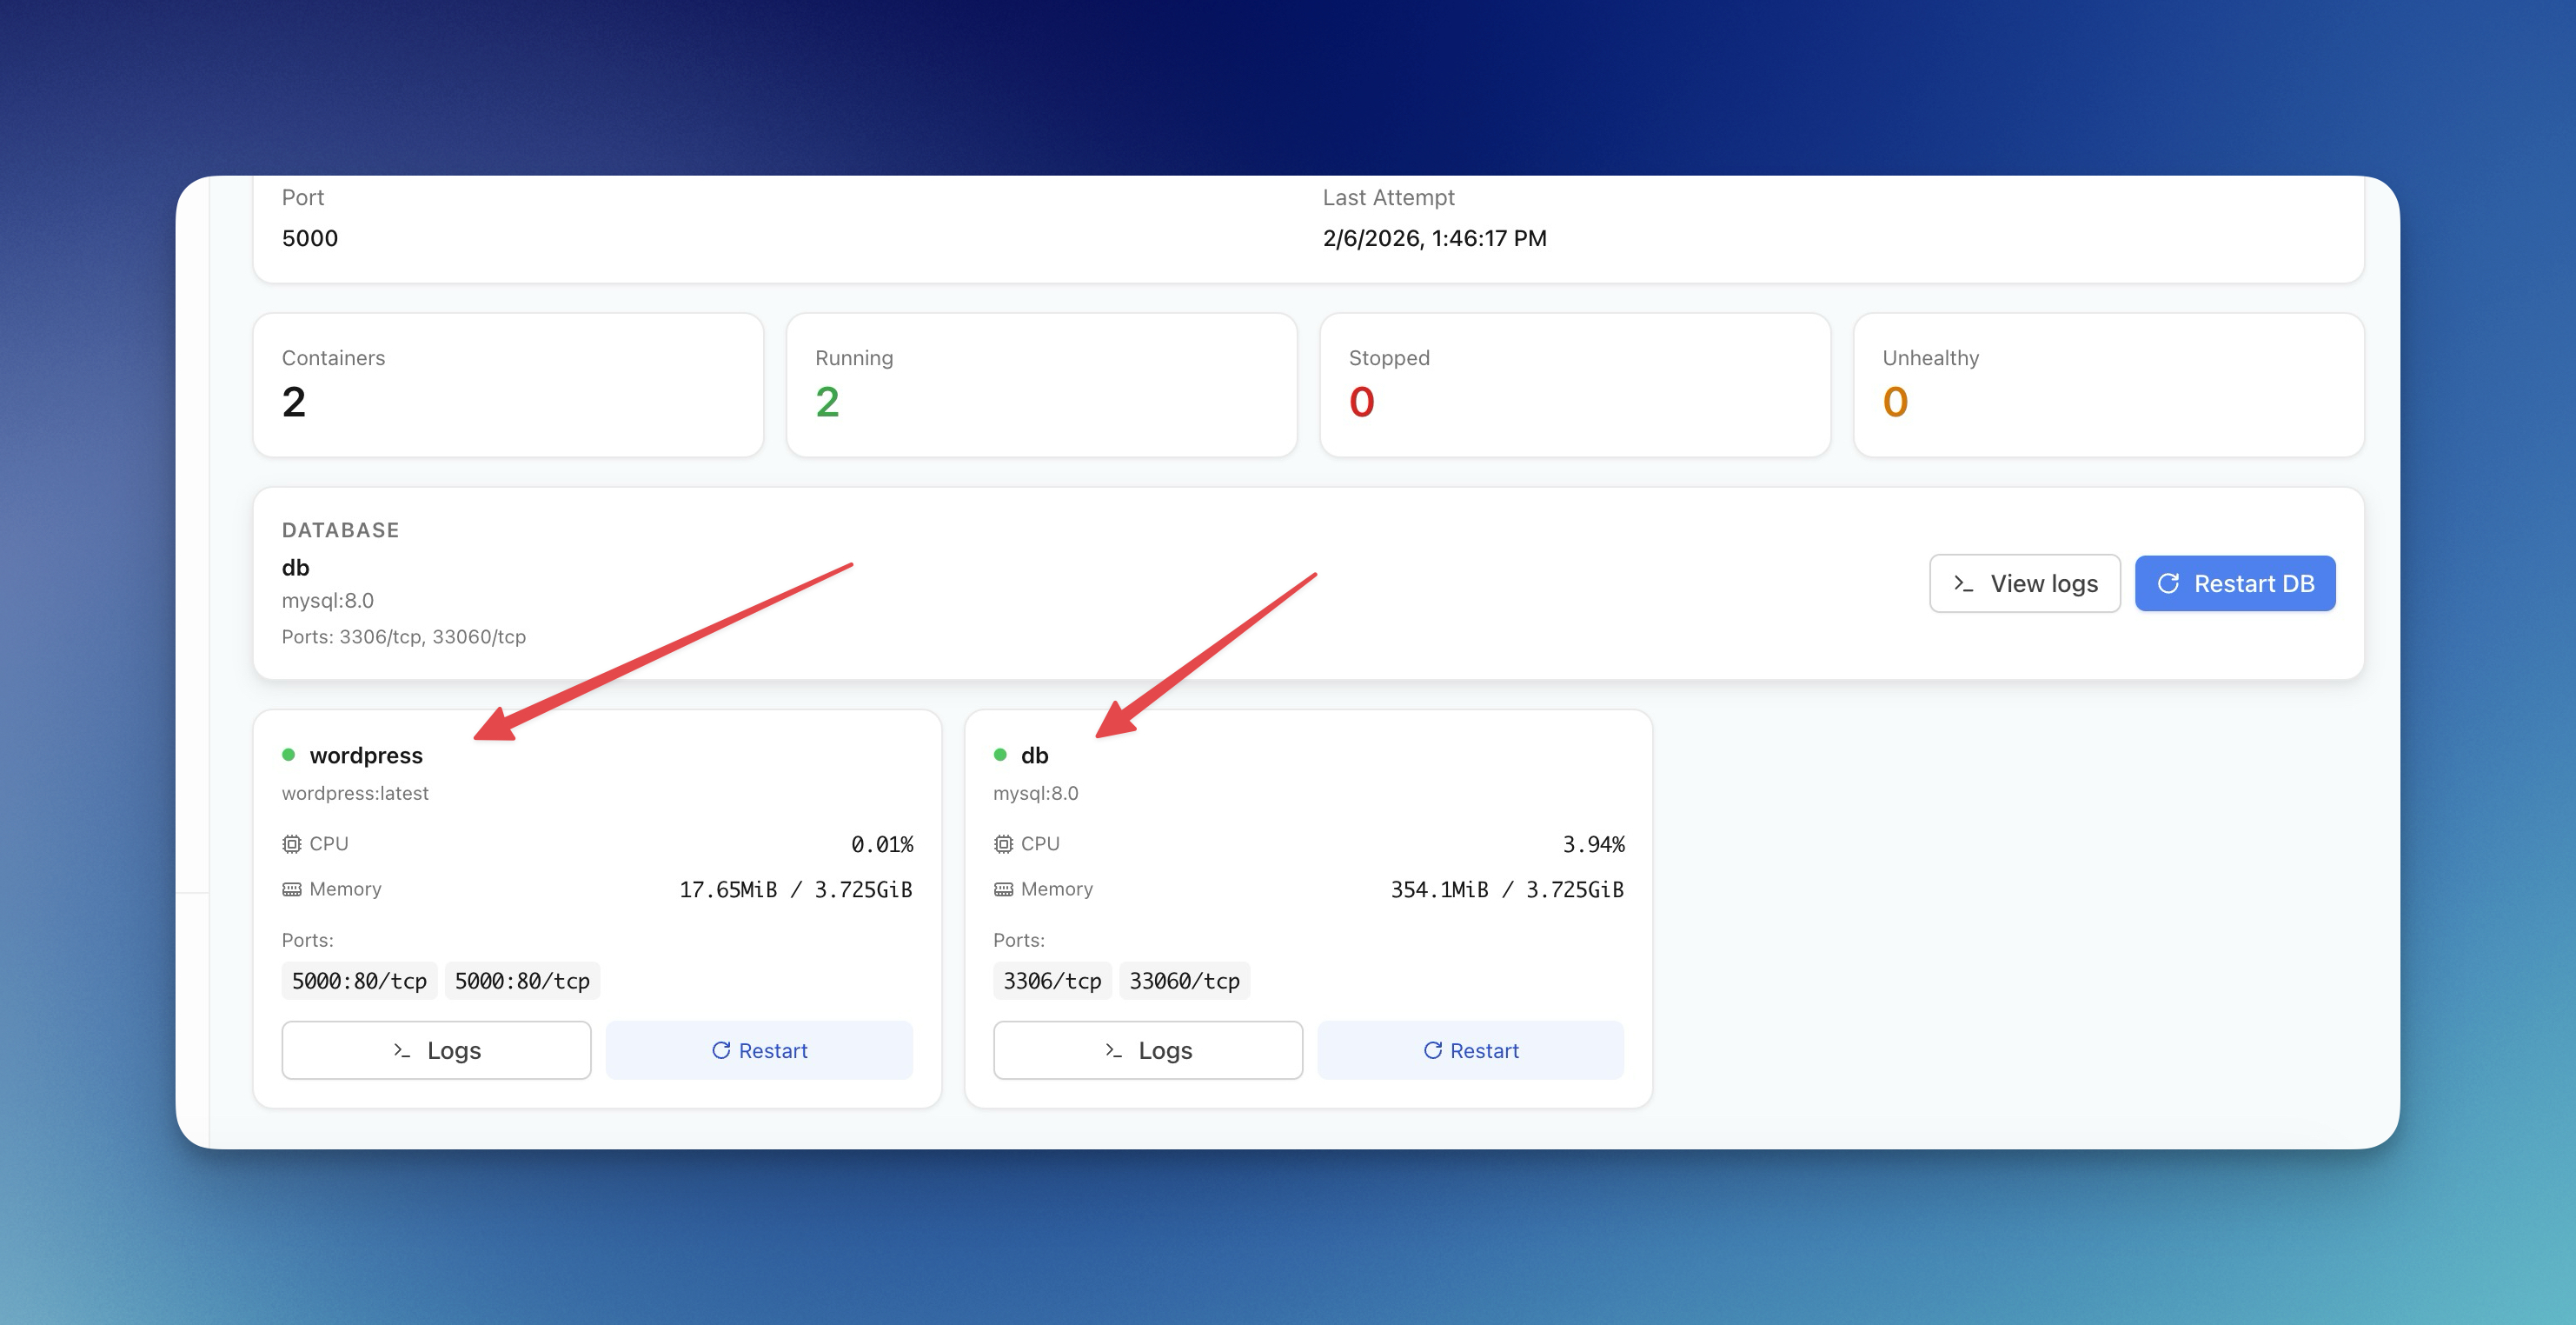
Everything in this guide — Docker installation, Dockerfile creation, compose files, Traefik configuration, container management — happens through a visual interface. No more SSH sessions, no more copy-pasting commands.
For teams moving away from platforms like Railway, Server Compass provides a similar developer experience on your own VPS. Check out our Railway alternative comparison for more details.
Frequently Asked Questions
When should I use Kubernetes instead of Docker on VPS?
Use Kubernetes when you need multi-node auto-scaling, automated failover across physical machines, or you're managing 50+ microservices. For most web apps, APIs, and side projects, Docker on a single VPS is simpler and more cost-effective. A well-configured $20/month VPS can handle more traffic than most apps will ever see.
Should I use Docker Compose or Docker Swarm?
Use Docker Compose for single-server deployments. Docker Swarm is designed for multi-node clusters and adds complexity you don't need for most projects. If you outgrow a single server, consider adding a second VPS with a load balancer before jumping to Swarm or Kubernetes.
Why Traefik instead of Nginx?
Traefik automatically discovers Docker containers and provisions SSL certificates with zero configuration. With Nginx, you manually edit config files and run Certbot for each domain. For Docker-based deployments, Traefik is significantly easier to maintain.
How do I secure my Docker containers?
Run containers as non-root users (shown in our Dockerfile examples), don't expose unnecessary ports, keep images updated, use secrets for sensitive data instead of environment variables, and scan images for vulnerabilities with docker scout or Trivy.
How do I update my containers without downtime?
Use blue-green deployment: spin up a new container, verify it's healthy, then switch Traefik routing. Server Compass handles this automatically with its GitHub Actions integration. For manual deployments, run the new container on a different port, test it, then update Traefik labels.
What's the best backup strategy for Docker volumes?
Use the docker run --rm -v volume:/data -v $(pwd):/backup alpine tar pattern shown earlier to create tarball backups. For databases, prefer native dump tools (pg_dump, mysqldump) for consistent backups. Store backups in S3-compatible storage like Backblaze B2 or Cloudflare R2.
How much VPS resources do I need?
For most web applications: 2GB RAM minimum, 4GB recommended. Database containers (PostgreSQL, MySQL) benefit from more RAM. CPU is usually less critical — 2 vCPUs handles most workloads. Start small and scale up based on actual usage monitoring.
Can I run multiple apps on one VPS?
Yes. Use Traefik as shown in this guide to route different domains to different containers. A single VPS can easily run 10+ applications if they're not all resource-intensive. Monitor with docker stats and upgrade when needed.
Conclusion
Deploying Docker containers to a VPS without Kubernetes is straightforward once you understand the fundamentals. Docker handles containerization, Docker Compose orchestrates multi-container apps, and Traefik provides automatic SSL and routing.
This stack scales from side projects to production workloads handling millions of requests. When you do outgrow a single VPS, you can add more servers behind a load balancer — still without Kubernetes.
For teams that want this power without the CLI complexity, Server Compass wraps everything in a visual interface. One-time $29 purchase, no subscription, deploy unlimited apps to unlimited servers.
Happy deploying!
Related in the StoicSoft network
If you're self-hosting on a VPS or working through a deployment guide like the one above, DeployToVPS is the StoicSoft network's handbook for VPS deployment recipes — docker-compose, nginx, traefik, and common app self-hosts.
If you're choosing a VPS provider or benchmarking real-world performance like the post above explores, StoicVPS is the StoicSoft network's independent tracker for VPS pricing, performance, and migration safety.
From across the StoicSoft network
Hand-curated reads on the same topic from sister sites in the StoicSoft family.
 1DevTool8 min read
AI Skills Manager & Docker Deep Dive: Extend Your Agents, Monitor Your Containers
Browse, create, and install AI agent skills with built-in security scanning. Plus a redesigned Docker manager with live CPU, memory, and network monitoring for every container.
Read on 1devtool.com 1DevTool11 min read
Self-Hosted AI Coding Assistant Workflow: Practical Setup Guide
A self-hosted AI coding workflow needs more than model hosting. You need environment control, connector governance, and reproducible operations. This guide covers the practical stack.
Read on 1devtool.com