March 6, 2026
Deploy React App to VPS with Nginx (Complete Guide)
Learn how to deploy your React application to a VPS with Nginx step by step. This comprehensive guide covers production builds, Nginx configuration for SPAs, SSL with Let's Encrypt, gzip compression, caching headers, and a Docker alternative.
Deploying a React application to a VPS with Nginx gives you complete control over your hosting environment, predictable costs, and the flexibility to customize every aspect of your server configuration. Unlike managed platforms that charge based on bandwidth or build minutes, a $5/month VPS can host multiple React apps with unlimited traffic.
This guide walks you through every step of deploying a React app to a VPS with Nginx — from building your production bundle to configuring SSL, gzip compression, and optimal caching headers. We'll also cover a Docker alternative and compare costs against platforms like Netlify.
Why Host React on Your Own VPS
Before diving into the technical steps, let's understand why developers choose to self-host React applications on a VPS instead of using platforms like Netlify, Vercel, or Cloudflare Pages:
- Predictable costs — A $5-10/month VPS can host unlimited React apps with no bandwidth overage fees. On Netlify, exceeding 100GB bandwidth costs $55 per additional 100GB.
- Full server control — Configure Nginx exactly how you want. Add custom headers, implement rate limiting, set up complex routing rules, or run backend services alongside your frontend.
- No build minute limits — Deploy as often as you want without worrying about monthly build quotas.
- Co-locate with your API — Run your React frontend and backend API on the same server with zero network latency between them.
- Learning experience — Understanding how web servers work makes you a better developer and helps with debugging production issues.
- Data sovereignty — Your files stay on servers you control, which matters for compliance or privacy requirements.
Prerequisites
Before we begin, make sure you have:
- A React application ready to deploy (Create React App, Vite, or any React setup)
- A VPS from any provider (DigitalOcean, Hetzner, Vultr, Linode, etc.) running Ubuntu 22.04 or later
- A domain name pointing to your VPS IP address (for SSL configuration)
- SSH access to your server with a user that has sudo privileges
- Basic terminal knowledge — comfort with running commands via SSH
If you don't have a VPS yet, providers like Hetzner offer servers starting at $4/month, or DigitalOcean and Vultr at $5/month. A basic server with 1GB RAM and 1 vCPU is sufficient for serving static React builds.
Step 1: Build React App for Production
First, create an optimized production build of your React application. This step happens on your local machine (or in a CI pipeline).
For Create React App
`# Navigate to your project directory cd my-react-app # Install dependencies (if not already installed) npm install # Create production build npm run build`
This creates a build/ directory containing your optimized, minified React application with hashed filenames for cache busting.
For Vite
`# Navigate to your project directory cd my-vite-app # Install dependencies npm install # Create production build npm run build`
Vite outputs to a dist/ directory by default. The build includes tree-shaking, code splitting, and optimized asset handling.
Verify Your Build
Before uploading, test your build locally to catch any issues:
`# For Create React App npx serve -s build # For Vite npx serve dist`
Visit http://localhost:3000 (or the port shown) and verify your app works correctly. Test navigation, ensure assets load, and check for console errors.
Step 2: Connect to VPS
Connect to your server via SSH:
`ssh username@your-server-ip`
Replace username with your actual username (often root for initial setup, though you should create a non-root user for security) and your-server-ip with your VPS IP address.
Once connected, update your system packages:
`sudo apt update && sudo apt upgrade -y`
Step 3: Install Nginx
Install Nginx, the high-performance web server that will serve your React app:
`sudo apt install nginx -y`
Start Nginx and enable it to run on system boot:
`sudo systemctl start nginx sudo systemctl enable nginx`
Verify Nginx is running:
`sudo systemctl status nginx`
You should see "active (running)" in the output. You can also visit your server's IP address in a browser — you should see the default Nginx welcome page.
Configure Firewall
If you're using UFW (Ubuntu's default firewall), allow HTTP and HTTPS traffic:
`sudo ufw allow 'Nginx Full' sudo ufw enable sudo ufw status`
Step 4: Configure Nginx for React SPA
React applications are Single Page Applications (SPAs), which means all routing is handled client-side by React Router (or your routing library of choice). This requires special Nginx configuration to ensure that all routes return index.html, allowing React to handle the routing.
Create Nginx Configuration
Create a new Nginx configuration file for your React app:
`sudo nano /etc/nginx/sites-available/react-app`
Add the following configuration (replace yourdomain.com with your actual domain):
`server { listen 80; listen [::]:80; server_name yourdomain.com www.yourdomain.com; root /var/www/react-app; index index.html; # React Router support - serve index.html for all routes location / { try_files $uri $uri/ /index.html; } # Cache static assets aggressively location ~* \\.(js|css|png|jpg|jpeg|gif|ico|svg|woff|woff2|ttf|eot)$ { expires 1y; add_header Cache-Control "public, immutable"; access_log off; } # Security headers add_header X-Frame-Options "SAMEORIGIN" always; add_header X-Content-Type-Options "nosniff" always; add_header X-XSS-Protection "1; mode=block" always; add_header Referrer-Policy "strict-origin-when-cross-origin" always; # Disable access to hidden files location ~ /\\. { deny all; access_log off; log_not_found off; } }`
The key line is try_files $uri $uri/ /index.html; — this tells Nginx to first try serving the exact file requested, then try it as a directory, and finally fall back to index.html. This allows React Router to handle client-side routing for paths like /dashboard, /users/123, etc.
Enable the Site
Create a symbolic link to enable the site and remove the default configuration:
`sudo ln -s /etc/nginx/sites-available/react-app /etc/nginx/sites-enabled/ sudo rm /etc/nginx/sites-enabled/default`
Test the Nginx configuration for syntax errors:
`sudo nginx -t`
If the test passes, reload Nginx:
`sudo systemctl reload nginx`
Need help generating Nginx configurations? Try our free Nginx Config Generator tool that creates optimized configs for React SPAs, reverse proxies, and more.
Step 5: Upload Build Files
Create the directory where your React app will live:
`sudo mkdir -p /var/www/react-app sudo chown -R $USER:$USER /var/www/react-app`
Now upload your build files from your local machine. Open a new terminal on your local machine (not the SSH session) and use scp or rsync:
Using SCP
`# For Create React App (build/ directory) scp -r ./build/* username@your-server-ip:/var/www/react-app/ # For Vite (dist/ directory) scp -r ./dist/* username@your-server-ip:/var/www/react-app/`
Using Rsync (Recommended)
Rsync is more efficient for subsequent deployments as it only transfers changed files:
`# For Create React App rsync -avz --delete ./build/ username@your-server-ip:/var/www/react-app/ # For Vite rsync -avz --delete ./dist/ username@your-server-ip:/var/www/react-app/`
The --delete flag removes files on the server that no longer exist in your local build, keeping the deployment clean.
After uploading, verify your site loads by visiting your domain in a browser. At this point, it will be served over HTTP (not HTTPS).
Step 6: SSL with Let's Encrypt
Secure your site with a free SSL certificate from Let's Encrypt using Certbot. This is essential for security and SEO (Google ranks HTTPS sites higher).
Install Certbot
`sudo apt install certbot python3-certbot-nginx -y`
Obtain SSL Certificate
Run Certbot with the Nginx plugin. It will automatically configure SSL for your domain:
`sudo certbot --nginx -d yourdomain.com -d www.yourdomain.com`
Certbot will prompt you for your email address (for renewal notifications) and ask if you want to redirect HTTP traffic to HTTPS. Choose yes for the redirect — this ensures all visitors use the secure version of your site.
Verify Auto-Renewal
Let's Encrypt certificates expire after 90 days, but Certbot sets up automatic renewal. Test the renewal process:
`sudo certbot renew --dry-run`
If successful, your certificates will automatically renew before expiration.
Updated Nginx Configuration
After running Certbot, your Nginx configuration will be automatically updated to include SSL settings. It will look something like this:
`server { listen 80; listen [::]:80; server_name yourdomain.com www.yourdomain.com; return 301 https://$server_name$request_uri; } server { listen 443 ssl http2; listen [::]:443 ssl http2; server_name yourdomain.com www.yourdomain.com; ssl_certificate /etc/letsencrypt/live/yourdomain.com/fullchain.pem; ssl_certificate_key /etc/letsencrypt/live/yourdomain.com/privkey.pem; include /etc/letsencrypt/options-ssl-nginx.conf; ssl_dhparam /etc/letsencrypt/ssl-dhparams.pem; root /var/www/react-app; index index.html; location / { try_files $uri $uri/ /index.html; } location ~* \\.(js|css|png|jpg|jpeg|gif|ico|svg|woff|woff2|ttf|eot)$ { expires 1y; add_header Cache-Control "public, immutable"; access_log off; } add_header X-Frame-Options "SAMEORIGIN" always; add_header X-Content-Type-Options "nosniff" always; add_header X-XSS-Protection "1; mode=block" always; add_header Referrer-Policy "strict-origin-when-cross-origin" always; location ~ /\\. { deny all; } }`
Step 7: Enable Gzip Compression
Gzip compression reduces the size of files sent to browsers, significantly improving load times. Edit the main Nginx configuration:
`sudo nano /etc/nginx/nginx.conf`
Find the http block and add or update these gzip settings:
`http { # ... existing settings ... # Gzip compression gzip on; gzip_vary on; gzip_proxied any; gzip_comp_level 6; gzip_min_length 1000; gzip_types text/plain text/css text/xml text/javascript application/json application/javascript application/x-javascript application/xml application/xml+rss application/vnd.ms-fontobject application/x-font-ttf font/opentype image/svg+xml image/x-icon; }`
Test and reload Nginx:
`sudo nginx -t sudo systemctl reload nginx`
Verify Gzip is Working
Test that gzip compression is active using curl:
`curl -H "Accept-Encoding: gzip" -I https://yourdomain.com`
Look for Content-Encoding: gzip in the response headers. You can also use browser DevTools — in the Network tab, check the "Content-Encoding" header for your JavaScript and CSS files.
Step 8: Configure Caching Headers
Proper caching dramatically improves repeat visitor performance. React build tools generate hashed filenames (like main.abc123.js), enabling aggressive caching — when the content changes, the hash changes, busting the cache automatically.
We already added basic caching in Step 4, but here's a more comprehensive caching configuration:
`server { # ... SSL and other settings ... root /var/www/react-app; index index.html; # HTML files - don't cache (they reference hashed assets) location ~* \\.html$ { expires -1; add_header Cache-Control "no-store, no-cache, must-revalidate"; } # JavaScript and CSS (hashed filenames) - cache for 1 year location ~* \\.(js|css)$ { expires 1y; add_header Cache-Control "public, immutable"; access_log off; } # Images, fonts, and other static assets location ~* \\.(png|jpg|jpeg|gif|ico|svg|webp|avif|woff|woff2|ttf|eot|otf)$ { expires 1y; add_header Cache-Control "public, immutable"; access_log off; } # JSON files (like manifest.json) - short cache location ~* \\.json$ { expires 1d; add_header Cache-Control "public"; } # React Router fallback location / { try_files $uri $uri/ /index.html; } }`
Once your caching is configured, don't forget to set up a robots.txt file to control search engine crawling. Our free robots.txt generator makes it easy to create one for your React SPA.
Key caching strategies:
- HTML files: Never cached, ensuring users always get the latest version that references current asset hashes
- JS/CSS with hashed names: Cached for 1 year with
immutabledirective (browsers won't even check for updates) - Images and fonts: Cached for 1 year (update filenames if content changes)
- JSON files: Short cache (1 day) for manifests and configuration files
Docker Alternative: React with Nginx in a Container
If you prefer containerized deployments, you can package your React app with Nginx in a Docker container. This approach offers several benefits:
- Consistent environment between development and production
- Easy rollbacks by switching container versions
- Simplified deployment with Docker Compose or Kubernetes
- Isolation from other applications on the server
Create Dockerfile
Create a Dockerfile in your React project root:
`# Build stage FROM node:20-alpine AS build WORKDIR /app # Copy package files COPY package*.json ./ # Install dependencies RUN npm ci --only=production=false # Copy source code COPY . . # Build the app RUN npm run build # Production stage FROM nginx:alpine # Copy custom nginx config COPY nginx.conf /etc/nginx/conf.d/default.conf # Copy build output to nginx html directory COPY --from=build /app/build /usr/share/nginx/html # Expose port 80 EXPOSE 80 # Start nginx CMD ["nginx", "-g", "daemon off;"]`
Create Nginx Config for Docker
Create an nginx.conf file in your project root:
`server { listen 80; server_name localhost; root /usr/share/nginx/html; index index.html; # Gzip compression gzip on; gzip_vary on; gzip_min_length 1000; gzip_types text/plain text/css text/xml text/javascript application/javascript application/json application/xml; # React Router support location / { try_files $uri $uri/ /index.html; } # Cache static assets location ~* \\.(js|css|png|jpg|jpeg|gif|ico|svg|woff|woff2)$ { expires 1y; add_header Cache-Control "public, immutable"; } # Security headers add_header X-Frame-Options "SAMEORIGIN" always; add_header X-Content-Type-Options "nosniff" always; }`
Build and Run
`# Build the Docker image docker build -t my-react-app . # Run the container docker run -d -p 80:80 --name react-app my-react-app`
Docker Compose Example
For a more complete setup with SSL using Traefik as a reverse proxy, create a docker-compose.yml:
``{`version: '3.8' services: react-app: build: . container_name: react-app restart: unless-stopped labels: - "traefik.enable=true" - "traefik.http.routers.react.rule=Host(\`yourdomain.com\`)" - "traefik.http.routers.react.entrypoints=websecure" - "traefik.http.routers.react.tls.certresolver=letsencrypt" networks: - web traefik: image: traefik:v2.10 container_name: traefik restart: unless-stopped command: - "--api.insecure=true" - "--providers.docker=true" - "--providers.docker.exposedbydefault=false" - "--entrypoints.web.address=:80" - "--entrypoints.websecure.address=:443" - "--certificatesresolvers.letsencrypt.acme.httpchallenge=true" - "--certificatesresolvers.letsencrypt.acme.httpchallenge.entrypoint=web" - "[email protected]" - "--certificatesresolvers.letsencrypt.acme.storage=/letsencrypt/acme.json" ports: - "80:80" - "443:443" volumes: - "/var/run/docker.sock:/var/run/docker.sock:ro" - "./letsencrypt:/letsencrypt" networks: - web networks: web: external: true`}``

The Easy Way: Deploy React with Server Compass
If configuring Nginx, SSL, and deployment scripts feels like too much work, Server Compass automates the entire process. It's a desktop app that deploys React applications to your VPS with a visual interface — no SSH commands or configuration files required.
How It Works
- Connect your VPS — Enter your server IP and credentials. Server Compass handles SSH setup automatically.
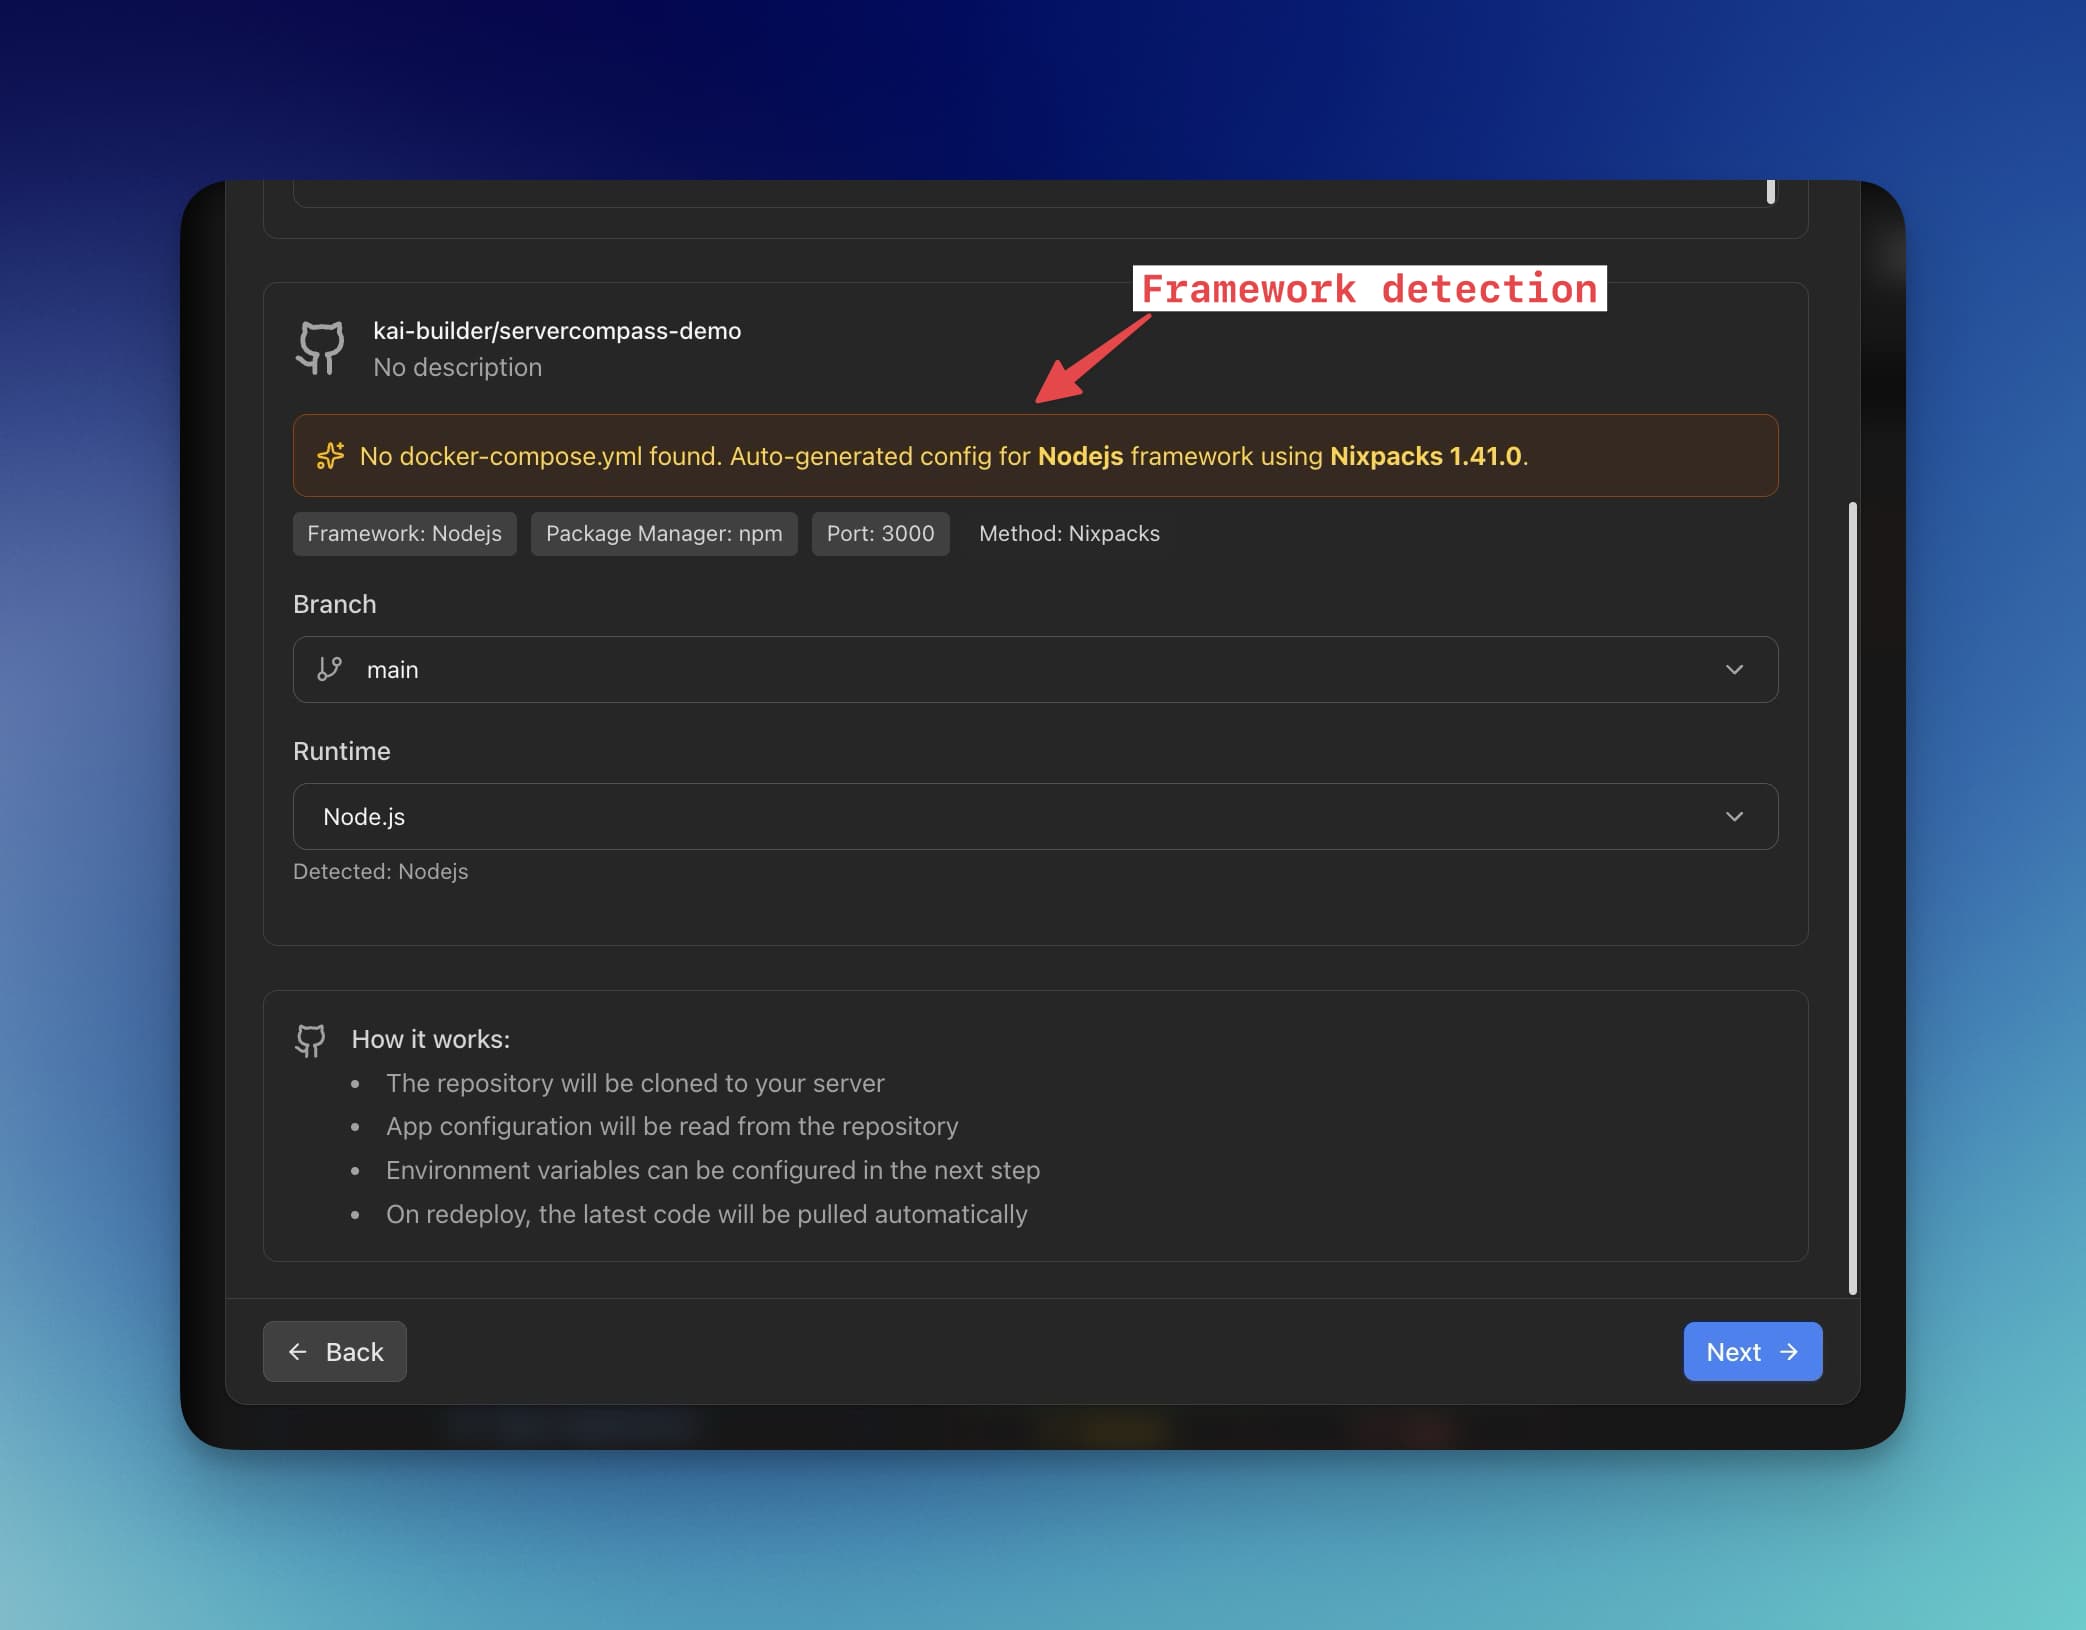
- Connect GitHub — Link your repository with OAuth. Server Compass auto-detects React, Vite, Create React App, and 16+ other frameworks.
- Deploy — Click deploy. Server Compass builds your app, configures Nginx with SPA routing, sets up SSL with Let's Encrypt, and handles caching headers automatically.
Features for React Apps
- Framework auto-detection — Automatically detects React, Vite, Next.js, and generates optimized Dockerfiles
- Automatic SSL — Let's Encrypt certificates configured with one click
- SPA routing — Nginx configured correctly for React Router out of the box
- Environment variables — Securely manage
.envfiles with AES-256-GCM encryption - Zero-downtime deploys — Blue-green deployment ensures no interruption for users
- GitHub Actions CI/CD — Optionally generate GitHub Actions workflows for automated deployments
Server Compass is a one-time $19 purchase with no monthly fees. Deploy unlimited apps to unlimited servers.
Netlify vs VPS: Cost Comparison
Let's compare the real costs of hosting a React app on Netlify versus a VPS. For this comparison, we'll use a typical scenario: a React app with moderate traffic.
Scenario: Growing Startup
- 200GB bandwidth per month
- 50 deploys per month
- Build time: 3 minutes per deploy
Cost Factor
Netlify Pro
VPS (Hetzner)
Base cost
$19/month
$4.50/month
Bandwidth (200GB)
$55 (100GB overage)
$0 (20TB included)
Build minutes (150 min)
Included
$0
Total
$74/month
$4.50/month
Annual cost
$888/year
$54/year
Scenario: High-Traffic Site
- 1TB bandwidth per month
- 100 deploys per month
- Build time: 5 minutes per deploy
Cost Factor
Netlify Pro
VPS (DigitalOcean)
Base cost
$19/month
$12/month (2GB RAM)
Bandwidth (1TB)
$495 (900GB overage)
$0 (2TB included)
Build minutes (500 min)
Included
$0
Total
$514/month
$12/month
Annual cost
$6,168/year
$144/year
At scale, the difference is staggering. A VPS costs 97% less than Netlify for high-traffic sites.
For a detailed comparison of Netlify alternatives, check out our Netlify Alternative page.
When Netlify Makes Sense
To be fair, Netlify offers advantages in certain scenarios:
- Low-traffic sites — The free tier (100GB bandwidth) is genuinely free
- Team collaboration — Built-in preview deployments and branch deploys
- Zero DevOps — No server maintenance whatsoever
- Edge functions — Serverless functions at the edge
However, once you exceed the free tier limits, costs escalate quickly. A VPS gives you predictable costs regardless of traffic.
Bonus: Automated Deployment Script
Create a simple deployment script on your local machine to streamline future deploys:
`#!/bin/bash # deploy.sh set -e SERVER="username@your-server-ip" REMOTE_PATH="/var/www/react-app" echo "Building React app..." npm run build echo "Deploying to server..." rsync -avz --delete ./build/ $SERVER:$REMOTE_PATH/ echo "Deployment complete!" echo "Visit: https://yourdomain.com"`
Make it executable and run:
`chmod +x deploy.sh ./deploy.sh`
For more sophisticated CI/CD, consider GitHub Actions that automatically deploy when you push to main.
Frequently Asked Questions
Why does React Router show 404 errors on refresh?
This happens when Nginx tries to find a file matching the URL path (like /dashboard) instead of serving index.html. The fix is the try_files $uri $uri/ /index.html; directive in your Nginx config, which falls back to index.html for all routes, letting React Router handle the routing client-side.
What VPS size do I need for a React app?
A React production build consists of static files (HTML, JS, CSS, images), so minimal resources are needed. The smallest VPS tier (1GB RAM, 1 vCPU) can easily serve millions of requests per month. Nginx is extremely efficient at serving static files. You'd only need to upgrade if you're also running a backend API or database on the same server.
Can I host multiple React apps on one VPS?
Yes! Create separate Nginx server blocks for each domain, each with its own root directory. For example:
`# /etc/nginx/sites-available/app1 server { server_name app1.com; root /var/www/app1; # ... } # /etc/nginx/sites-available/app2 server { server_name app2.com; root /var/www/app2; # ... }`
How do I handle environment variables in production?
React apps are client-side, so environment variables must be embedded at build time. Set them before running npm run build:
`REACT_APP_API_URL=https://api.yourdomain.com npm run build`
For Vite, use VITE_ prefix:
`VITE_API_URL=https://api.yourdomain.com npm run build`
Remember: never embed secrets in React apps — everything in the bundle is visible to users.
Why isn't my SSL certificate working?
Common issues and solutions:
- DNS not propagated — Ensure your domain points to your VPS IP. Use
dig yourdomain.comto verify. - Firewall blocking port 443 — Run
sudo ufw allow 443 - Certbot failed — Check that port 80 is accessible for the HTTP challenge
How do I verify gzip compression is working?
Use curl to check the response headers:
`curl -H "Accept-Encoding: gzip" -I https://yourdomain.com/static/js/main.js`
Look for Content-Encoding: gzip. You can also check in Chrome DevTools: Network tab → select a JS file → Headers → Response Headers.
Which VPS provider should I use?
Popular choices include:
- Hetzner — Best value, starting at $4/month (20TB bandwidth included)
- DigitalOcean — Great UX and documentation, $6/month
- Vultr — Global locations, $5/month
- Linode (Akamai) — Reliable, $5/month
All of these work well for hosting React apps. Choose based on data center locations (pick one close to your users) and your preferred management interface.
Should I use Docker or deploy directly?
Both approaches work well. Direct deployment (copying files to /var/www) is simpler and uses fewer resources. Docker adds overhead but provides better isolation, easier rollbacks, and consistency between environments. If you're already using Docker for development or running multiple services, containerizing your React app makes sense. For a simple single-app deployment, direct deployment is often easier.
Conclusion
Deploying a React app to a VPS with Nginx gives you complete control over your hosting environment at a fraction of the cost of managed platforms. With the configuration in this guide, your React app will have:
- Proper SPA routing support for React Router
- Free SSL certificates with automatic renewal
- Gzip compression for faster load times
- Aggressive caching for optimal performance
- Security headers to protect your users
Whether you follow the manual approach or use Server Compass to automate the process, self-hosting your React app is a smart choice for developers who want predictable costs and full control over their infrastructure.
Ready to deploy? Grab a $5 VPS, follow this guide, and have your React app live in under 30 minutes. Or try Server Compass for a visual deployment experience that handles all the configuration automatically.
Related in the StoicSoft network
If you're choosing a VPS provider or benchmarking real-world performance like the post above explores, StoicVPS is the StoicSoft network's independent tracker for VPS pricing, performance, and migration safety.
If you're self-hosting on a VPS or working through a deployment guide like the one above, DeployToVPS is the StoicSoft network's handbook for VPS deployment recipes — docker-compose, nginx, traefik, and common app self-hosts.
From across the StoicSoft network
Hand-curated reads on the same topic from sister sites in the StoicSoft family.
 1DevTool11 min read
Self-Hosted AI Coding Assistant Workflow: Practical Setup Guide
A self-hosted AI coding workflow needs more than model hosting. You need environment control, connector governance, and reproducible operations. This guide covers the practical stack.
Read on 1devtool.com 1DevTool9 min read
AI Code Editor for React Developers: Practical Guide (2026)
React workflows benefit from tight loops between code, browser preview, DevTools, and AI agent prompts. This guide shows what to look for in an AI code editor built for frontend speed.
Read on 1devtool.com