March 6, 2026
How to Deploy a Node.js App on a VPS (Beginner Guide)
Learn how to deploy your Node.js application on a VPS step by step. This beginner-friendly guide covers SSH setup, Node.js installation, PM2 process management, Nginx reverse proxy, SSL certificates, and firewall configuration.
Deploying a Node.js application to a Virtual Private Server (VPS) might seem intimidating if you've only used platforms like Vercel, Railway, or Heroku. But here's the truth: once you understand the basics, VPS deployment gives you more control, better performance, and significantly lower costs.
In this comprehensive guide, you'll learn how to deploy a Node.js app on a VPS from scratch. We'll cover everything from connecting via SSH to setting up a production-ready environment with PM2, Nginx, SSL certificates, and firewall rules.
By the end of this tutorial, your Node.js application will be running on your own server, secured with HTTPS, and ready to handle real traffic.
Why Deploy Node.js on a VPS Instead of PaaS?
Platform-as-a-Service (PaaS) providers like Vercel, Railway, and Render offer convenience — push your code and they handle the rest. But that convenience comes at a price, both literally and figuratively.
Cost Savings
Let's do the math. A basic Node.js app on Railway or Render costs $5-15/month. Add a database, and you're at $15-30/month. Scale to handle more traffic, and costs climb quickly to $50-100+/month.
A VPS from providers like Hetzner, DigitalOcean, or Vultr costs $4-10/month for a server with 2-4GB RAM, 2 vCPUs, and 40-80GB of SSD storage. That single server can run your Node.js app, database, Redis cache, and multiple other services — all for less than the cheapest PaaS tier.
Over a year, you could save $200-500 or more. For indie developers and startups, that money goes a long way.
Full Control Over Your Environment
On a VPS, you control everything:
- Node.js version — Run any version you need, including LTS and experimental releases
- System dependencies — Install native modules, image processing libraries, or any Linux package
- Server configuration — Tune your environment for your specific workload
- Data location — Choose where your data physically lives for compliance and latency
- No cold starts — Your app runs continuously, ready to serve requests instantly
No Vendor Lock-in
PaaS platforms often introduce subtle dependencies: proprietary environment variables, platform-specific APIs, unique deployment configurations. When you need to migrate, you're rewriting infrastructure code.
A VPS deployment uses standard tools — Node.js, PM2, Nginx, and systemd. Move to any other VPS provider, and your deployment process stays the same.
Prerequisites
Before we begin, make sure you have the following:
- A VPS running Ubuntu 22.04 or 24.04 — You can use any Linux distribution, but this guide assumes Ubuntu. Get one from Hetzner , DigitalOcean , Vultr , or any other provider. A $5-10/month plan is sufficient for most apps.
- A Node.js application ready to deploy — This can be an Express, Fastify, NestJS, or any other Node.js framework. Your app should have a
package.jsonand a start script. - SSH access to your server — Your VPS provider will give you an IP address and either a root password or SSH key.
- A domain name (optional but recommended) — For SSL certificates and professional deployment.
- Basic terminal knowledge — You should be comfortable running commands in a terminal.
If you're starting from scratch, create a simple Express app locally that we'll use throughout this tutorial:
{`# Create a new directory
mkdir my-node-app && cd my-node-app

# Initialize the project
npm init -y

# Install Express
npm install express

# Create the main file
cat > index.js << 'EOF'
const express = require('express');
const app = express();
const PORT = process.env.PORT || 3000;

app.get('/', (req, res) => {
  res.json({ message: 'Hello from my VPS!', timestamp: new Date().toISOString() });
});

app.get('/health', (req, res) => {
  res.status(200).json({ status: 'healthy' });
});

app.listen(PORT, () => {
  console.log(\`Server running on port \$\`);
});
EOF`}
Push this to a Git repository (GitHub, GitLab, or any Git hosting) so we can clone it on the server.
Step 1: Connect to Your VPS via SSH
SSH (Secure Shell) is how you'll access your server's command line remotely. When you create a VPS, your provider gives you an IP address and credentials.
Connecting with a Password
If your provider gave you a root password, connect like this:
ssh root@your-server-ip
Replace your-server-ip with your actual server IP address (e.g., 203.0.113.50). You'll be prompted to enter the password.
Connecting with an SSH Key (Recommended)
SSH keys are more secure than passwords. If you set up an SSH key when creating your VPS, connect like this:
ssh -i ~/.ssh/your-key root@your-server-ip
If your key is the default ~/.ssh/id_rsa or ~/.ssh/id_ed25519, you can simply use:
ssh root@your-server-ip
First-Time Connection
The first time you connect, you'll see a message asking you to verify the server's fingerprint:
The authenticity of host 'your-server-ip' can't be established.
ED25519 key fingerprint is SHA256:xxxxxxxxxxxxx.
Are you sure you want to continue connecting (yes/no)?
Type yes and press Enter. This adds the server to your known hosts so you won't see this message again.
Create a Non-Root User (Security Best Practice)
Running everything as root is risky. Let's create a dedicated user for your application:
# Create a new user (replace 'deploy' with your preferred username)
adduser deploy

# Add the user to the sudo group
usermod -aG sudo deploy

# Switch to the new user
su - deploy
From now on, we'll run commands as this user. When you need root privileges, prefix commands with sudo.
Step 2: Install Node.js and npm Using nvm
The best way to install Node.js on a server is with nvm (Node Version Manager). It lets you install multiple Node versions and switch between them easily — perfect for managing different projects or upgrading Node.js later.
Install nvm
# Download and install nvm
curl -o- https://raw.githubusercontent.com/nvm-sh/nvm/v0.40.1/install.sh | bash

# Load nvm into your current session
export NVM_DIR="$HOME/.nvm"
[ -s "$NVM_DIR/nvm.sh" ] && \\. "$NVM_DIR/nvm.sh"

# Verify nvm is installed
nvm --version
You should see a version number like 0.40.1.
Install Node.js
# Install the latest LTS version of Node.js
nvm install --lts

# Verify installation
node --version
npm --version
You should see something like v22.x.x for Node and 10.x.x for npm (versions may vary).
Set the Default Node Version
Make sure this Node version is used whenever you log in:
nvm alias default node
Step 3: Clone Your Application
Now let's get your application code onto the server. We'll clone it from Git.
Install Git (if not already installed)
sudo apt update
sudo apt install -y git
Clone Your Repository
# Navigate to the home directory
cd ~

# Clone your repository (replace with your actual repo URL)
git clone https://github.com/yourusername/my-node-app.git

# Enter the project directory
cd my-node-app
For private repositories, you'll need to set up SSH keys on the server or use a personal access token:
# For private repos with token (GitHub)
git clone https://[email protected]/yourusername/my-node-app.git

# Or set up SSH keys for the deploy user
ssh-keygen -t ed25519 -C "deploy@yourserver"
cat ~/.ssh/id_ed25519.pub
# Add this public key to your GitHub/GitLab account
Step 4: Install Dependencies and Build
With your code on the server, install dependencies and build your application.
Install Dependencies
# Make sure you're in your project directory
cd ~/my-node-app

# Install production dependencies
npm ci --production

# Or if you need dev dependencies for building
npm ci
Using npm ci instead of npm install ensures your dependencies match the exact versions in package-lock.json, making deployments reproducible.
Build Your Application (If Needed)
If your app has a build step (TypeScript compilation, bundling, etc.):
# Run the build script
npm run build

# If you have TypeScript
npx tsc
Test the Application
Before setting up process management, verify your app runs:
# Start your app
npm start

# Or if your entry point is different
node index.js
You should see output like Server running on port 3000. Press Ctrl+C to stop it.
Step 5: Set Up PM2 for Process Management
Running your app with node index.js works for testing, but it has problems in production:
- The app stops if you close your SSH session
- If the app crashes, it stays down
- No logging or monitoring
- Can't utilize multiple CPU cores
PM2 solves all of these. It's a production-grade process manager for Node.js that handles automatic restarts, clustering, logging, and startup scripts.
Install PM2 Globally
npm install -g pm2
Start Your App with PM2
# Start the application
pm2 start index.js --name "my-node-app"

# Or if you have a start script in package.json
pm2 start npm --name "my-node-app" -- start
You should see a table showing your app's status:
┌─────┬──────────────┬─────────────┬─────────┬─────────┬──────────┐
│ id  │ name         │ namespace   │ version │ mode    │ pid      │
├─────┼──────────────┼─────────────┼─────────┼─────────┼──────────┤
│ 0   │ my-node-app  │ default     │ 1.0.0   │ fork    │ 12345    │
└─────┴──────────────┴─────────────┴─────────┴─────────┴──────────┘
Essential PM2 Commands
# View running processes
pm2 list

# View logs
pm2 logs my-node-app

# Monitor CPU and memory in real-time
pm2 monit

# Restart the application
pm2 restart my-node-app

# Stop the application
pm2 stop my-node-app

# Delete from PM2 (doesn't delete files)
pm2 delete my-node-app
Create an Ecosystem File (Advanced Configuration)
For more control, create a PM2 ecosystem file:
cat > ecosystem.config.js << 'EOF'
module.exports = {
  apps: [{
    name: 'my-node-app',
    script: 'index.js',
    instances: 'max',        // Use all CPU cores
    exec_mode: 'cluster',    // Enable clustering
    env: {
      NODE_ENV: 'production',
      PORT: 3000
    },
    env_production: {
      NODE_ENV: 'production',
      PORT: 3000
    },
    max_memory_restart: '500M',  // Restart if memory exceeds 500MB
    log_date_format: 'YYYY-MM-DD HH:mm:ss',
    error_file: '/home/deploy/logs/my-node-app-error.log',
    out_file: '/home/deploy/logs/my-node-app-out.log',
    merge_logs: true
  }]
}
EOF

# Create logs directory
mkdir -p ~/logs

# Start using the ecosystem file
pm2 start ecosystem.config.js --env production
Configure PM2 to Start on Boot
Make sure your app survives server reboots:
# Generate startup script
pm2 startup systemd

# PM2 will output a command to run with sudo - copy and run it
# It looks like: sudo env PATH=$PATH:/home/deploy/.nvm/versions/node/v22.x.x/bin pm2 startup systemd -u deploy --hp /home/deploy

# Save the current PM2 process list
pm2 save
Now PM2 will automatically start your app when the server boots.
Step 6: Configure Nginx as a Reverse Proxy
Your Node.js app is running on port 3000, but you want users to access it on port 80 (HTTP) and 443 (HTTPS). Nginx serves as a reverse proxy — it receives requests on standard ports and forwards them to your Node.js app.
Nginx also provides benefits like:
- Serving static files efficiently
- SSL/TLS termination
- Load balancing (if you have multiple app instances)
- Compression and caching
- Protection against certain attacks
Install Nginx
sudo apt update
sudo apt install -y nginx
Create an Nginx Configuration
Create a new site configuration for your app:
sudo nano /etc/nginx/sites-available/my-node-app
Add the following configuration (replace yourdomain.com with your actual domain, or use your server's IP address):
server {
    listen 80;
    listen [::]:80;
    server_name yourdomain.com www.yourdomain.com;

    location / {
        proxy_pass http://127.0.0.1:3000;
        proxy_http_version 1.1;
        proxy_set_header Upgrade $http_upgrade;
        proxy_set_header Connection 'upgrade';
        proxy_set_header Host $host;
        proxy_set_header X-Real-IP $remote_addr;
        proxy_set_header X-Forwarded-For $proxy_add_x_forwarded_for;
        proxy_set_header X-Forwarded-Proto $scheme;
        proxy_cache_bypass $http_upgrade;
        proxy_read_timeout 86400s;
        proxy_send_timeout 86400s;
    }
}
Pro tip: Use our Nginx Config Generator tool to create optimized configurations for your specific setup — including SSL, caching, WebSocket support, and more. Also create a robots.txt file to control how search engines crawl your Node.js app.
Enable the Site
# Create a symbolic link to enable the site
sudo ln -s /etc/nginx/sites-available/my-node-app /etc/nginx/sites-enabled/

# Remove the default site (optional)
sudo rm /etc/nginx/sites-enabled/default

# Test Nginx configuration
sudo nginx -t

# If the test passes, reload Nginx
sudo systemctl reload nginx
You should see nginx: configuration file /etc/nginx/nginx.conf test is successful.
Test the Configuration
Open your browser and navigate to http://yourdomain.com or http://your-server-ip. You should see your Node.js app's response.
If you get a 502 Bad Gateway error, make sure your Node.js app is running with PM2 and listening on port 3000.
Step 7: Set Up SSL with Let's Encrypt
HTTPS is essential for production applications. It encrypts traffic between users and your server, builds trust, and is required for many modern web features. Let's Encrypt provides free SSL certificates that auto-renew.
Install Certbot
Certbot is the official Let's Encrypt client:
sudo apt update
sudo apt install -y certbot python3-certbot-nginx
Obtain an SSL Certificate
Make sure your domain's DNS A record points to your server's IP address before running this command:
sudo certbot --nginx -d yourdomain.com -d www.yourdomain.com
Certbot will:
- Ask for your email (for renewal notifications)
- Ask you to agree to the terms of service
- Ask if you want to redirect HTTP to HTTPS (choose Yes)
- Automatically configure Nginx for SSL
After completion, your Nginx configuration will be updated with SSL settings, and your site will be accessible via HTTPS.
Verify Auto-Renewal
Let's Encrypt certificates expire after 90 days. Certbot sets up automatic renewal, but let's verify it works:
# Test the renewal process (dry run)
sudo certbot renew --dry-run

# Check the renewal timer
sudo systemctl status certbot.timer
If the dry run succeeds, your certificates will renew automatically.
Step 8: Configure the UFW Firewall
A firewall controls which network traffic can reach your server. UFW (Uncomplicated Firewall) is Ubuntu's default firewall tool and is easy to configure.
Set Up UFW
# Allow SSH (important - don't lock yourself out!)
sudo ufw allow OpenSSH

# Allow HTTP and HTTPS traffic
sudo ufw allow 'Nginx Full'

# Enable the firewall
sudo ufw enable

# Check the status
sudo ufw status
You should see output like:
Status: active

To                         Action      From
--                         ------      ----
OpenSSH                    ALLOW       Anywhere
Nginx Full                 ALLOW       Anywhere
OpenSSH (v6)               ALLOW       Anywhere (v6)
Nginx Full (v6)            ALLOW       Anywhere (v6)
Important Notes on Ports
Notice that we did not open port 3000 (where Node.js runs). This is intentional — your app is only accessible through Nginx, which adds a layer of security and allows for proper SSL termination.
If you need to access other services (databases, Redis, etc.), either:
- Keep them listening on localhost only (e.g.,
127.0.0.1:5432for PostgreSQL) - Whitelist specific IP addresses with
sudo ufw allow from YOUR_IP to any port 5432
Your Node.js App is Now Deployed
Congratulations! You've successfully deployed a Node.js application to a VPS with a production-ready setup. Here's what you now have:
- Node.js running via nvm (easy version management)
- PM2 managing your process (auto-restart, clustering, logs)
- Nginx as a reverse proxy (efficient routing, SSL termination)
- Free SSL certificate from Let's Encrypt (auto-renewing)
- UFW firewall (only necessary ports open)
Updating Your Application
When you push changes to your repository, here's how to deploy them:
# SSH into your server
ssh deploy@your-server-ip

# Navigate to your app
cd ~/my-node-app

# Pull the latest changes
git pull origin main

# Install any new dependencies
npm ci --production

# Build if needed
npm run build

# Restart PM2
pm2 restart my-node-app

# Or reload for zero-downtime (if using cluster mode)
pm2 reload my-node-app
You can automate this with a simple shell script or set up CI/CD with GitHub Actions.
The Easy Way: Deploy with Server Compass in 3 Minutes
The manual process we just covered works, but it's a lot of steps. Every deployment requires SSH access, remembering commands, and hoping nothing breaks. For ongoing projects, this adds up to hours of time every month.
Server Compass automates everything you just learned — and more — through a visual desktop app. No terminal commands, no config files to edit, no certificates to manage manually.

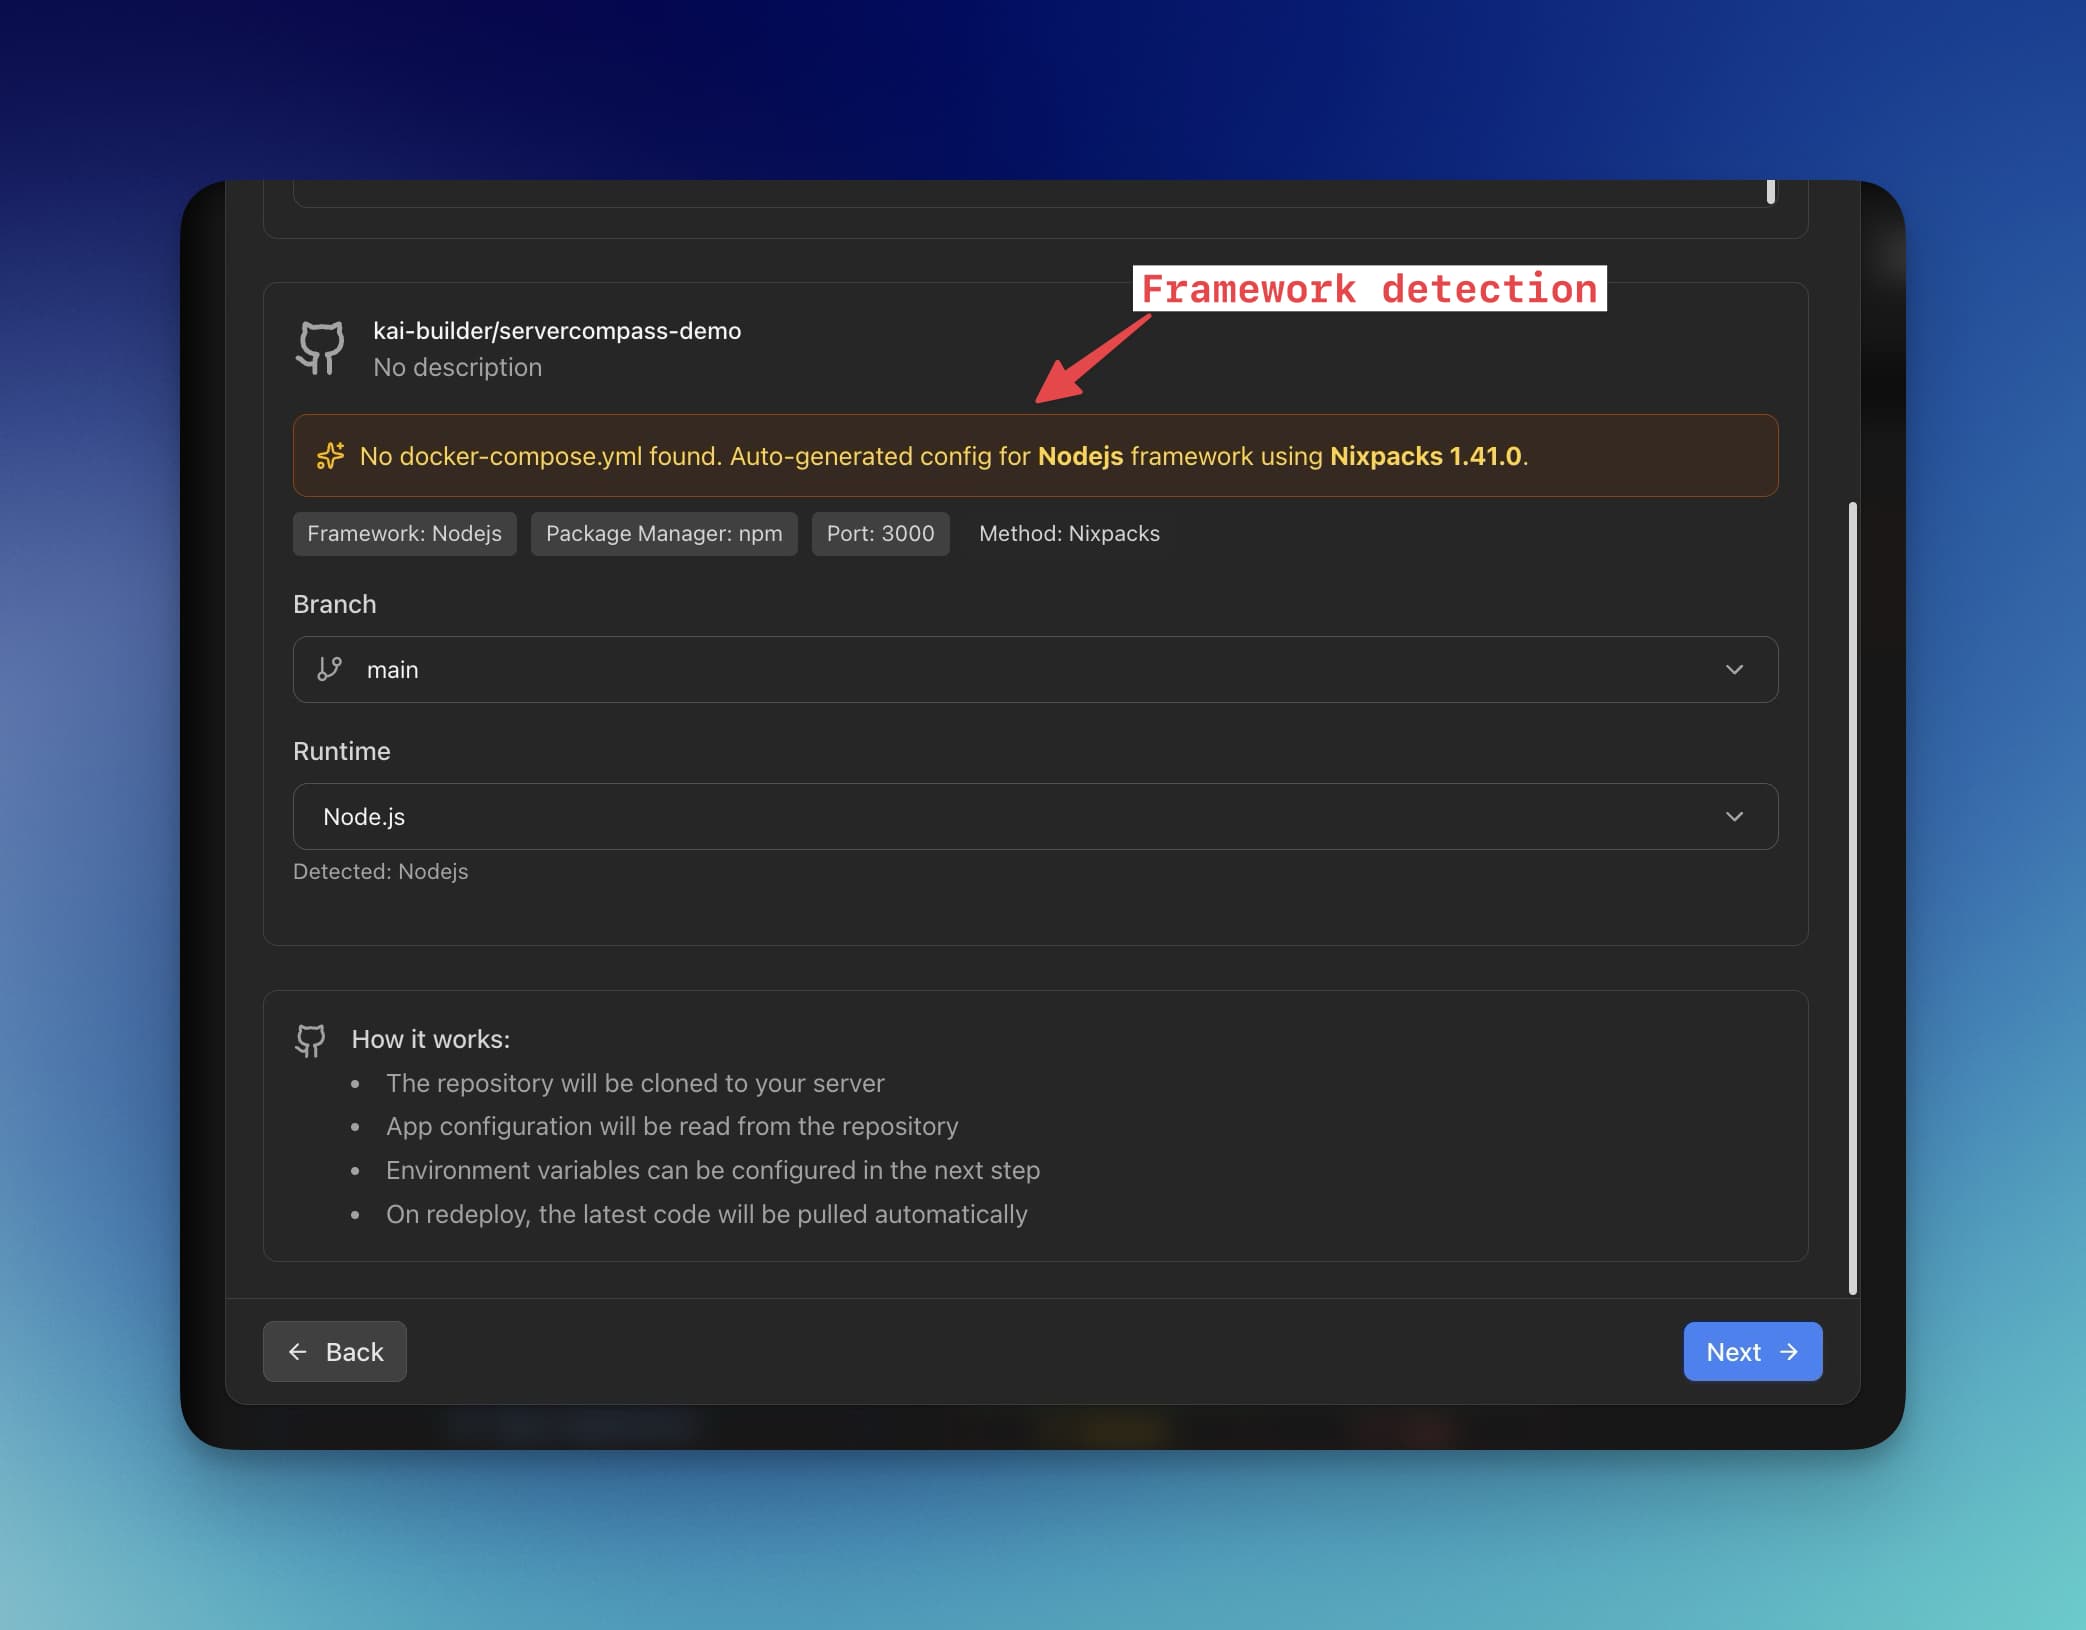
What Server Compass Automates
- Framework detection — Automatically detects Express, Fastify, NestJS, Next.js, and 16+ other frameworks
- One-click Node.js templates — Deploy pre-configured Node.js stacks with databases and caching
- GitHub integration — Connect your repo and deploy any branch with one click
- Automatic SSL — Let's Encrypt certificates provisioned and renewed automatically
- Nginx configuration — Generated and optimized for your app, no manual editing
- PM2 setup — Process management configured automatically with clustering
- Environment variables — Secure .env vault with AES-256 encryption
- Zero-downtime deployments — Blue-green deployment so your users never see downtime
Deploy Your Node.js App in 3 Minutes
- Download Server Compass from servercompass.app (Mac, Windows, Linux)
- Add your VPS — Enter your server IP and SSH credentials. Server Compass handles the rest.
- Connect your GitHub repo — Authorize GitHub and select your Node.js project.
- Click Deploy — Server Compass detects your framework, builds your app, configures PM2 and Nginx, sets up SSL, and deploys.
That's it. No SSH sessions, no command memorization, no config file editing. Every subsequent deployment is a single click.
Looking for an alternative to expensive PaaS platforms? See how Server Compass compares to Vercel for Node.js deployments.
Ready to simplify your deployments?
Server Compass is a one-time purchase ($29) with no monthly fees. Deploy unlimited Node.js apps to unlimited servers.
Troubleshooting FAQ
My app shows 502 Bad Gateway. What's wrong?
A 502 error means Nginx can't reach your Node.js app. Check these things:
- Is your app running? Run
pm2 listto see if it's online. - Is it listening on the right port? Your Nginx config says
proxy_pass http://127.0.0.1:3000— make sure your app is on port 3000. - Check the logs with
pm2 logs my-node-appfor any crash messages. - Check Nginx error logs with
sudo tail -f /var/log/nginx/error.log.
npm install fails with permission errors
This usually happens if you installed nvm as root but are running as a different user. Solutions:
# Make sure nvm is installed for your user
curl -o- https://raw.githubusercontent.com/nvm-sh/nvm/v0.40.1/install.sh | bash
source ~/.bashrc
nvm install --lts

# Or fix permissions on node_modules
sudo chown -R $(whoami) ~/my-node-app/node_modules
My app doesn't start after server reboot
Make sure you ran the PM2 startup configuration:
# Generate startup script
pm2 startup

# Copy and run the command PM2 outputs

# Save your process list
pm2 save
SSL certificate isn't working
Common causes:
- DNS not propagated — Make sure your domain's A record points to your server IP. Use
dig yourdomain.comto check. - Port 80 blocked — Let's Encrypt needs port 80 for verification. Make sure
sudo ufw allow 'Nginx Full'was run. - Rate limited — Let's Encrypt limits certificate requests. Wait an hour and try again.
# Check Certbot logs
sudo cat /var/log/letsencrypt/letsencrypt.log

# Try again with verbose output
sudo certbot --nginx -d yourdomain.com -v
How do I view my application logs?
PM2 stores logs automatically:
# View real-time logs
pm2 logs my-node-app

# View last 100 lines
pm2 logs my-node-app --lines 100

# View error logs only
pm2 logs my-node-app --err

# Clear logs
pm2 flush
How do I set environment variables?
There are several ways:
# Option 1: Create a .env file
cat > .env << 'EOF'
NODE_ENV=production
DATABASE_URL=postgresql://user:pass@localhost:5432/mydb
API_KEY=your-secret-key
EOF

# Then use dotenv in your app or PM2 ecosystem file

# Option 2: Set in PM2 ecosystem file
module.exports = {
  apps: [{
    name: 'my-node-app',
    script: 'index.js',
    env: {
      NODE_ENV: 'production',
      DATABASE_URL: 'postgresql://...',
    }
  }]
}

# Option 3: Set inline when starting
PORT=3000 NODE_ENV=production pm2 start index.js
Can I run multiple Node.js apps on one VPS?
Absolutely. Just use different ports for each app:
# Start apps on different ports
pm2 start app1/index.js --name "app1" -- --port 3001
pm2 start app2/index.js --name "app2" -- --port 3002

# Create separate Nginx configs for each domain/subdomain
# pointing to the appropriate port
A single $5 VPS can easily run 5-10 lightweight Node.js applications.
Next Steps
Now that your Node.js app is deployed, consider these improvements:
- Set up CI/CD — Automate deployments with GitHub Actions so pushing to main deploys automatically
- Add monitoring — Deploy Uptime Kuma to monitor your app's availability
- Configure backups — Set up automated backups of your database and application data
- Add a database — Deploy PostgreSQL or MongoDB alongside your app
- Implement caching — Add Redis for session storage and caching
With the foundation you've built, your VPS can grow into a complete production environment that rivals expensive PaaS platforms — at a fraction of the cost.
Happy deploying!
Related in the StoicSoft network
If you're self-hosting on a VPS or working through a deployment guide like the one above, DeployToVPS is the StoicSoft network's handbook for VPS deployment recipes — docker-compose, nginx, traefik, and common app self-hosts.
If you're choosing a VPS provider or benchmarking real-world performance like the post above explores, StoicVPS is the StoicSoft network's independent tracker for VPS pricing, performance, and migration safety.
From across the StoicSoft network
Hand-curated reads on the same topic from sister sites in the StoicSoft family.
