July 10, 2026
Bring Your Own SSL Certificate for Any Domain
Server Compass now lets you upload an OV or EV certificate from your own certificate authority for any domain — validated, installed, and served over HTTPS without touching a terminal.
Let's Encrypt is the right default for most domains, and Server Compass has issued and renewed those certificates automatically for a long time. But not every domain gets to use it. Maybe your company bought an OV or EV certificate so the browser shows the verified organization name. Maybe a client, a bank, or a compliance requirement mandates a specific certificate authority. Maybe you're serving an internal domain that Let's Encrypt can't validate at all.
Until now, those cases dropped you out of the visual workflow and back into a terminal. You'd SSH in, paste PEM blocks into files, hand-edit Traefik or nginx config, wire up the certificate resolver, reload the proxy, and hope the chain order was right — because a missing intermediate certificate looks fine in your browser and broken in everyone else's. Every renewal meant doing it all again from memory.
What changed
You can now bring your own SSL certificate for any domain, right inside Server Compass. When you add a domain, you choose between Let's Encrypt and a custom certificate you provide. Server Compass validates the files, installs them on your server, wires up the reverse proxy, and shows the certificate's real status afterward — no SSH session, no config editing, no guesswork about the chain.
How it works in practice
Pick your certificate type when you add the domain
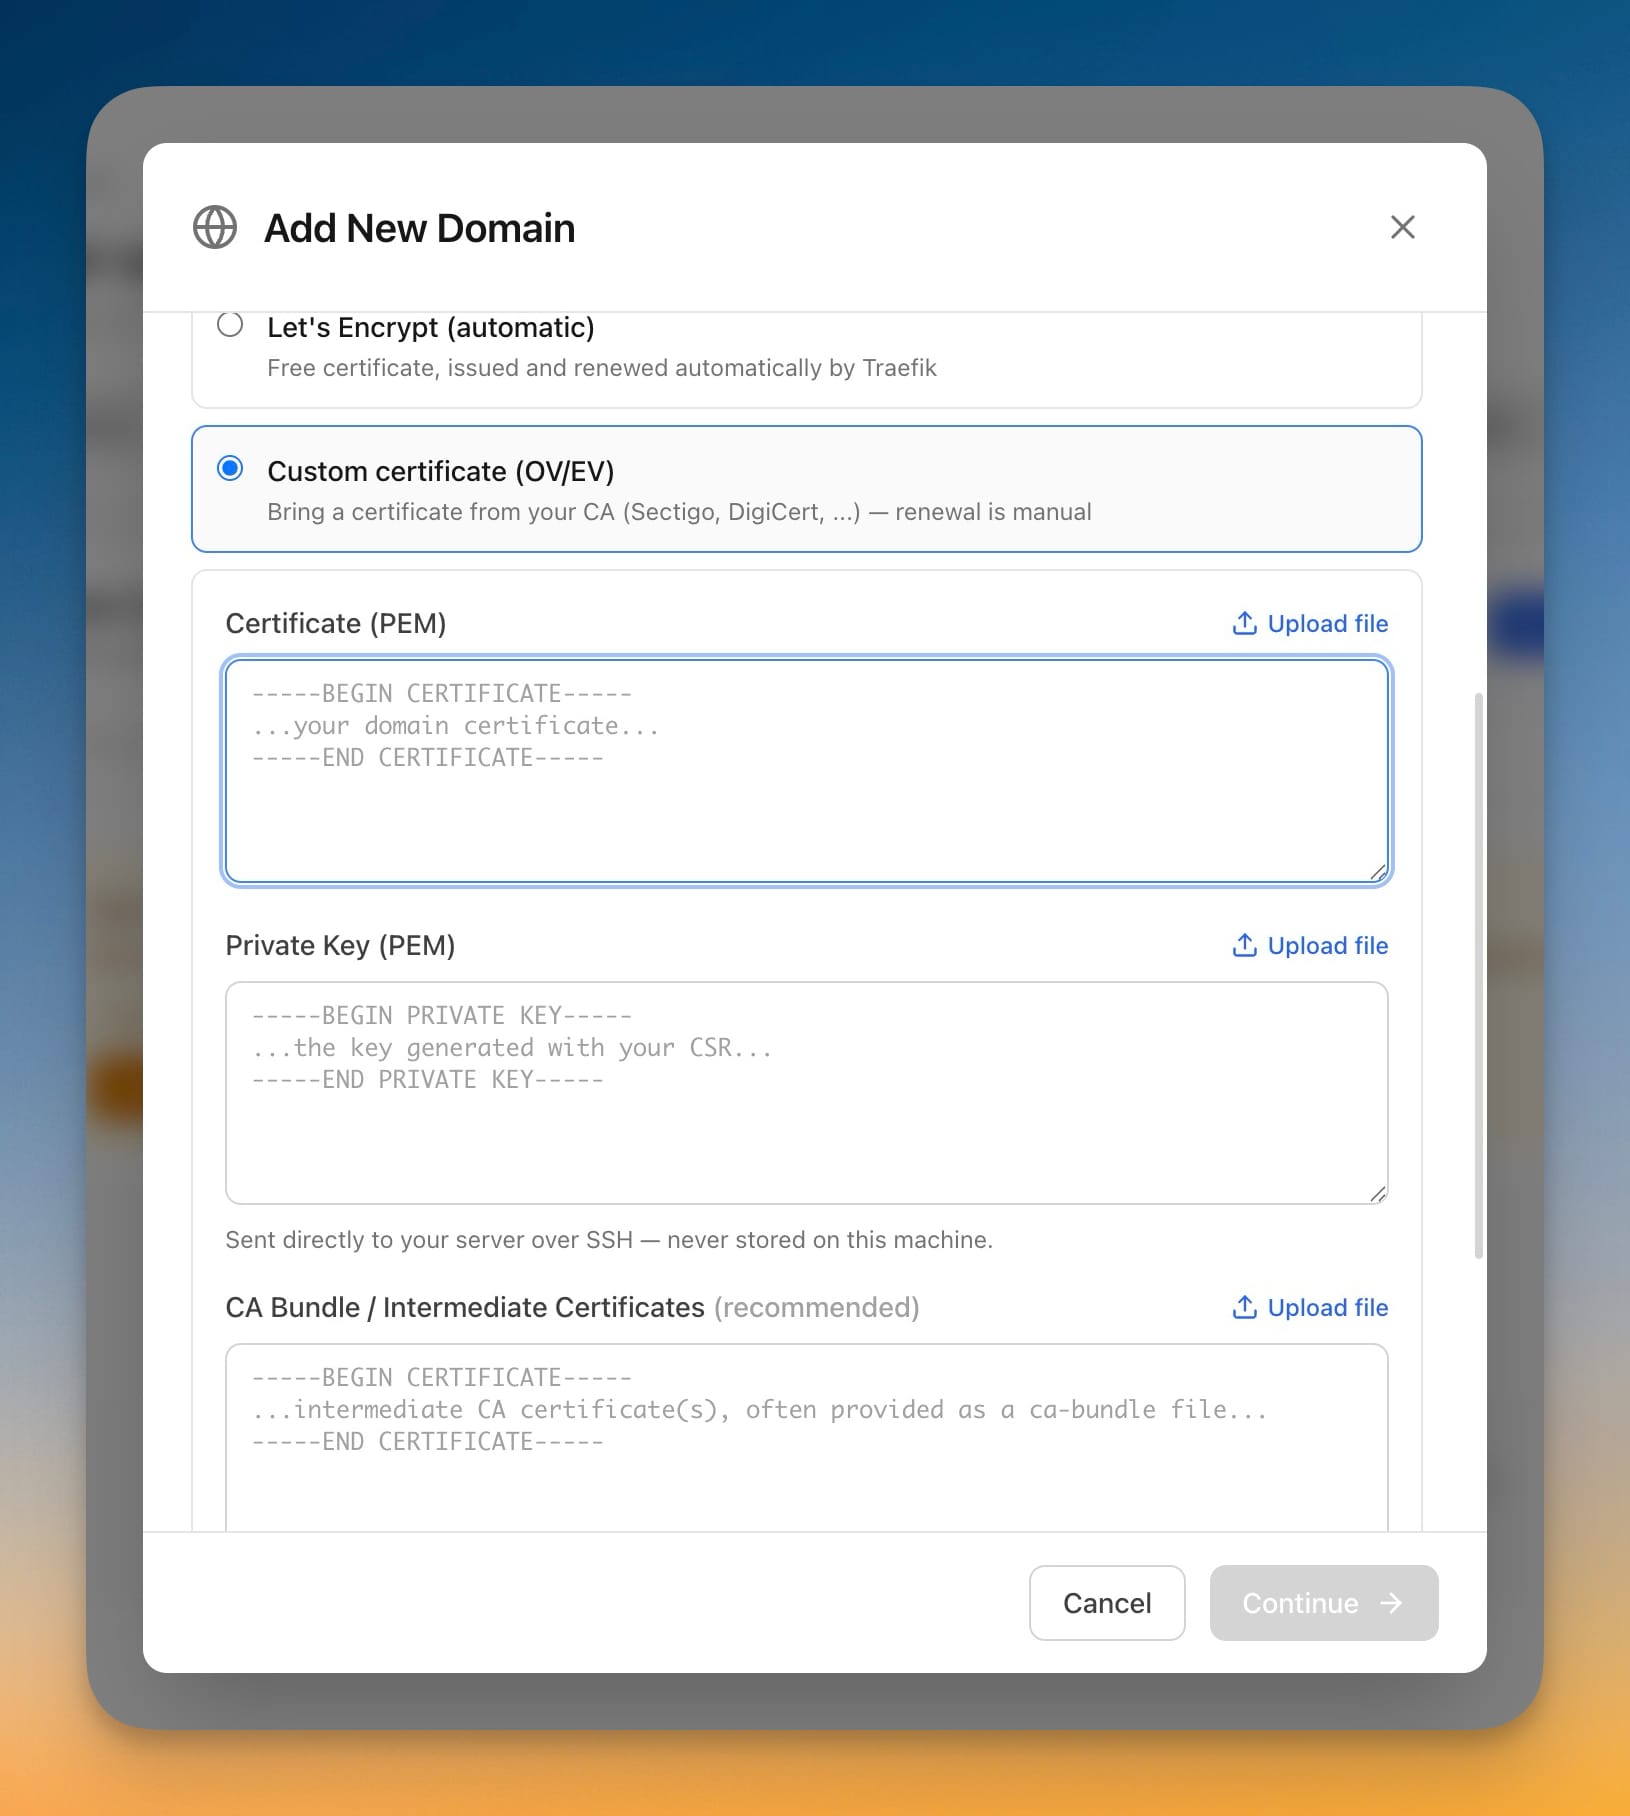
The Add Domain screen now offers two clearly labeled choices: Let's Encrypt (automatic) — free, issued and renewed automatically by Traefik — or Custom certificate (OV/EV) — bring a certificate from your own CA like Sectigo or DigiCert, where renewal is manual. Choosing custom reveals three upload fields: Certificate (PEM), Private Key (PEM), and CA Bundle / Intermediate Certificates.
You don't have to copy-paste long PEM text. Each field has an Upload file button, so you can pick the .pem, .crt, or .key files your certificate authority sent you straight from your computer. And the note under the private key field says exactly what happens to it: it's sent directly to your server over SSH and never stored on the machine you're working from.
Get the certificate validated before you commit
The moment your certificate and key are in, Server Compass checks them. It confirms the certificate matches the private key, that it actually covers the domain you're adding, and that it hasn't expired — the three mistakes that otherwise only surface after your site is already live and broken.
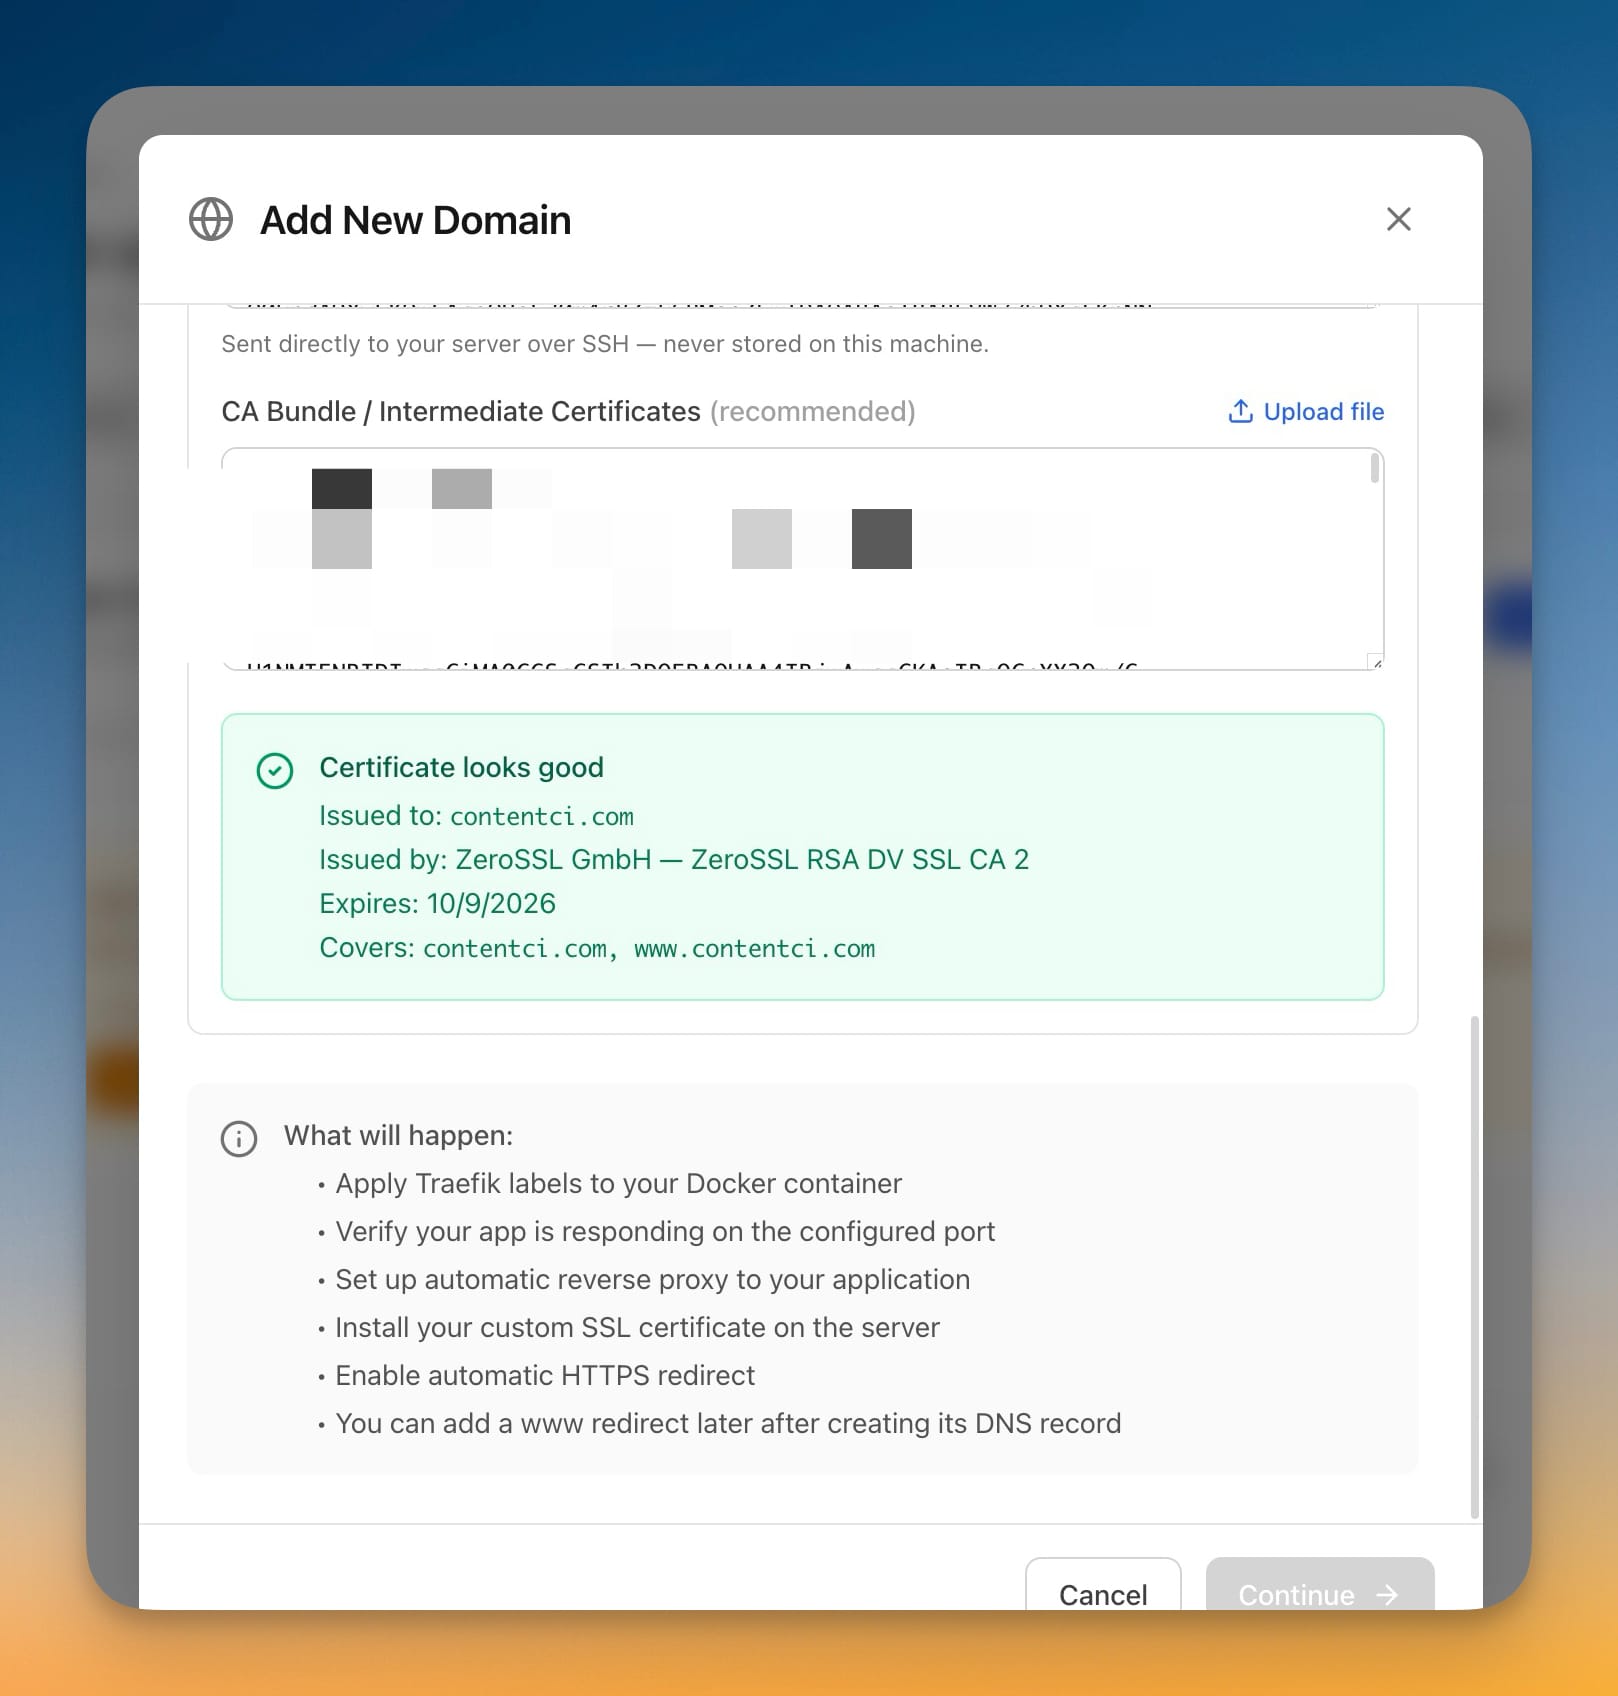
When everything lines up, you get a green Certificate looks good card that reads back what you uploaded: who it was issued to, the issuing certificate authority, the expiry date, and every domain the certificate covers. Below it, Server Compass tells you exactly what it's about to do — apply Traefik labels to your container, verify the app is responding on its port, set up the reverse proxy, install the certificate on the server, and enable the automatic HTTPS redirect. You approve a plan, not a black box.
See custom certificates at a glance afterward
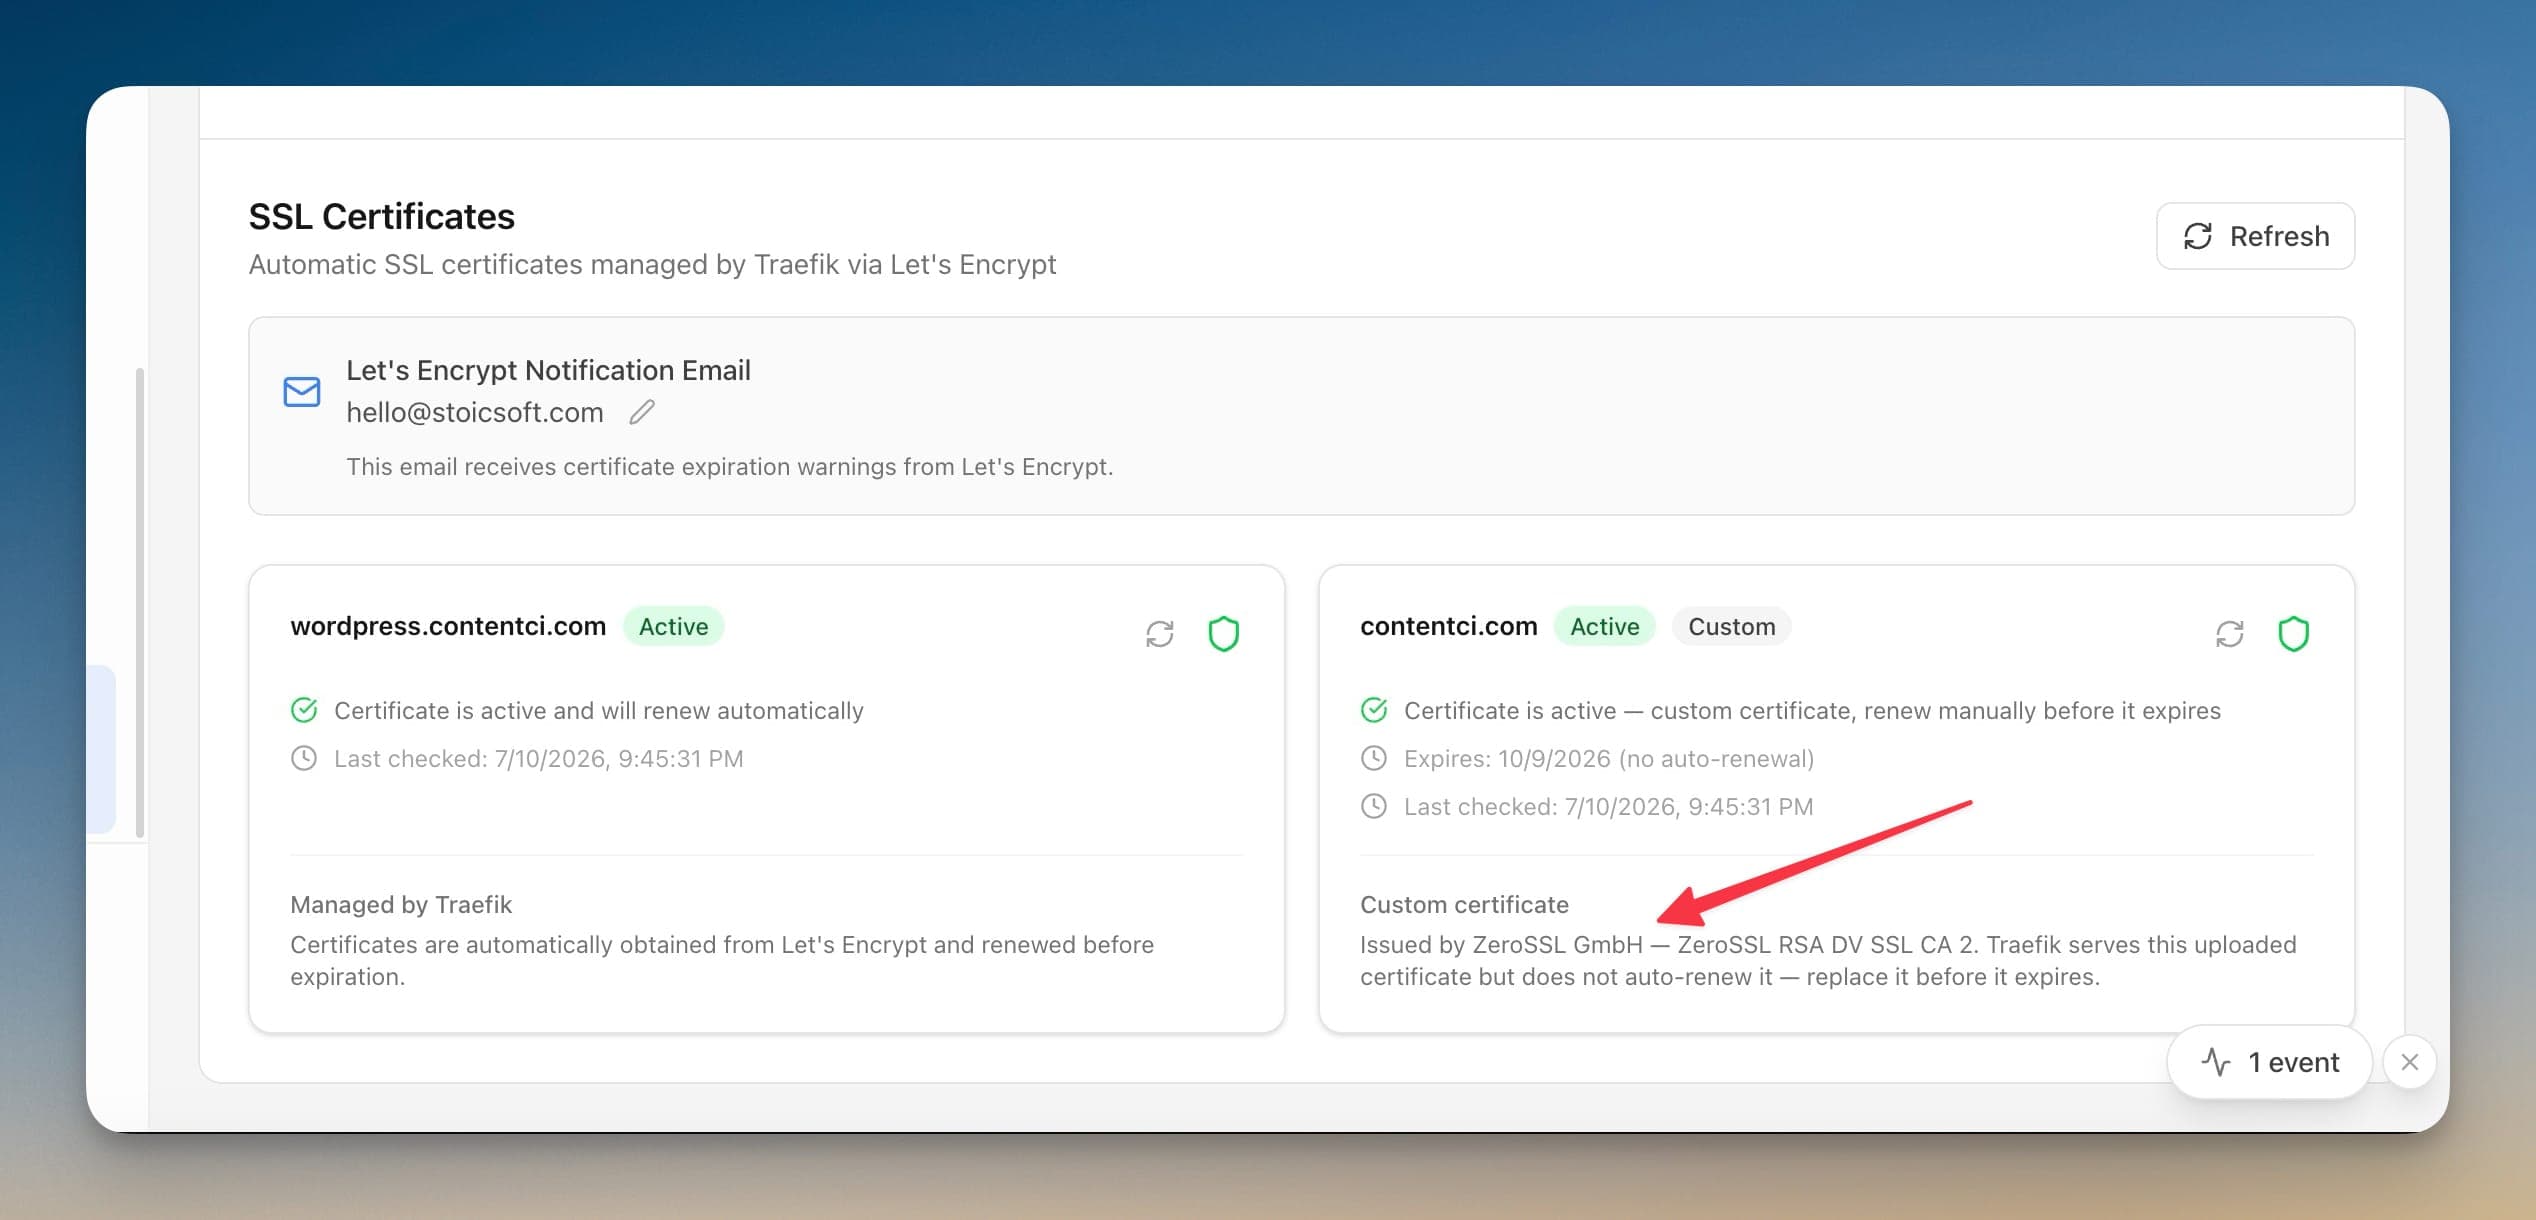
A custom certificate has one property Let's Encrypt doesn't: it won't renew itself. So the SSL Certificates list makes that impossible to forget. Custom domains show a Custom badge next to their status, along with the issuing authority, the real expiry date, and a plain reminder that Traefik serves the uploaded certificate but does not auto-renew it — replace it before it expires.
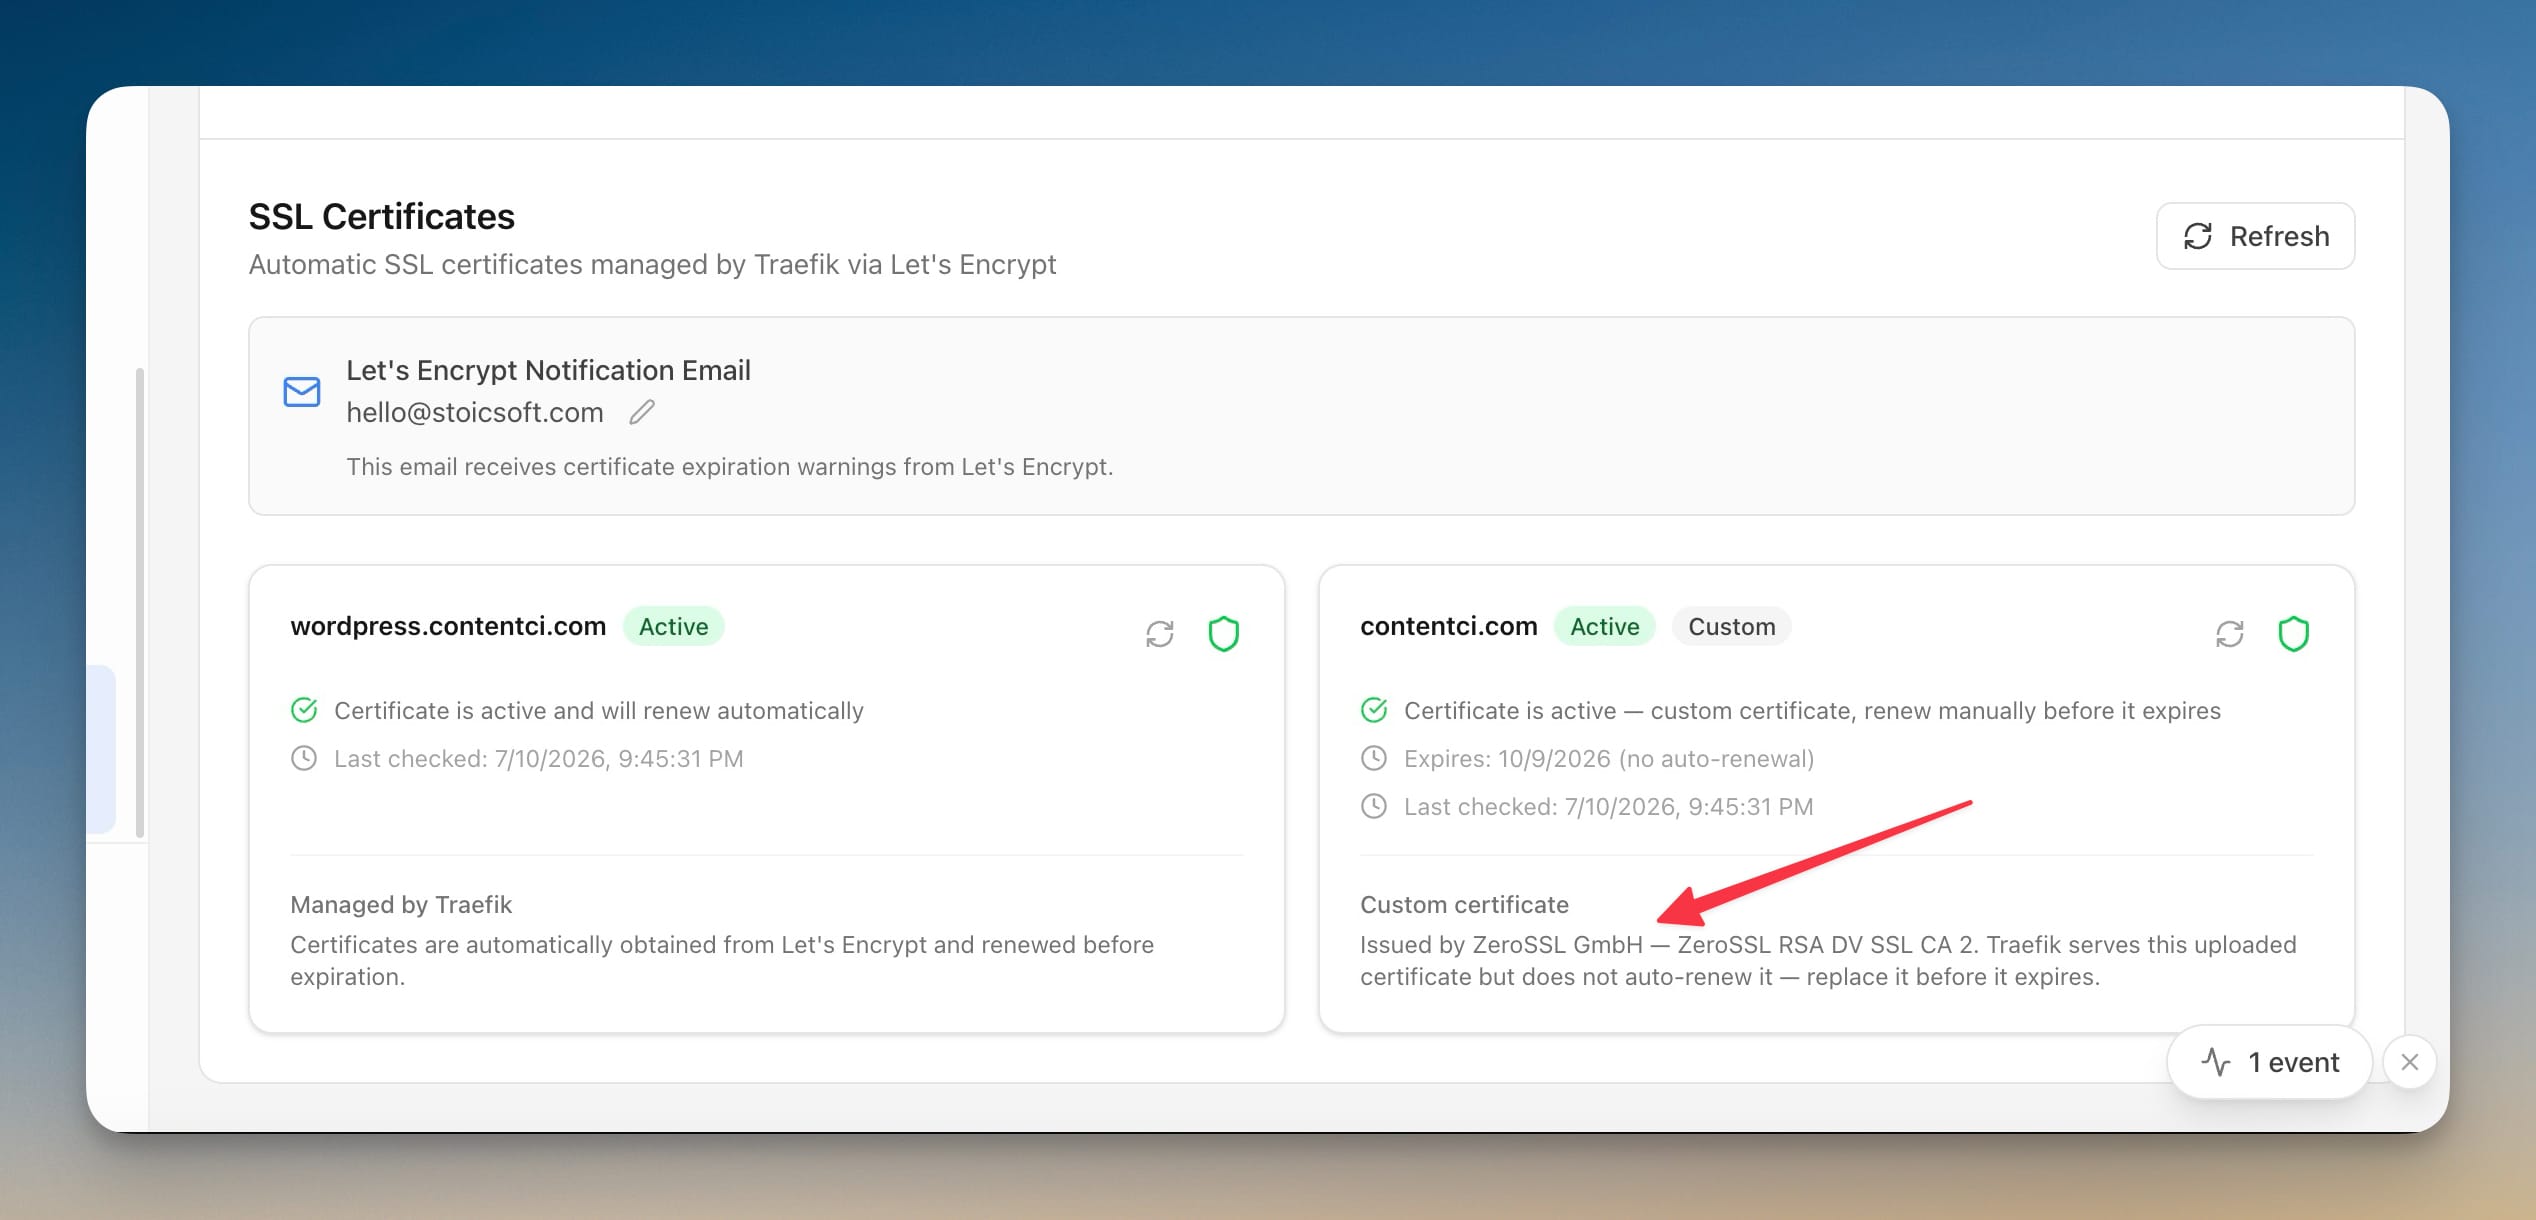
Sitting right next to your Let's Encrypt domains — which still say "renews automatically" — the difference is obvious. You always know which certificates you're responsible for and when the next one is due.
Switch an existing domain over at any time
This isn't only for brand-new domains. Open any domain's SSL settings and you'll find a Use Custom Certificate button to upload a certificate for a domain that's currently on Let's Encrypt. Already on a custom certificate and renewal time has come around? Replace Certificate swaps in the new files. Changed your mind entirely? Use Let's Encrypt hands the domain back to automatic management. You're never locked into the choice you made when you first added the domain.
Before vs after
| Task | Before | Now |
|---|---|---|
| Install a custom certificate | SSH in, paste PEM blocks into files, edit Traefik config by hand | Upload three files in the Add Domain screen |
| Verify the chain and key match | Reload the proxy, open the site, hope it works everywhere | Validated before you submit, with a clear pass/fail |
| Know when it expires | Set your own calendar reminder and pray | Expiry date and a manual-renewal badge in the SSL list |
| Renew | Repeat the whole manual process from memory | Replace Certificate, upload the new files |
| Switch back to Let's Encrypt | Undo the config by hand | One button |
Terminals that stay put
The same release fixes a smaller annoyance that adds up over a long session. Terminal tabs are now persistent: when you open a terminal, run something, then jump to another screen to check a container or edit a domain, the session is still there — and still running — when you come back. Long-running commands keep going in the background even when the terminal isn't the active window, so a build, a migration, or a log tail no longer dies the moment you look away.
Who benefits most
Teams under compliance requirements. If your security policy or a client contract dictates a specific CA, OV, or EV certificate, you can finally satisfy it without leaving the tool that manages everything else.
Agencies running client sites. Some clients arrive with a certificate already purchased. Now onboarding that domain is an upload, not a manual server-configuration task you have to schedule and document.
Anyone with an internal or wildcard certificate. Domains that Let's Encrypt can't or shouldn't issue for — internal hostnames, wildcard certs bought in bulk — now get the same one-screen setup as everything else.
Try it
Update to the latest version of Server Compass, open a domain, and choose Custom certificate when you add it or from its SSL settings. Upload your files, watch them validate, and let Server Compass handle the proxy and the install. Your own certificate, served over HTTPS, without a single line of config edited by hand.