July 21, 2026
How to Auto-Deploy to Your VPS on Every Git Push (No Exposed SSH)
Turn on Auto Deploy in Server Compass v1.34.0 and every push to your branch deploys itself — through an always-on worker on your server, with the desktop app closed and your SSH port private. A full step-by-step setup using a Cloudflare Tunnel.
Every developer who self-hosts hits the same wall eventually. You make a change, commit it, push to GitHub — and then you have to go do the deploy. Open the desktop app, find the app, click Redeploy, wait. Miss that last step and production quietly keeps serving yesterday's code.
The usual fixes all have a catch. Keep your laptop awake and the app open so it can watch the repo? Fragile. Wire up a CI runner that SSHes into your box? Now you're poking a hole in your firewall and handing a deploy key to a third party. Poll the repository every few minutes? Slow, wasteful, and still needs something running.
Server Compass v1.34.0 removes the wall. Turn on Auto Deploy for a GitHub-connected app and every push to your tracked branch deploys the exact commit on its own — through an always-on worker that lives on your server. Your computer can be asleep. Your SSH port can stay private. GitHub just sends a signed webhook over HTTPS, and your server does the rest.
This tutorial walks through the whole setup end to end, using a Cloudflare Tunnel as the public entry point.
What you'll need
- Server Compass with a Pro license (Auto Deploy runs a licensed always-on service).
- An app deployed from a GitHub repository that builds on your VPS. Auto Deploy tracks a branch of a real GitHub-connected app — it isn't available for registry-only or upload deployments.
- A public HTTPS address GitHub can reach. GitHub's webhooks come from the public internet, so it needs some way in. You have three options, and you pick one during setup:
- Server Compass–managed Traefik — attach the gateway route to your existing
traefik-publicnetwork. - Existing reverse proxy — route a hostname you already control to the loopback gateway port.
- Stable tunnel — a named Cloudflare Tunnel (or equivalent) that forwards to the gateway. This is the one we'll use because it works even on servers with no public inbound ports at all.
- Server Compass–managed Traefik — attach the gateway route to your existing
Step 1 — Deploy an app from GitHub, building on the VPS
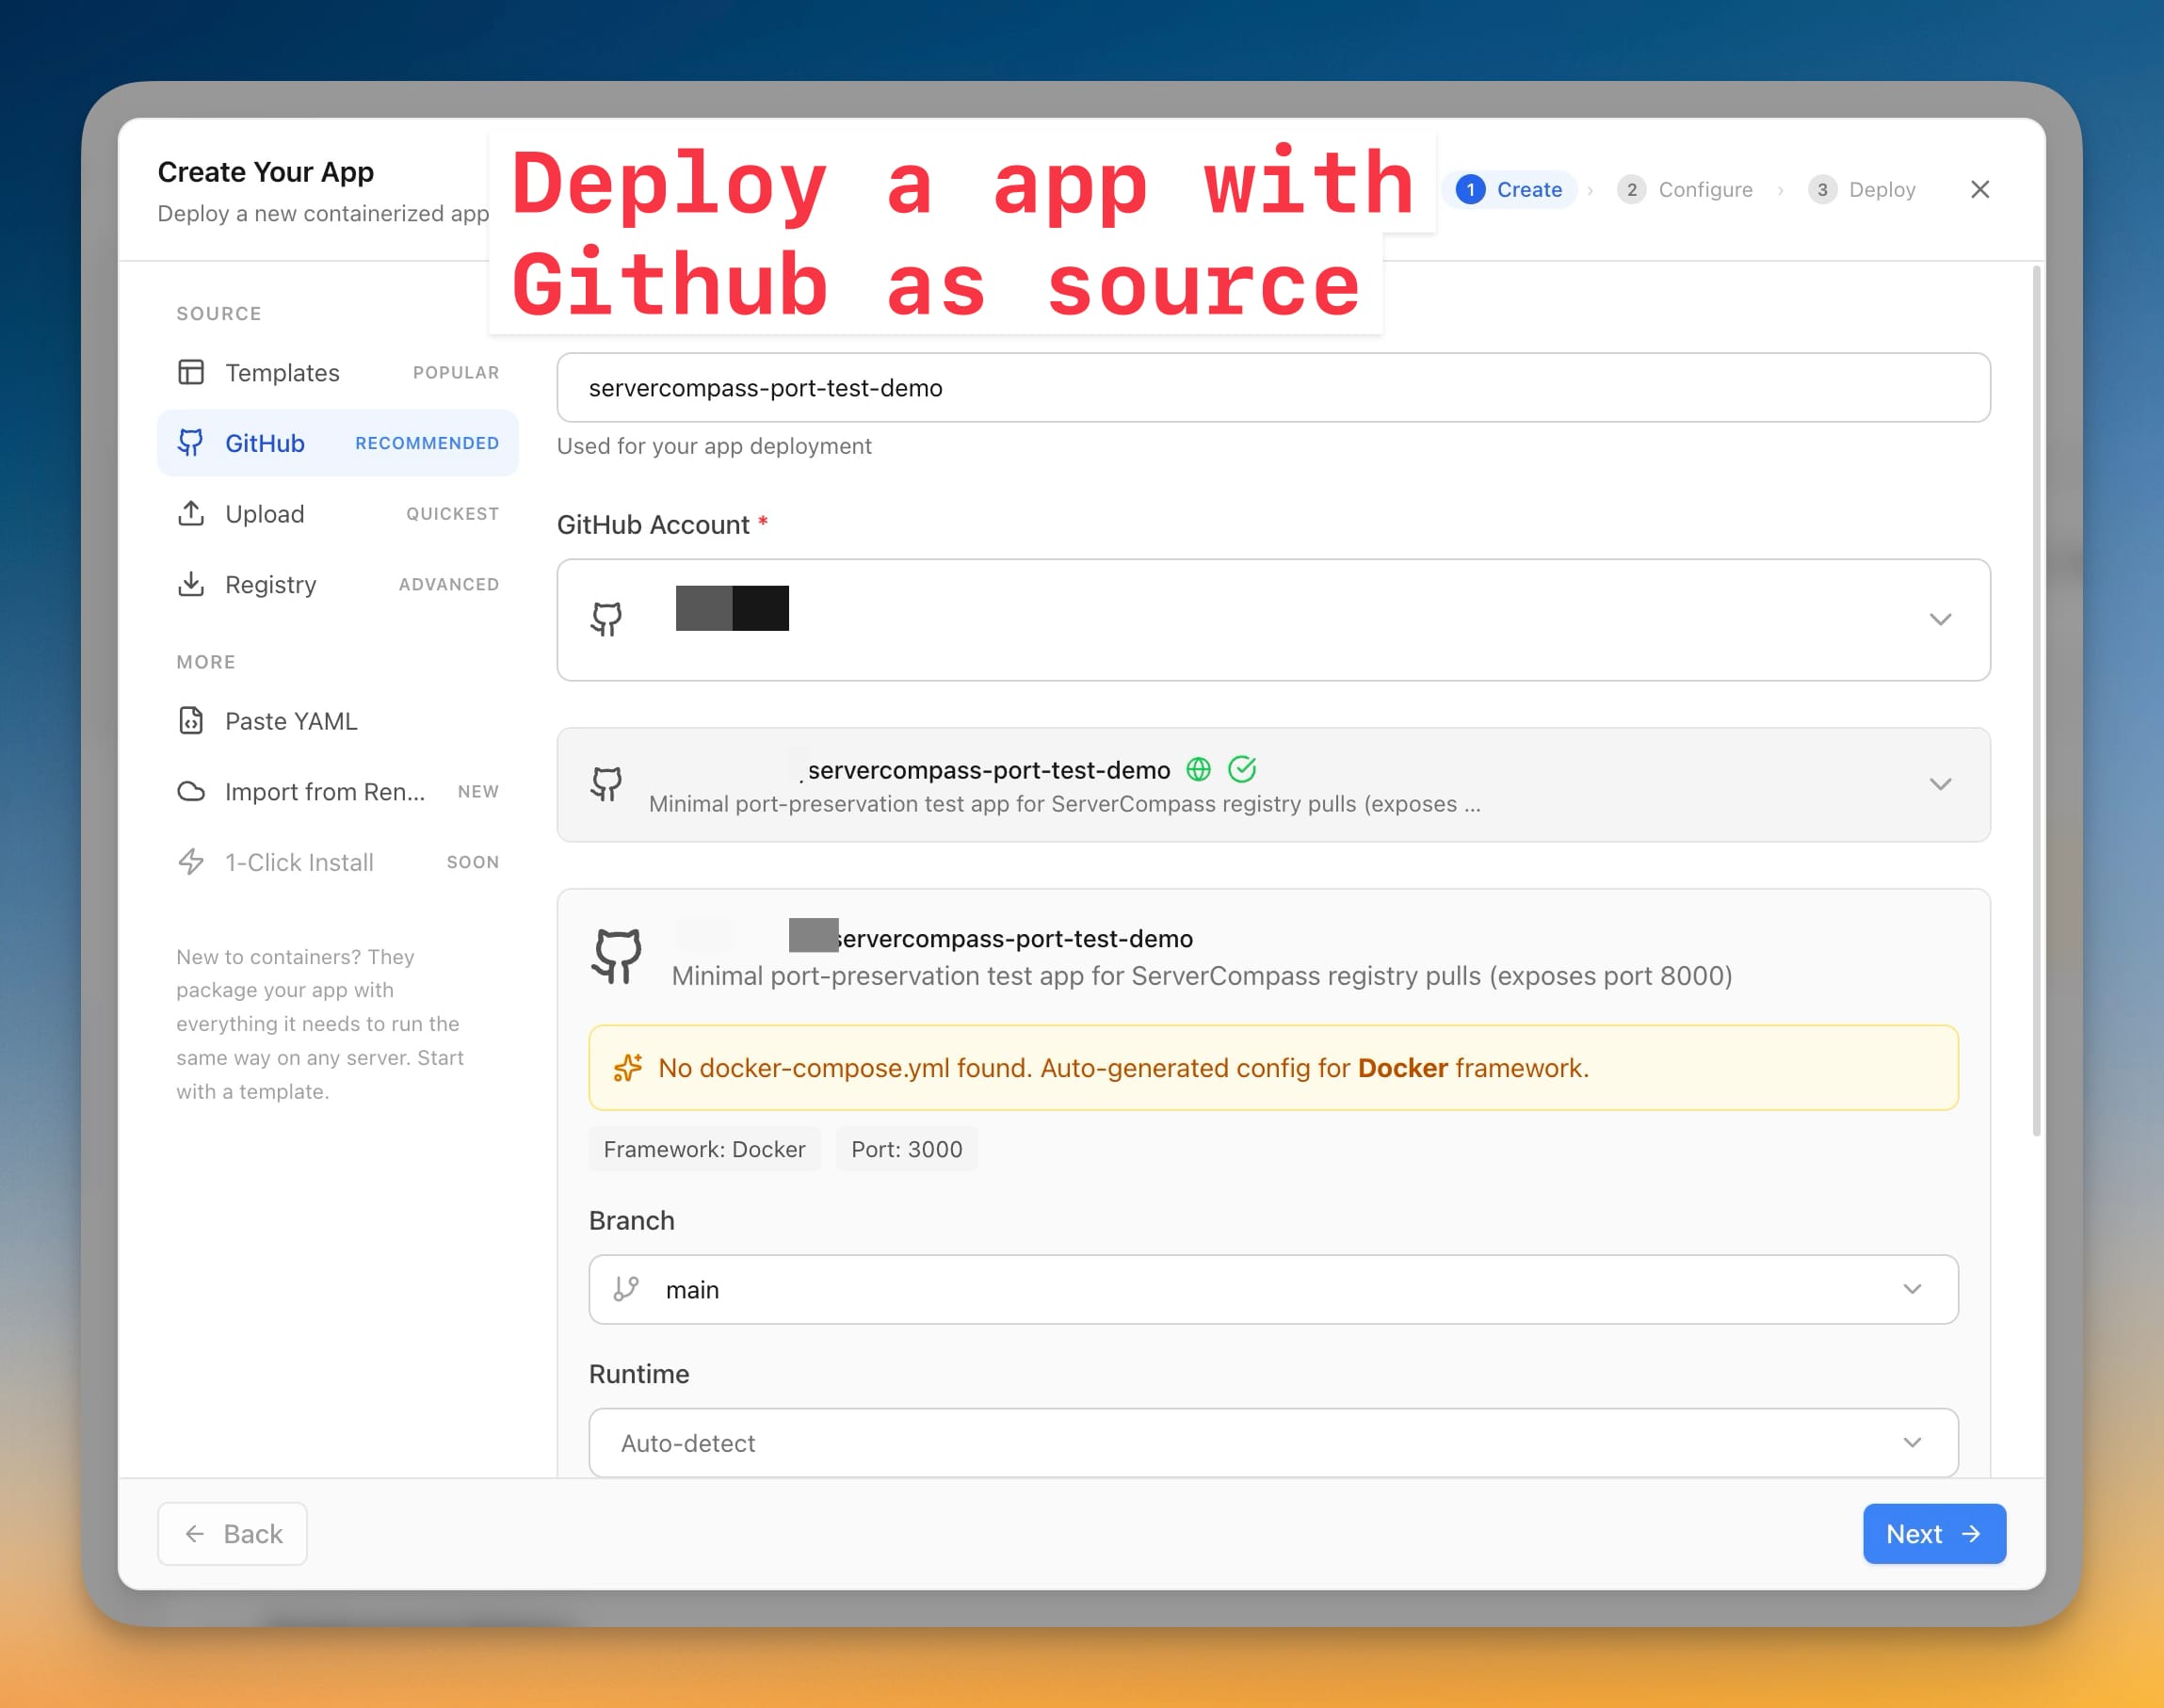
Auto Deploy attaches to an existing app, so start by creating one from a GitHub source if you haven't already. In Create Your App, choose GitHub as the source, pick your account and repository, and select the branch you want to track — main in this example. Server Compass auto-detects the framework and, if there's no docker-compose.yml, generates one for you.
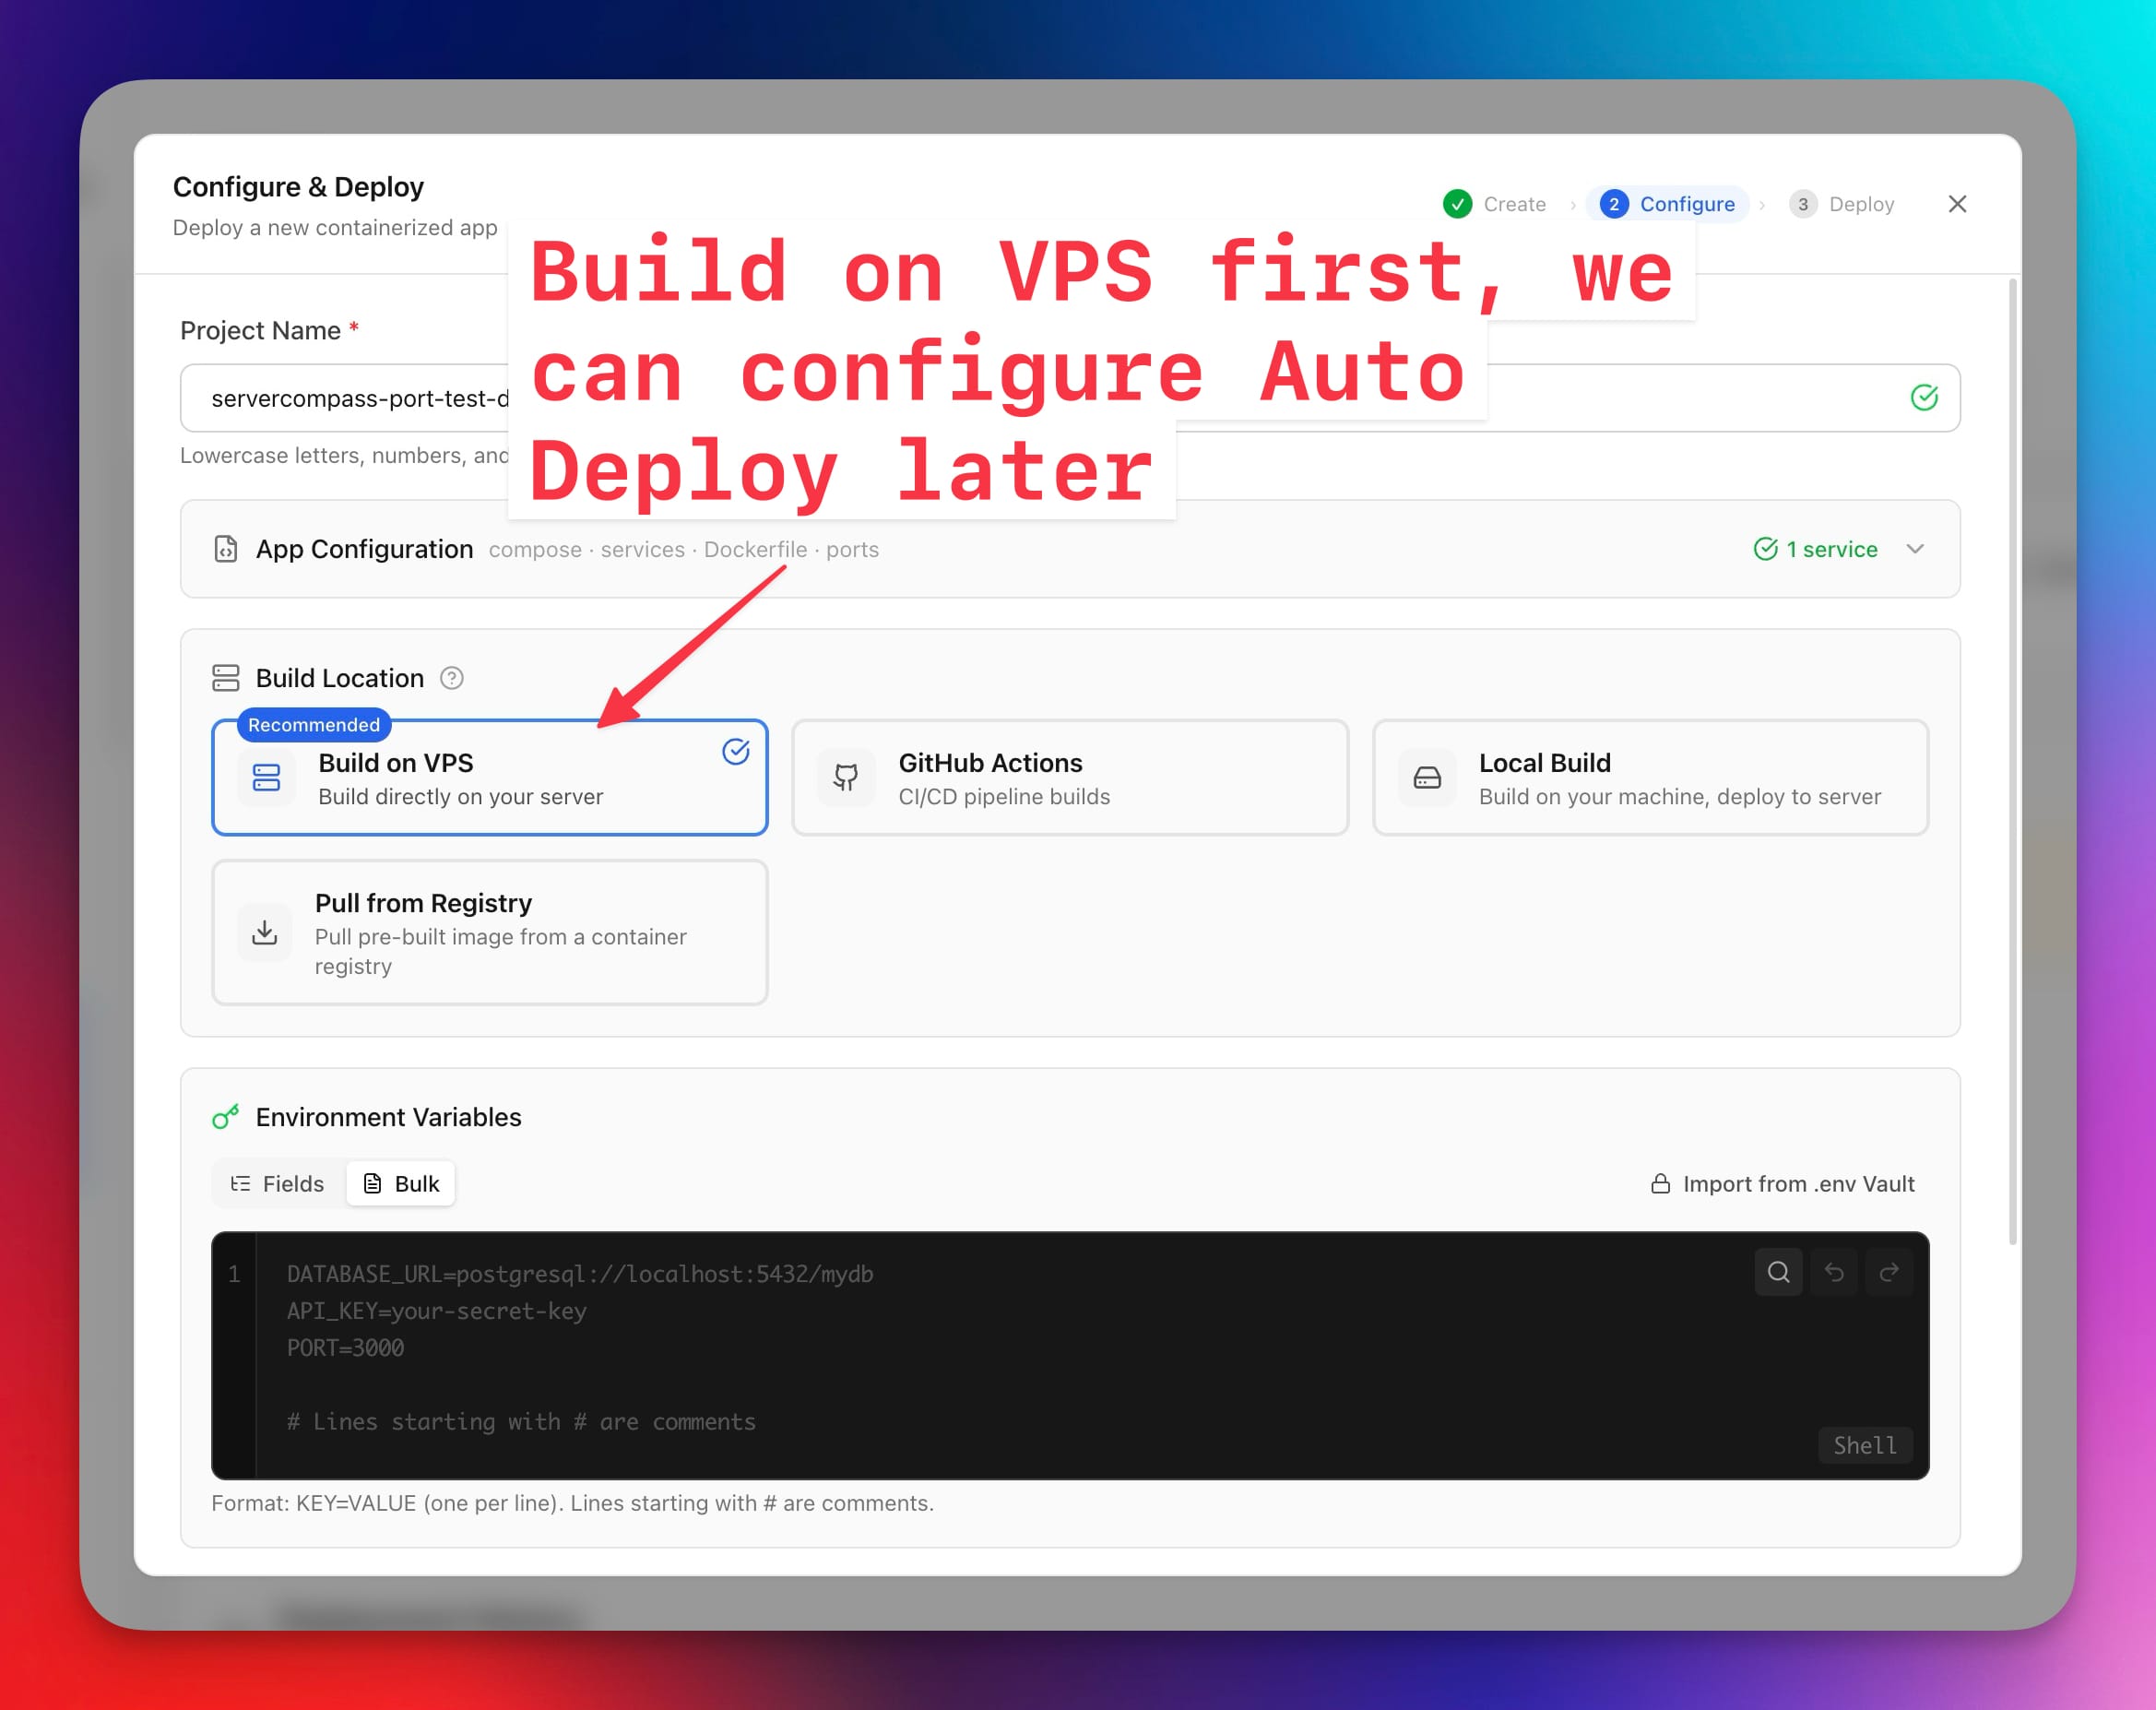
On the next step, set Build Location to Build on VPS. This matters: Auto Deploy redeploys by building the tracked commit on the server, so the server-side Compose stays authoritative. You can wire up Auto Deploy after the first manual deploy succeeds.
Step 2 — Open Deployments and start Auto Deploy setup
Once the app is live, open it and switch to the Deployments tab. You'll see the source repository, the tracked branch, and an Auto Deploy card that reads: "Deploy every push to main through an always-on worker on this server. Server Compass does not need to stay open." Click Set up Auto Deploy to begin.
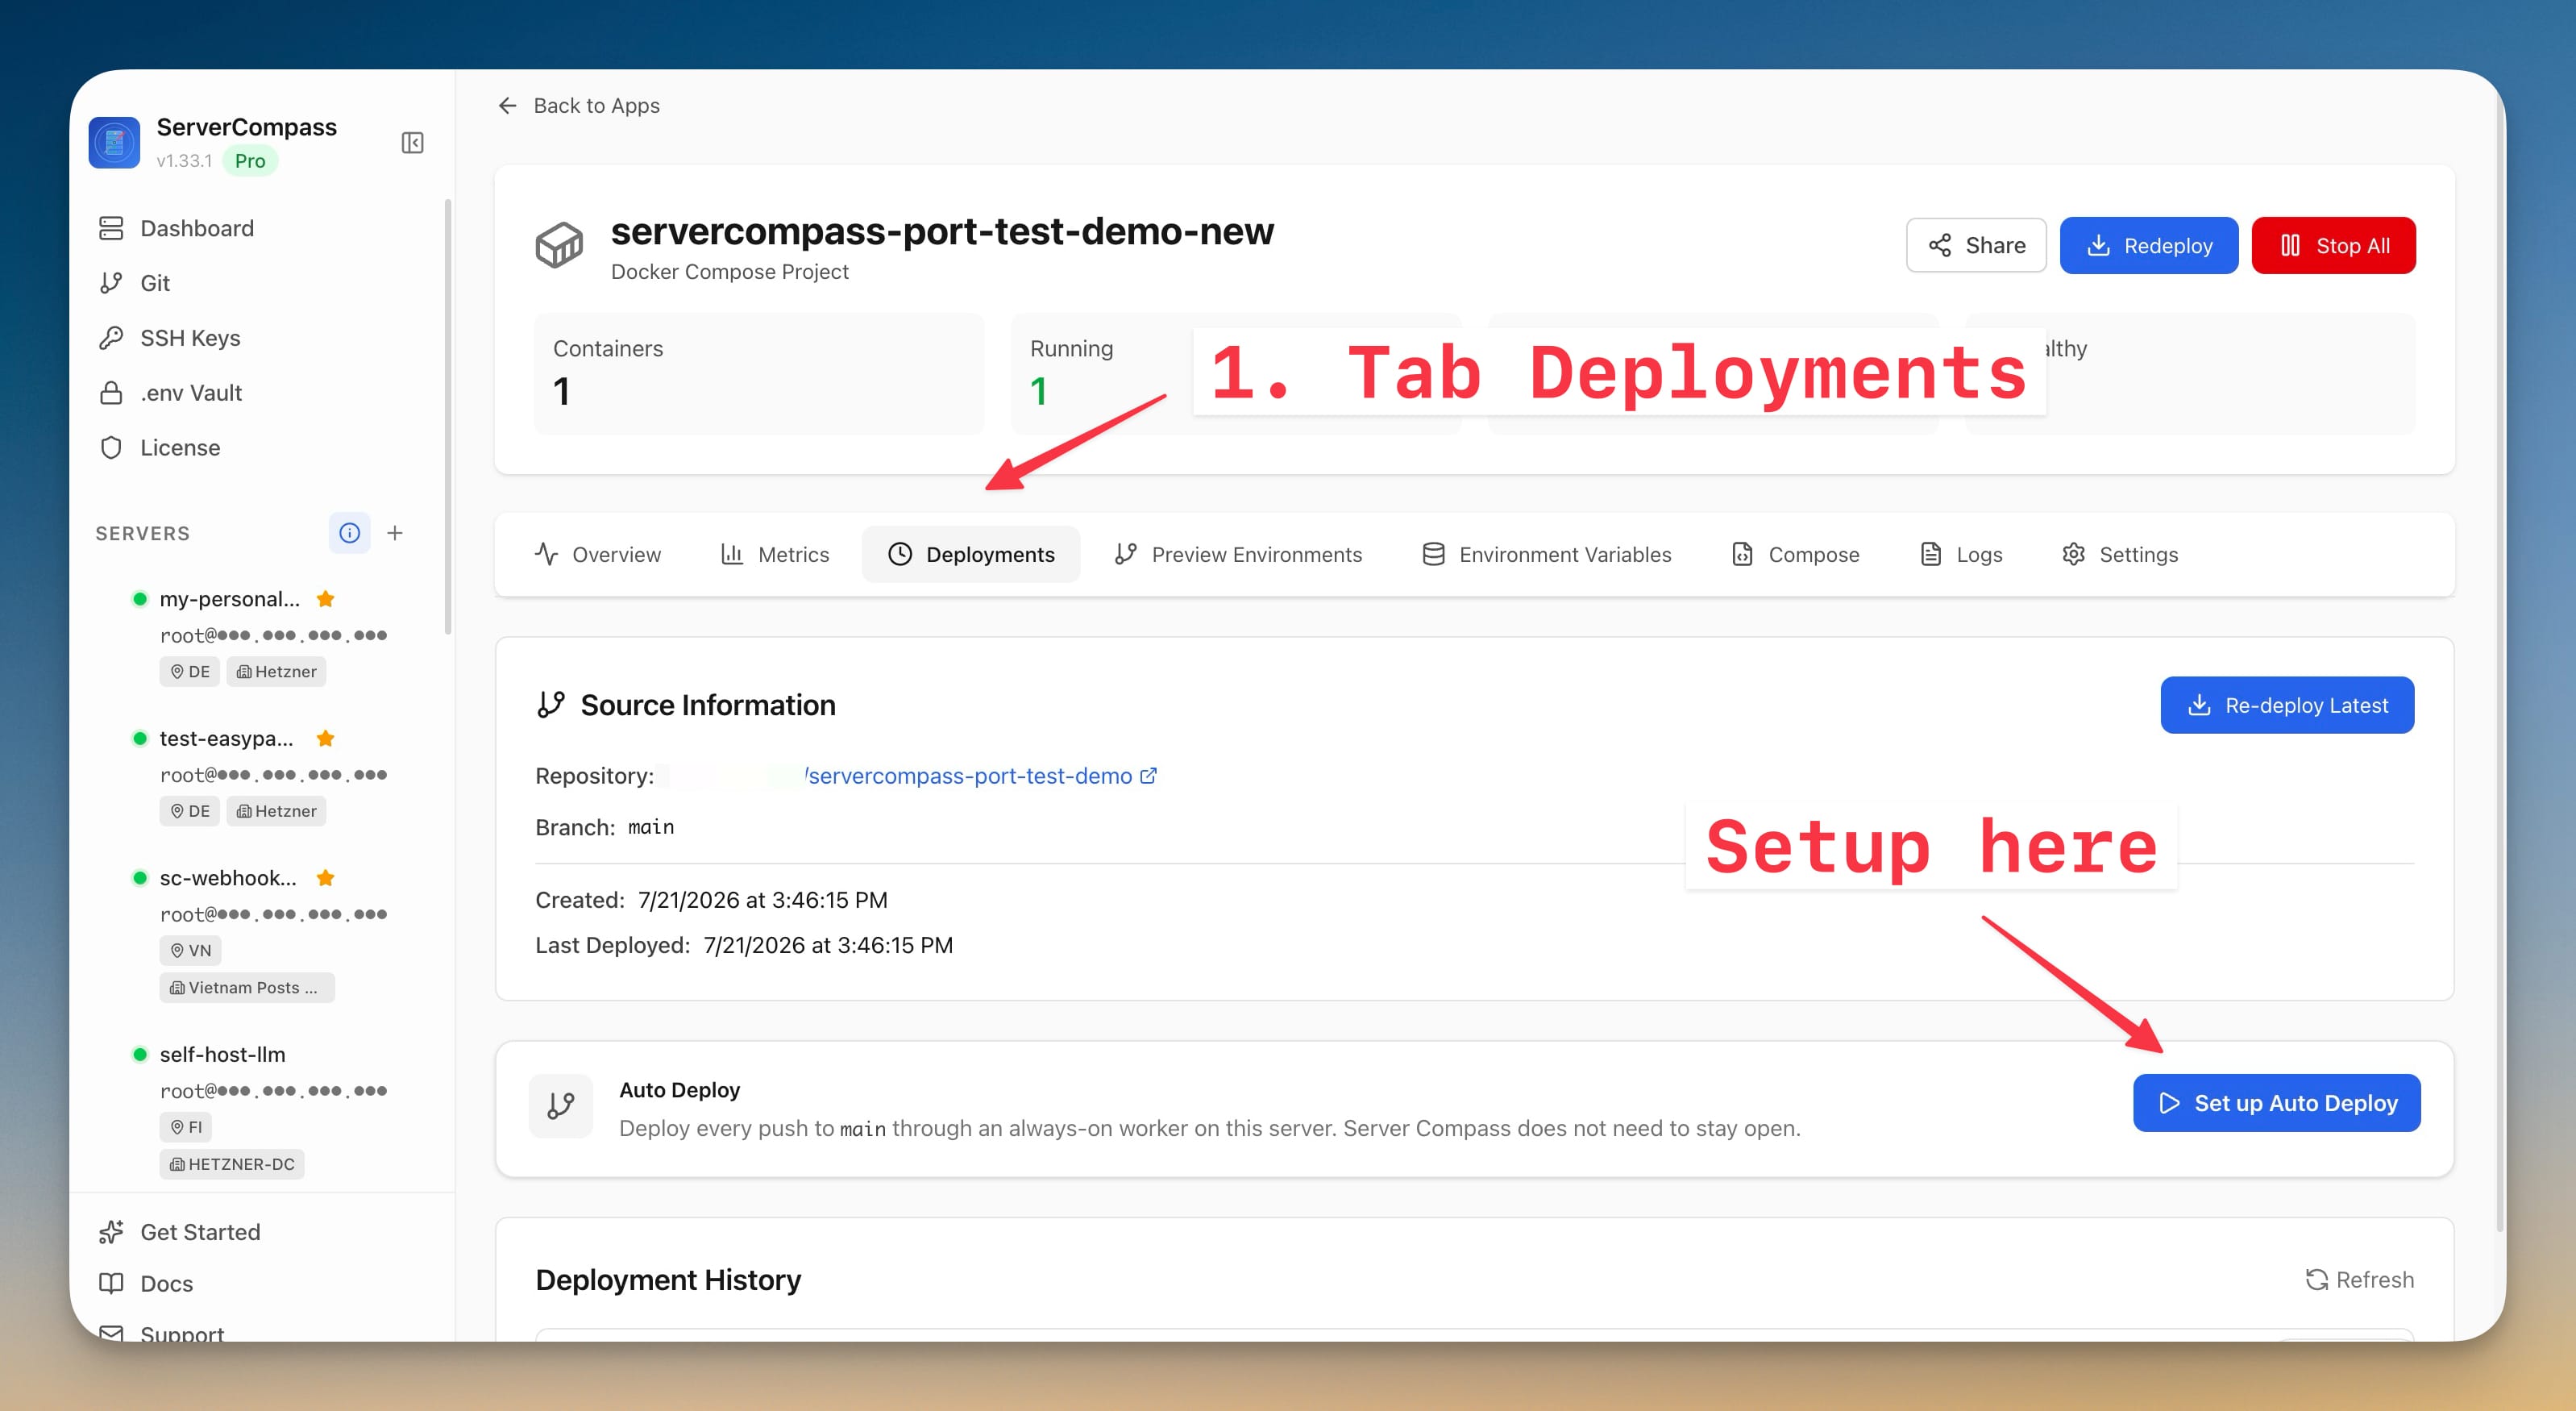
Step 3 — Choose how GitHub reaches your server
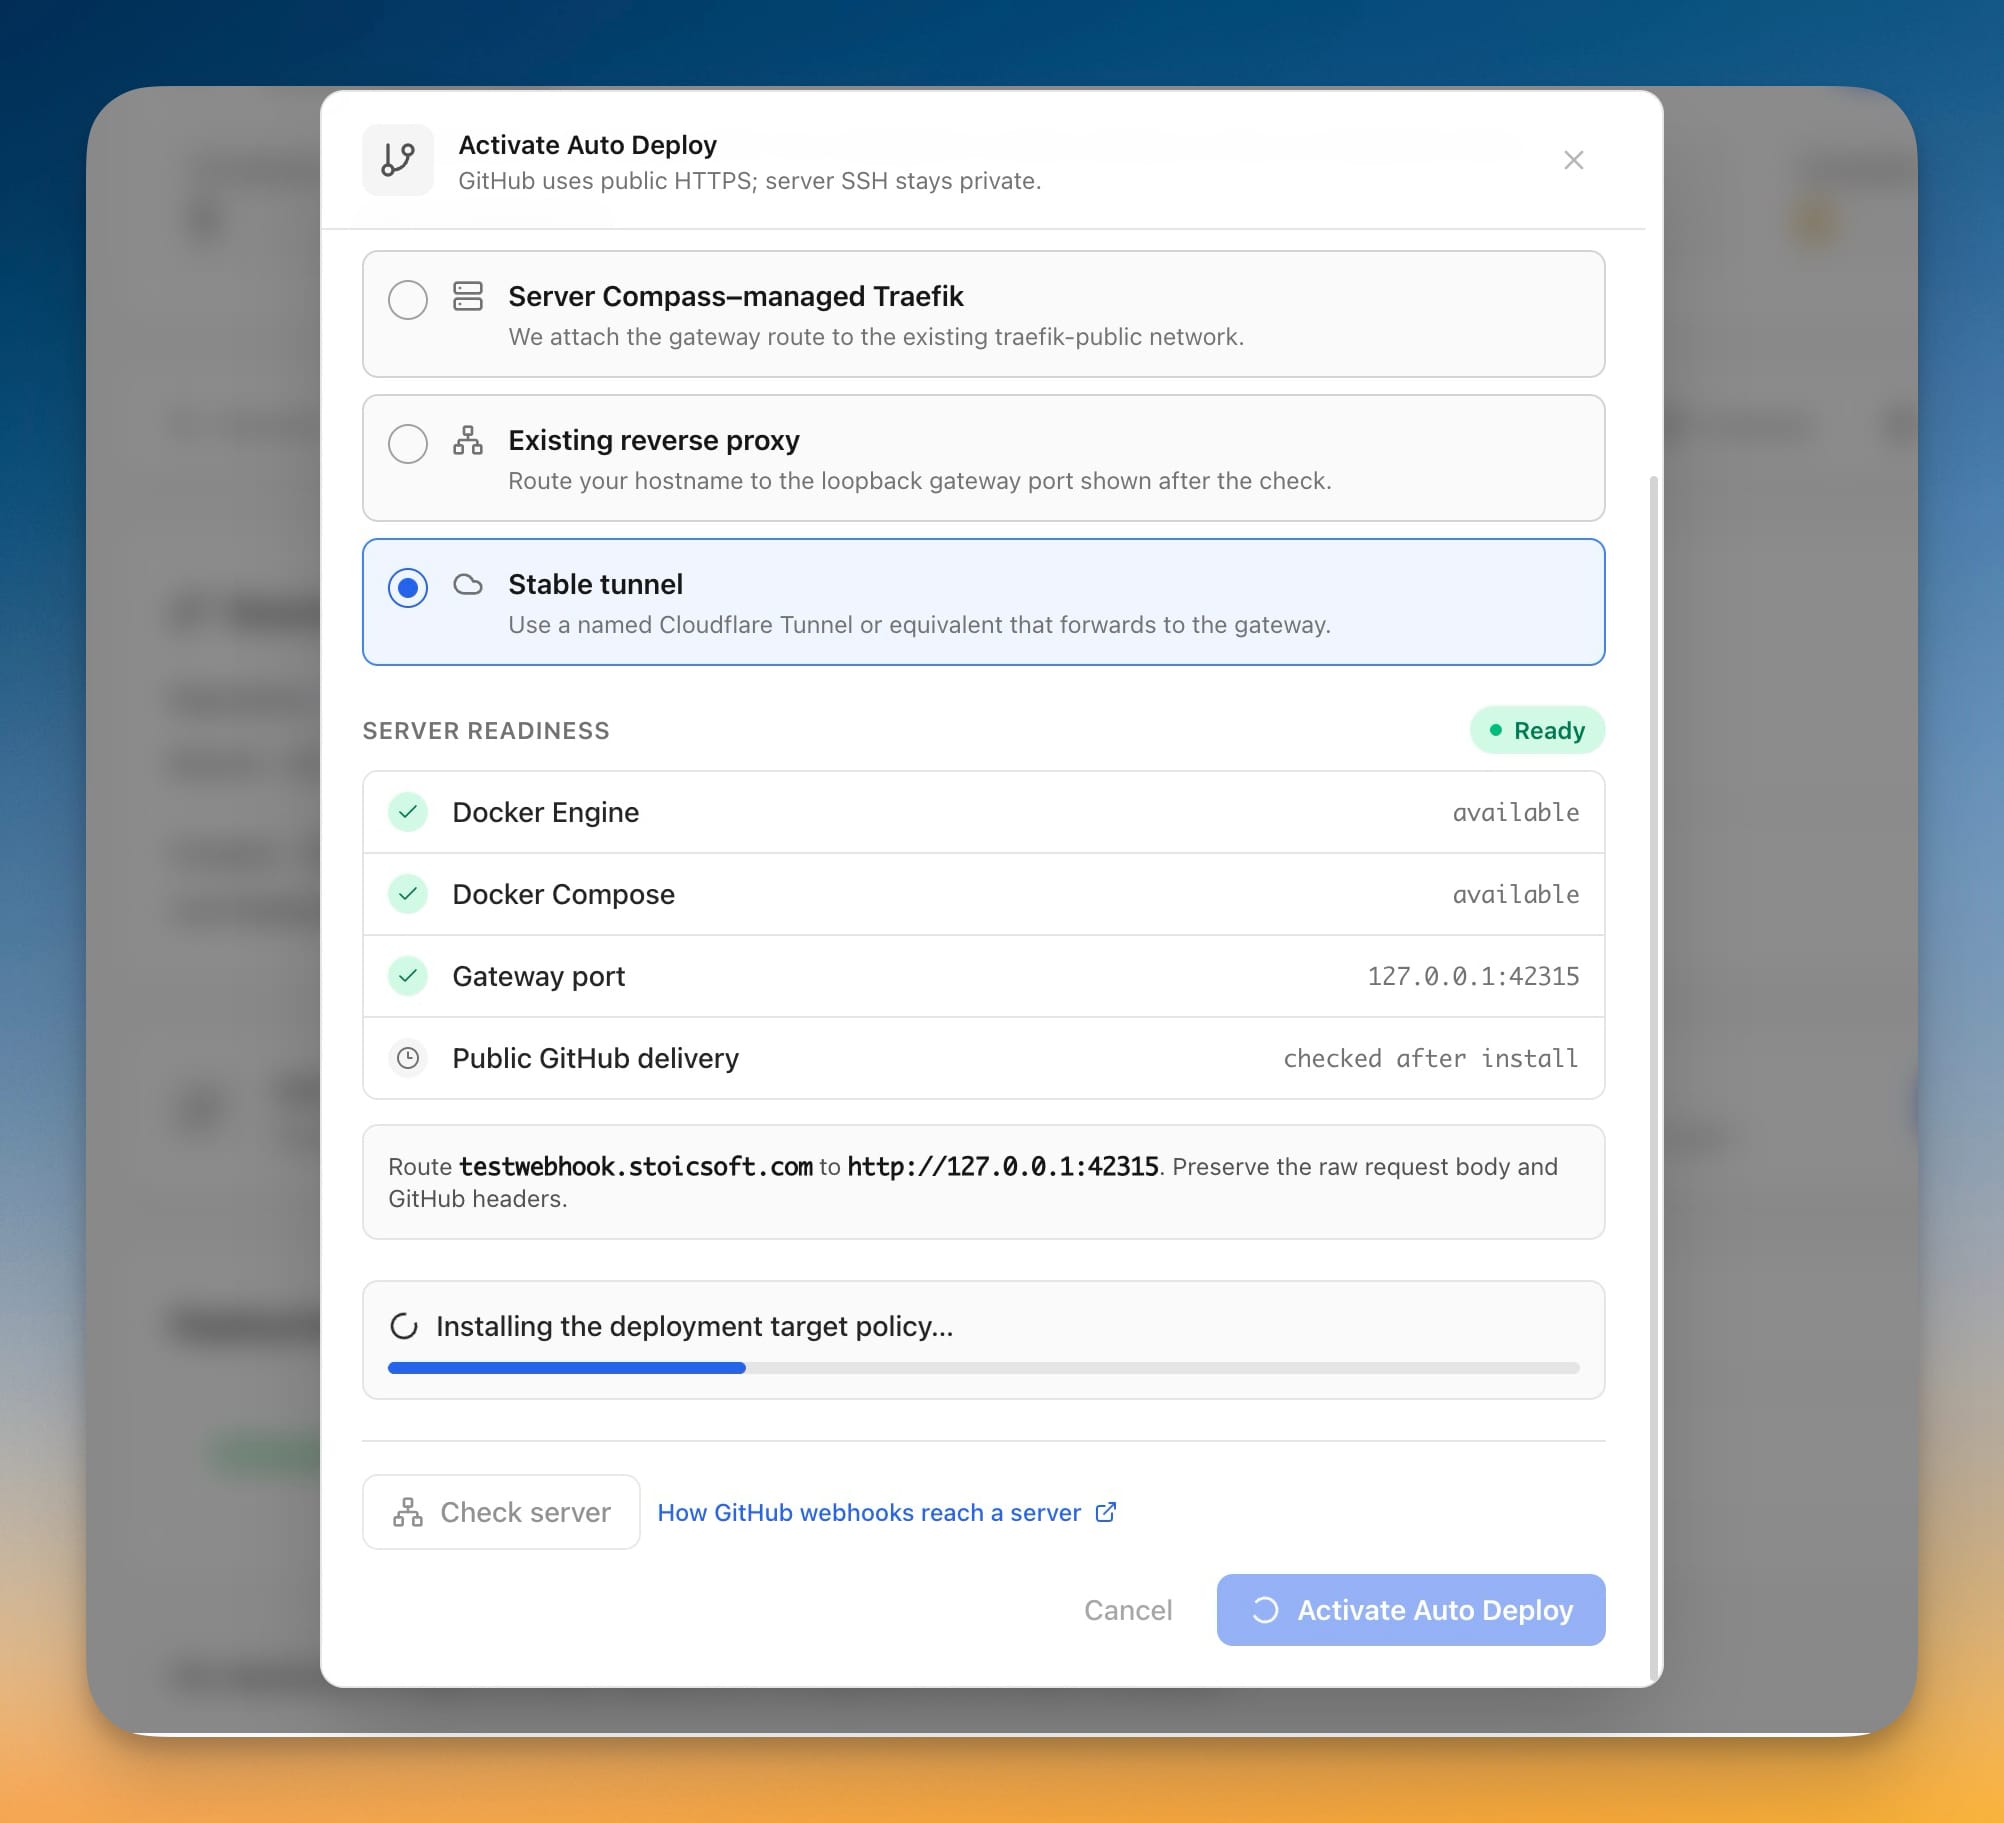
This is the heart of the setup. The Activate Auto Deploy dialog opens with the reminder that GitHub uses public HTTPS while your server's SSH stays private. Enter the public hostname GitHub will call — here, a testwebhook subdomain — and choose your Route ownership. We're picking Stable tunnel.
Below that, the Server readiness check confirms Docker Engine and Docker Compose are available and shows the gateway port the receiver listens on (a loopback address like 127.0.0.1:42315). Note that port — you'll forward your tunnel to it. Public GitHub delivery is checked after install.
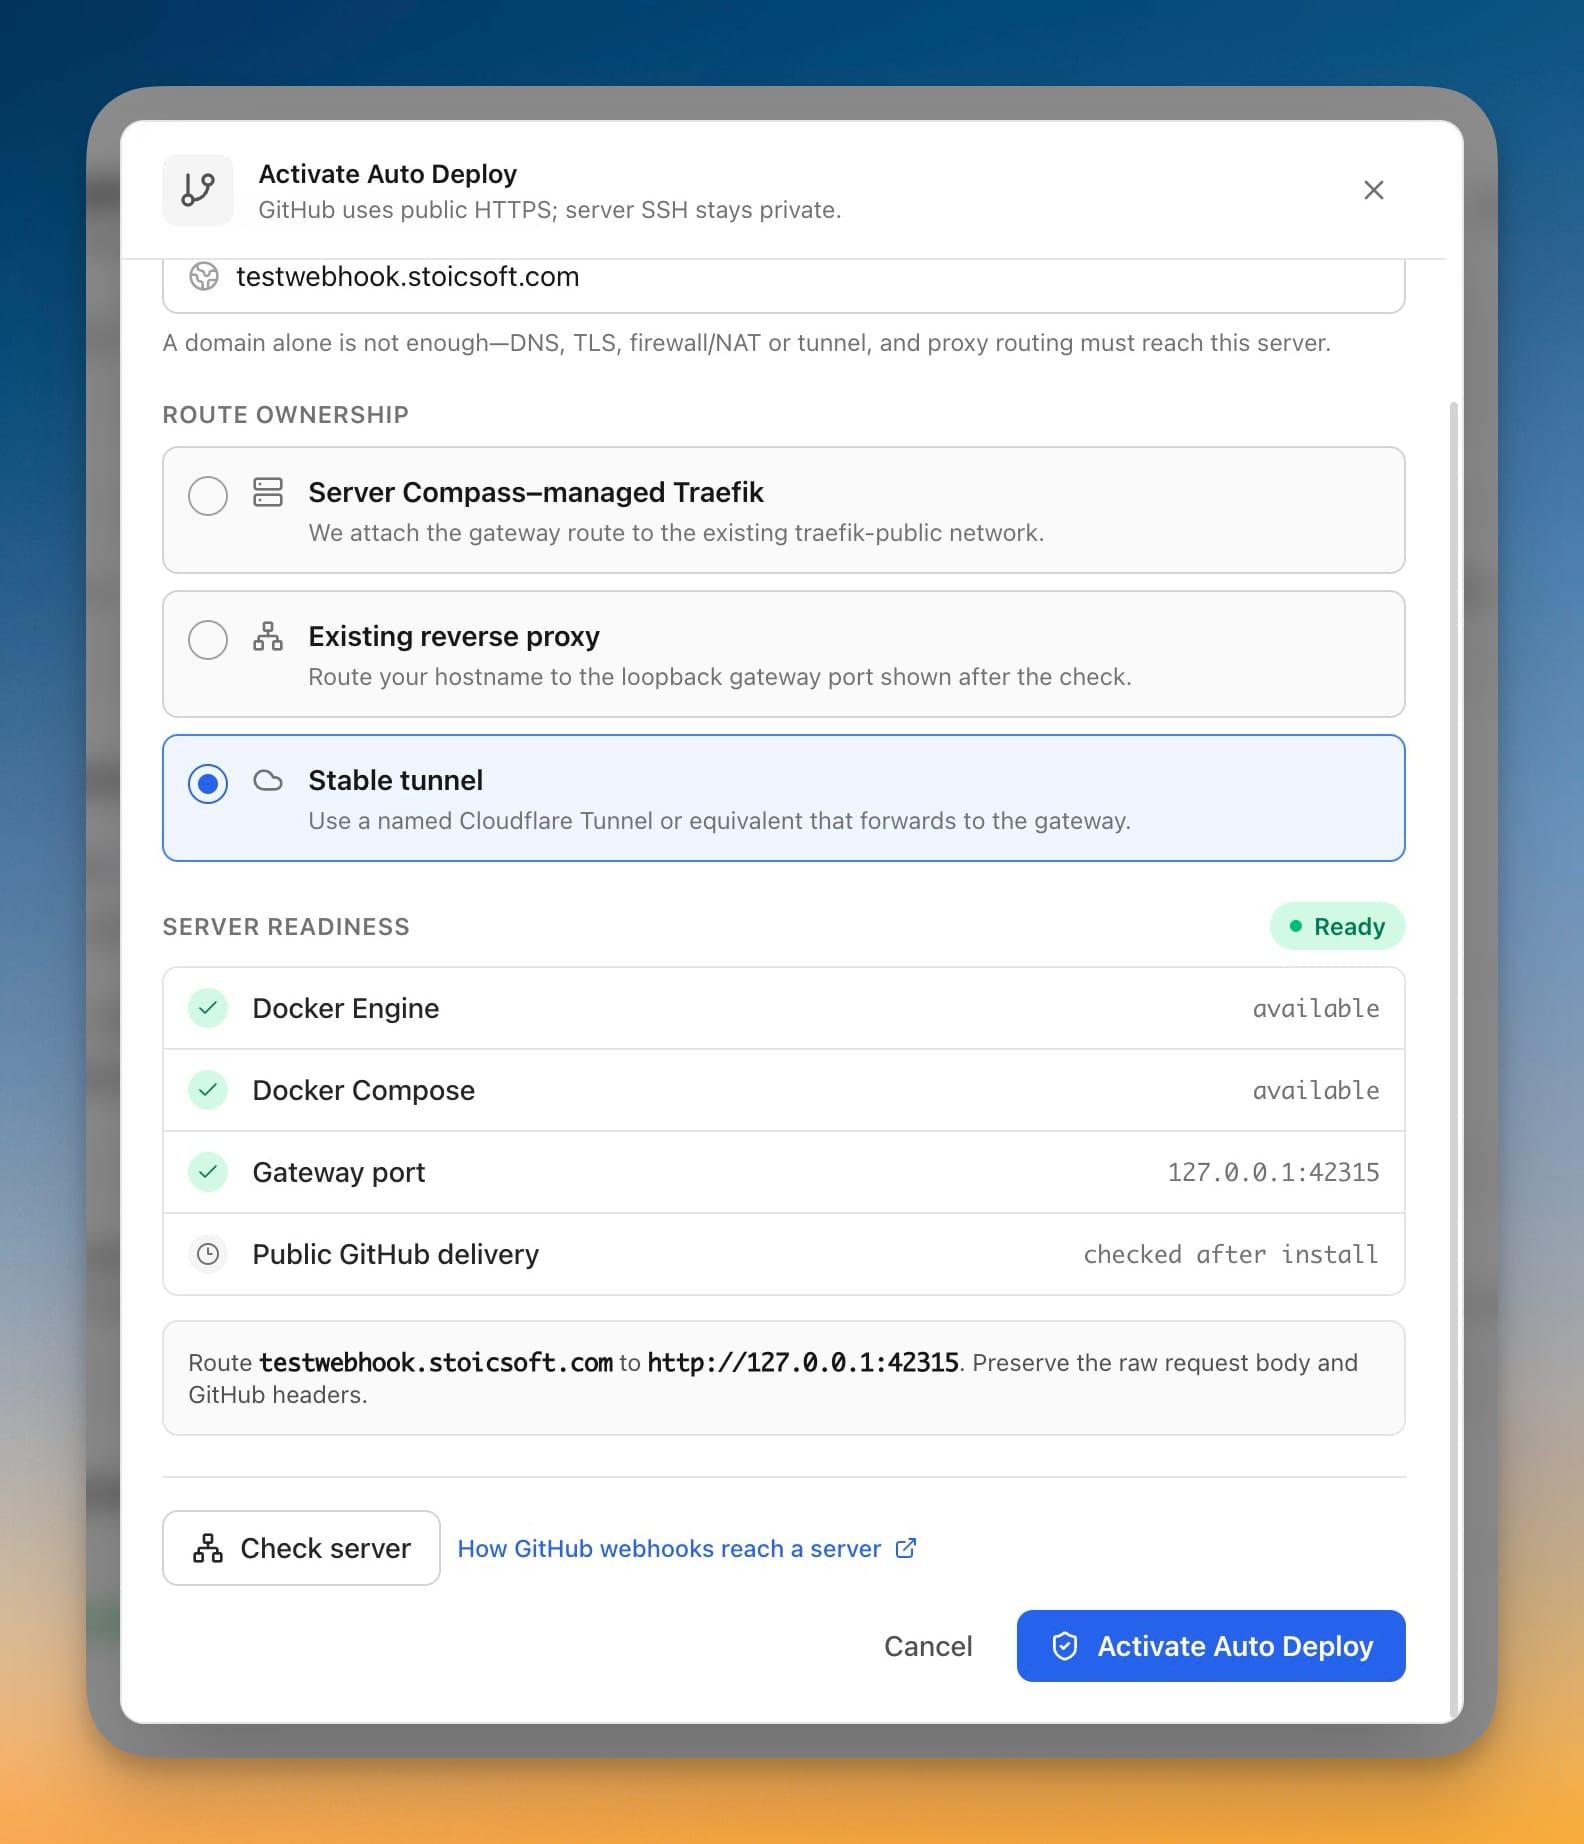
Step 4 — Point a Cloudflare Tunnel at the gateway
If you chose Stable tunnel, hop over to your Cloudflare dashboard and open Networking → Tunnels (under Zero Trust). Cloudflare Tunnel lets a public hostname reach a service running on localhost with no open inbound ports on your server at all.
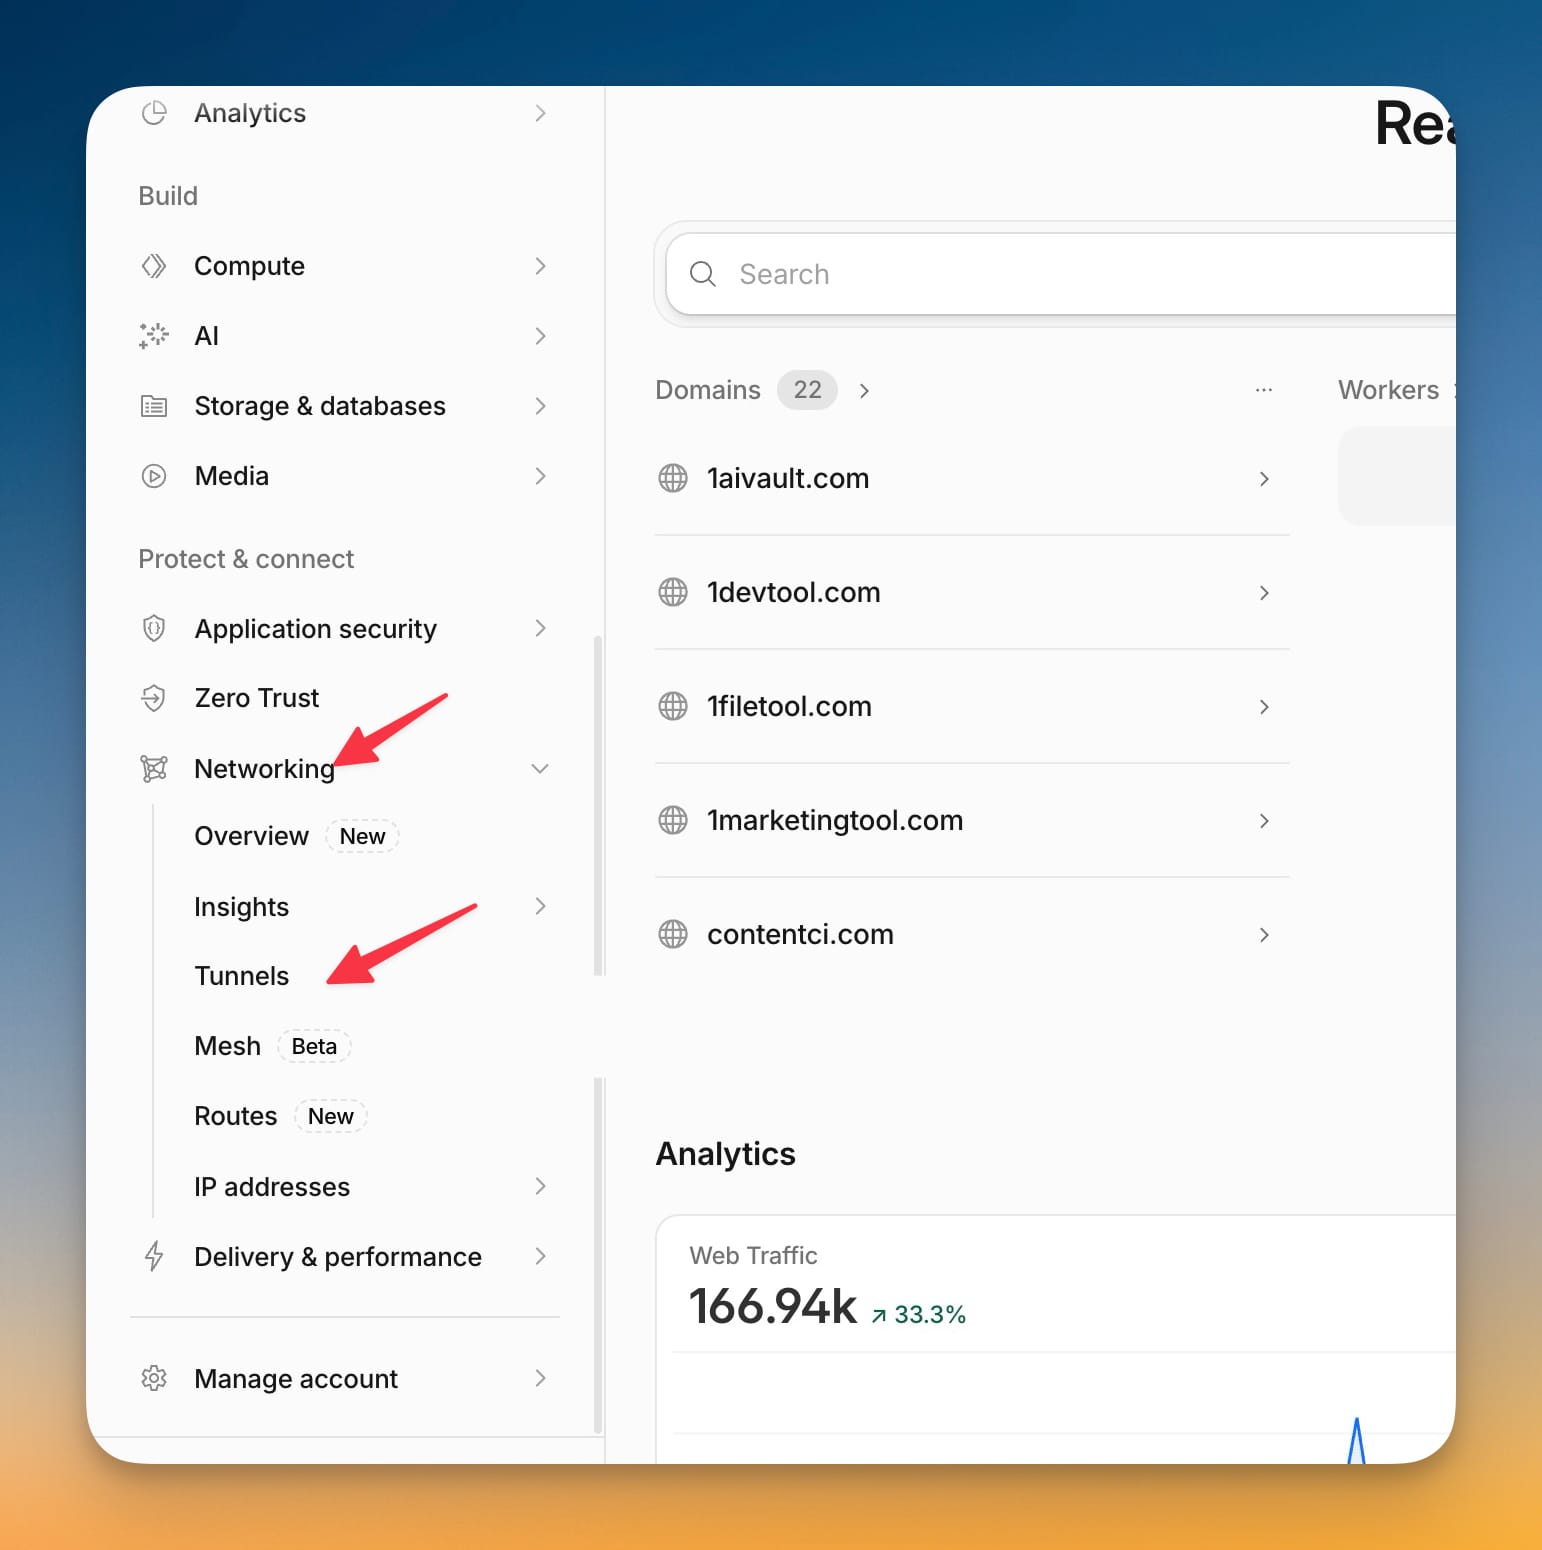
In your tunnel, Add a published application route. Set the public hostname to the same subdomain you entered in Server Compass (testwebhook on your domain), and set the Service URL to the loopback gateway from Step 3 — http://127.0.0.1:42315. Cloudflare configures DNS for you. Save the route.
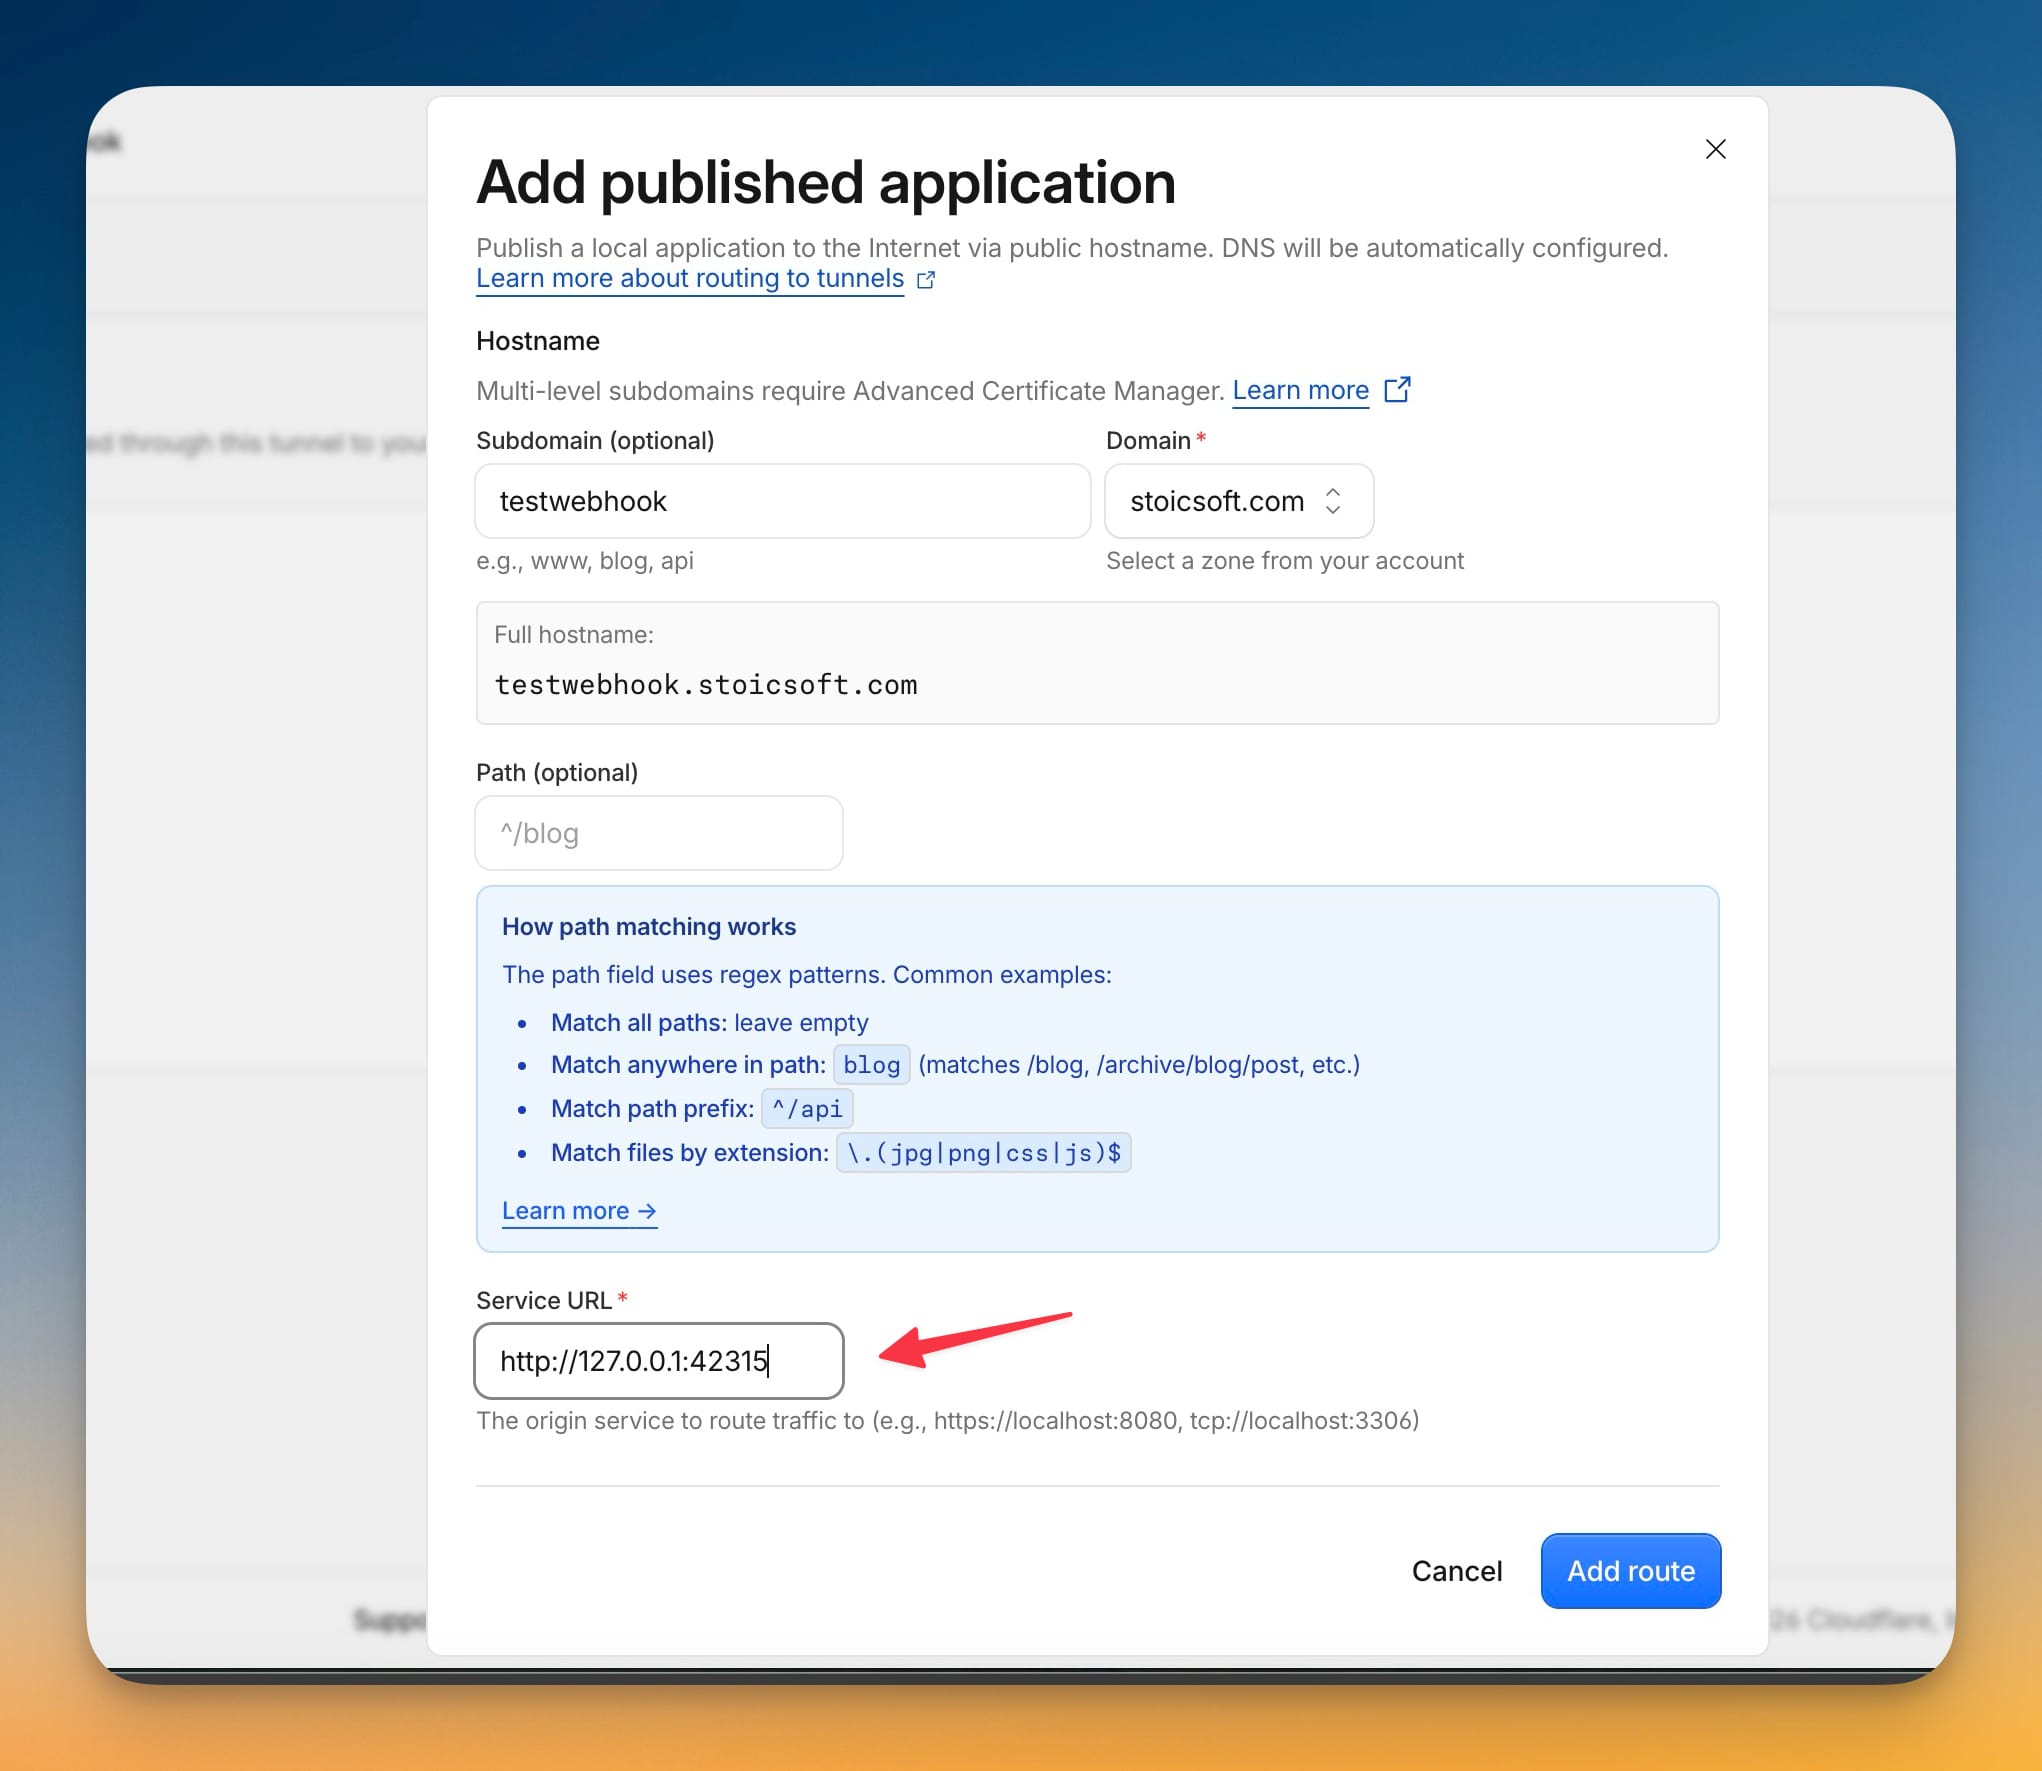
Step 5 — Activate
Back in Server Compass, click Activate Auto Deploy. It installs the deployment target policy on the server and wires everything together.
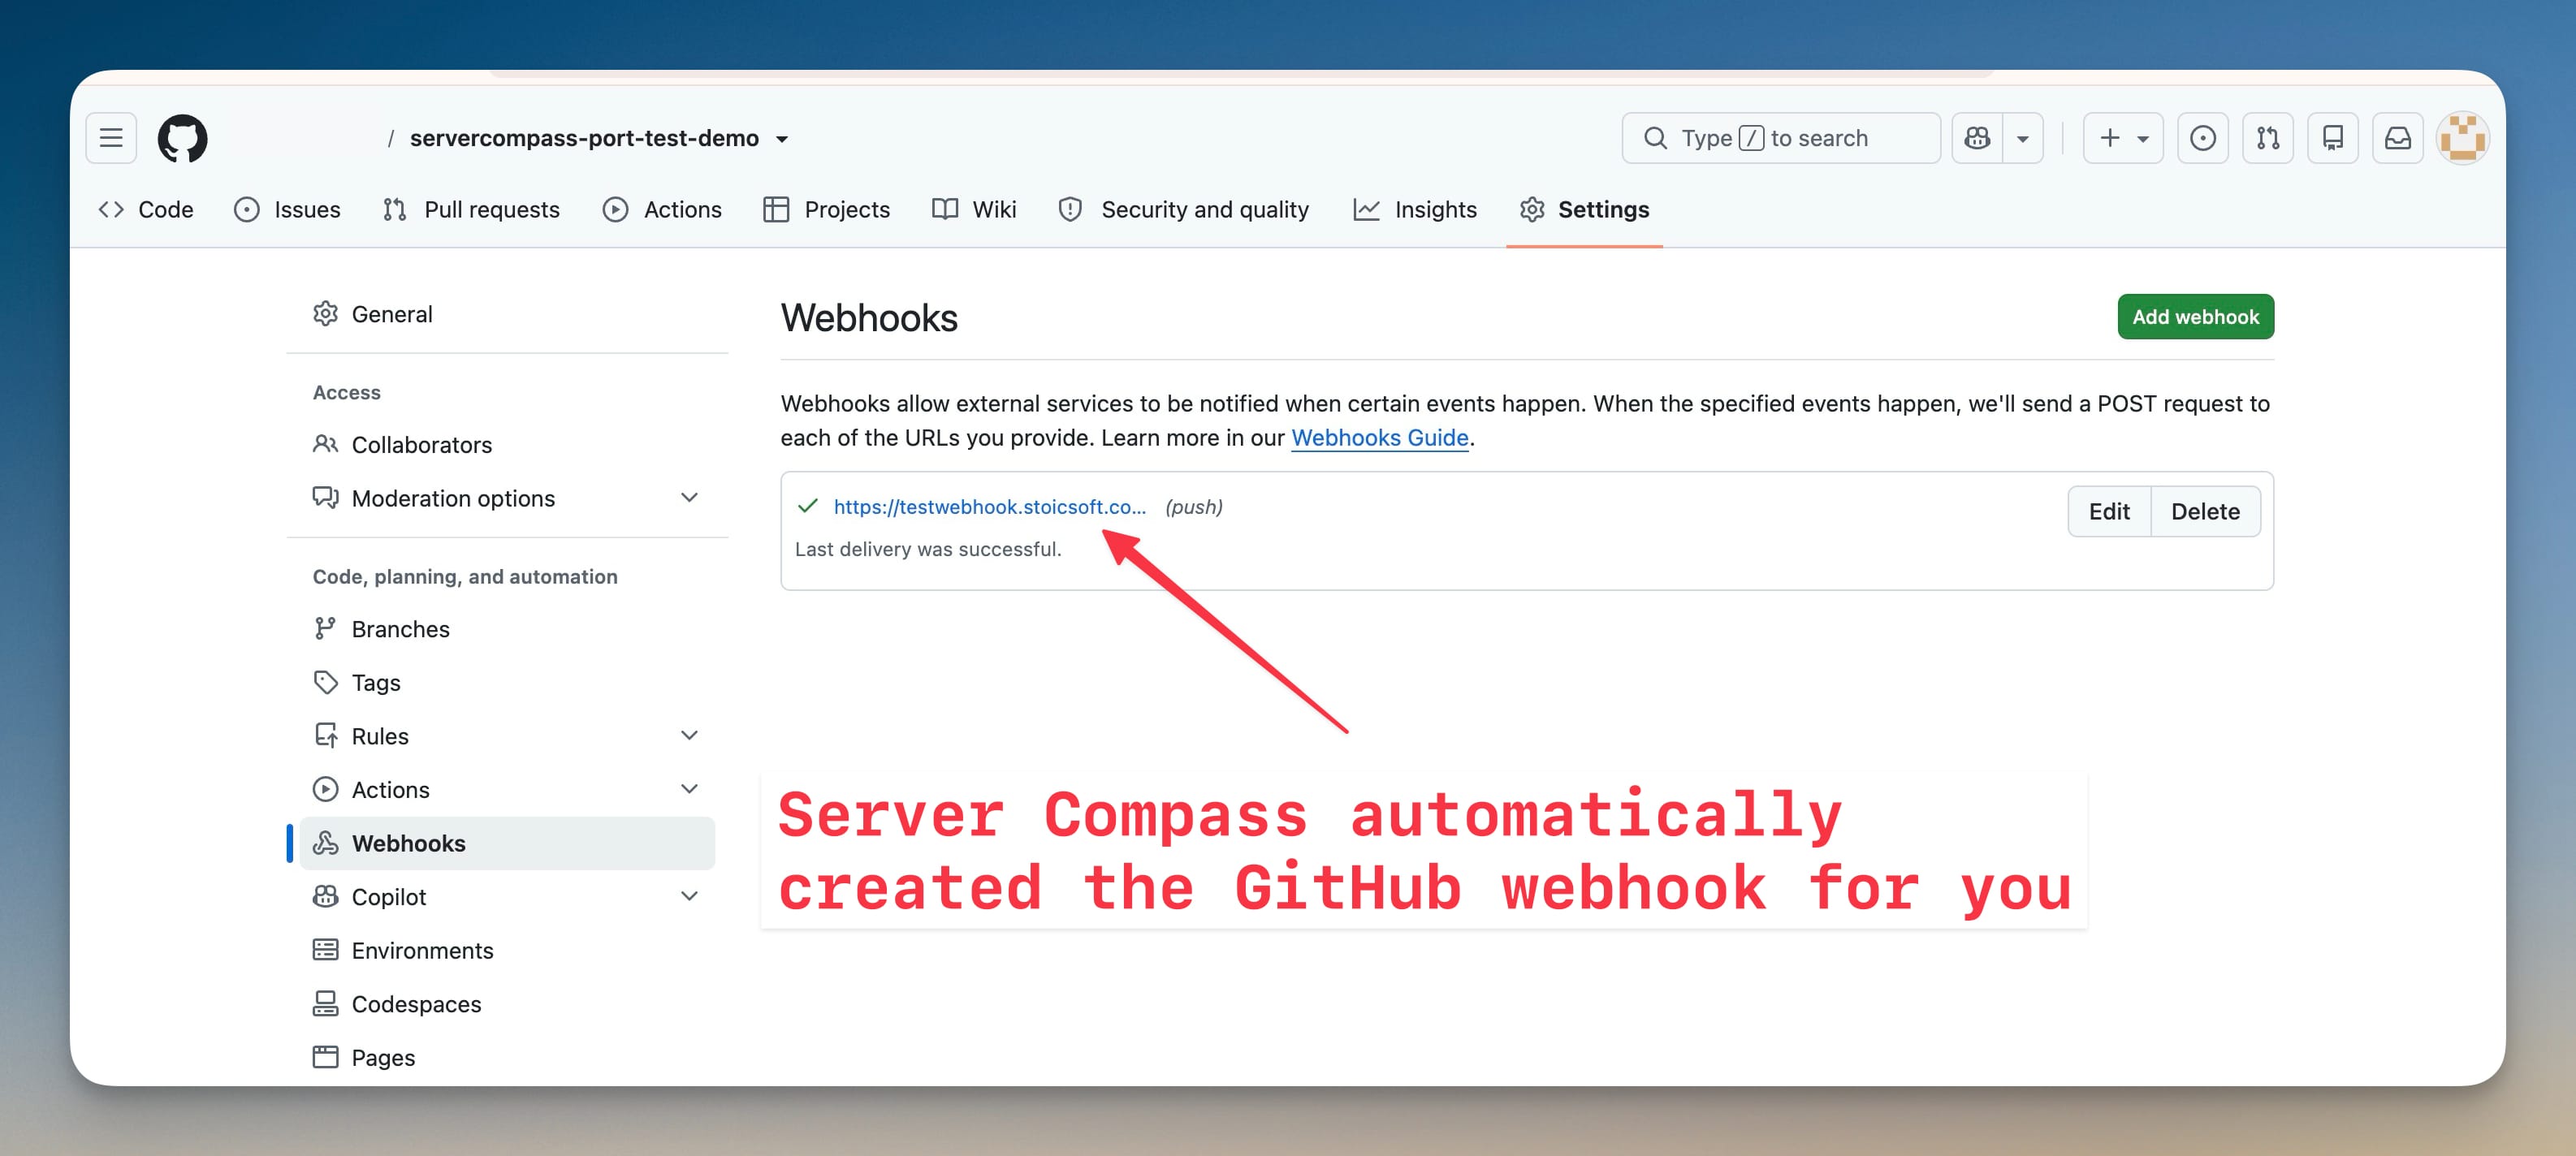
Server Compass then creates the GitHub webhook for you — no fiddling in repo settings. If you open your repository's Settings → Webhooks, you'll see a freshly created push webhook pointing at your tunnel hostname, with a green check for its last delivery.
Step 6 — Verify the connection
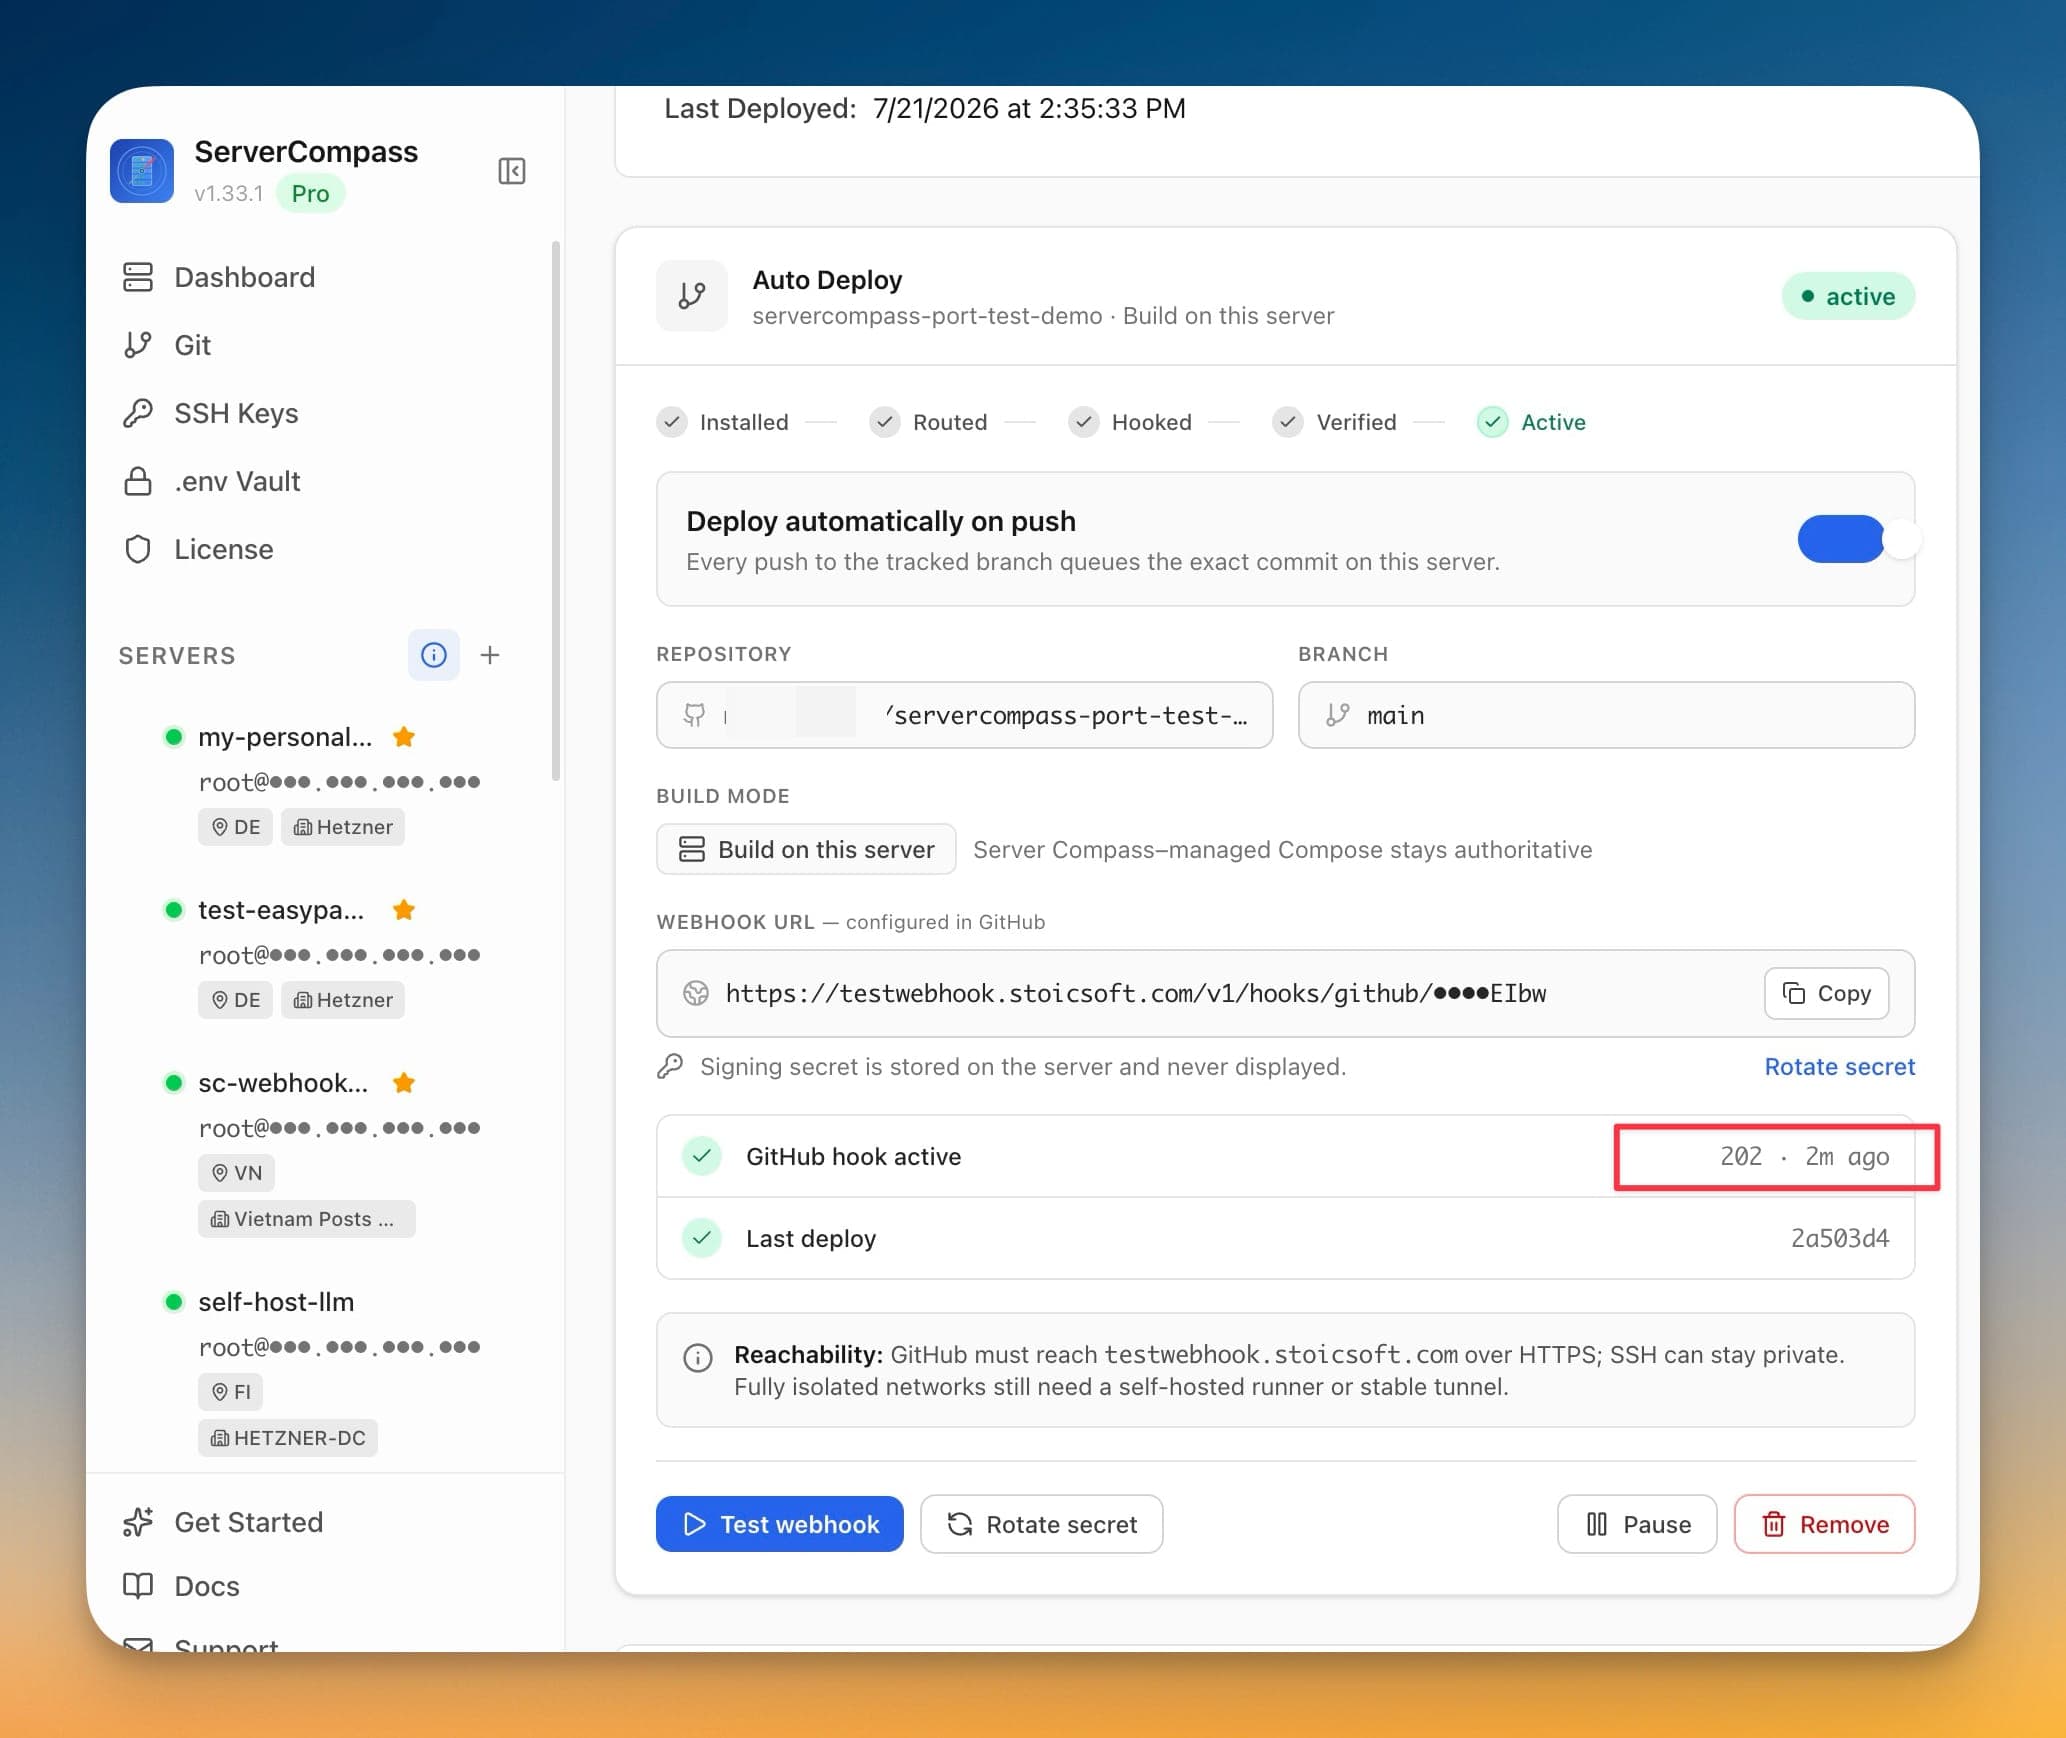
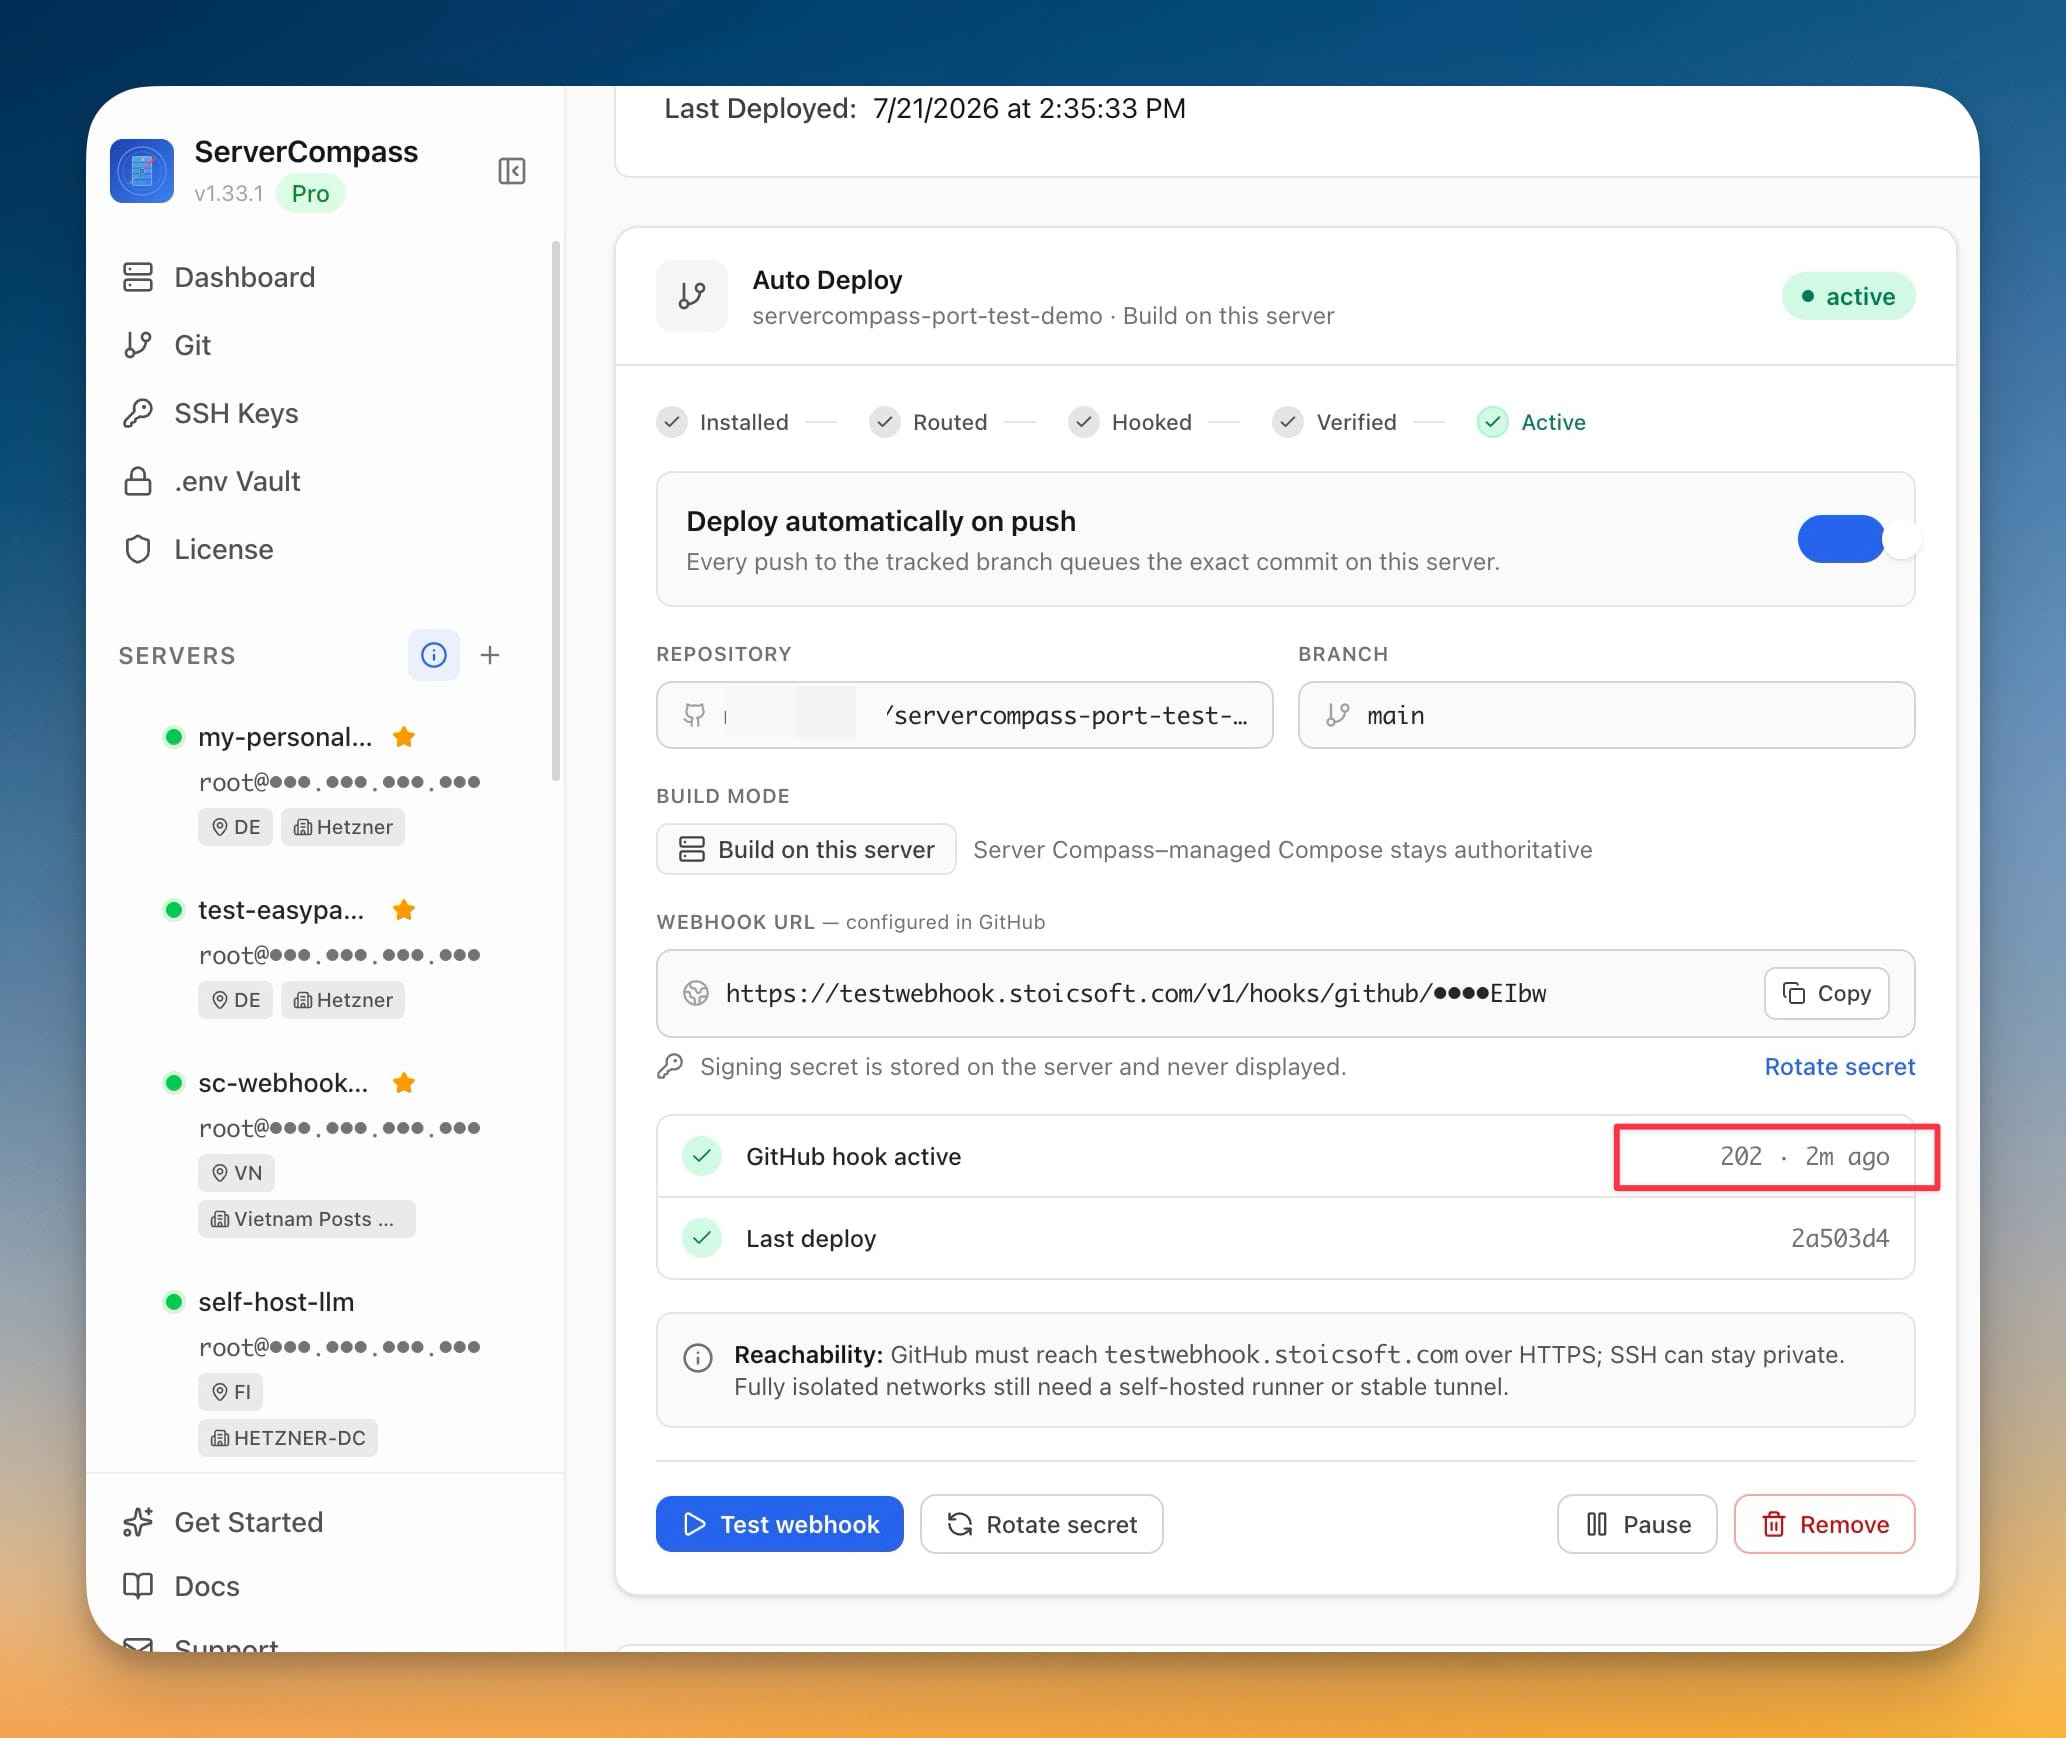
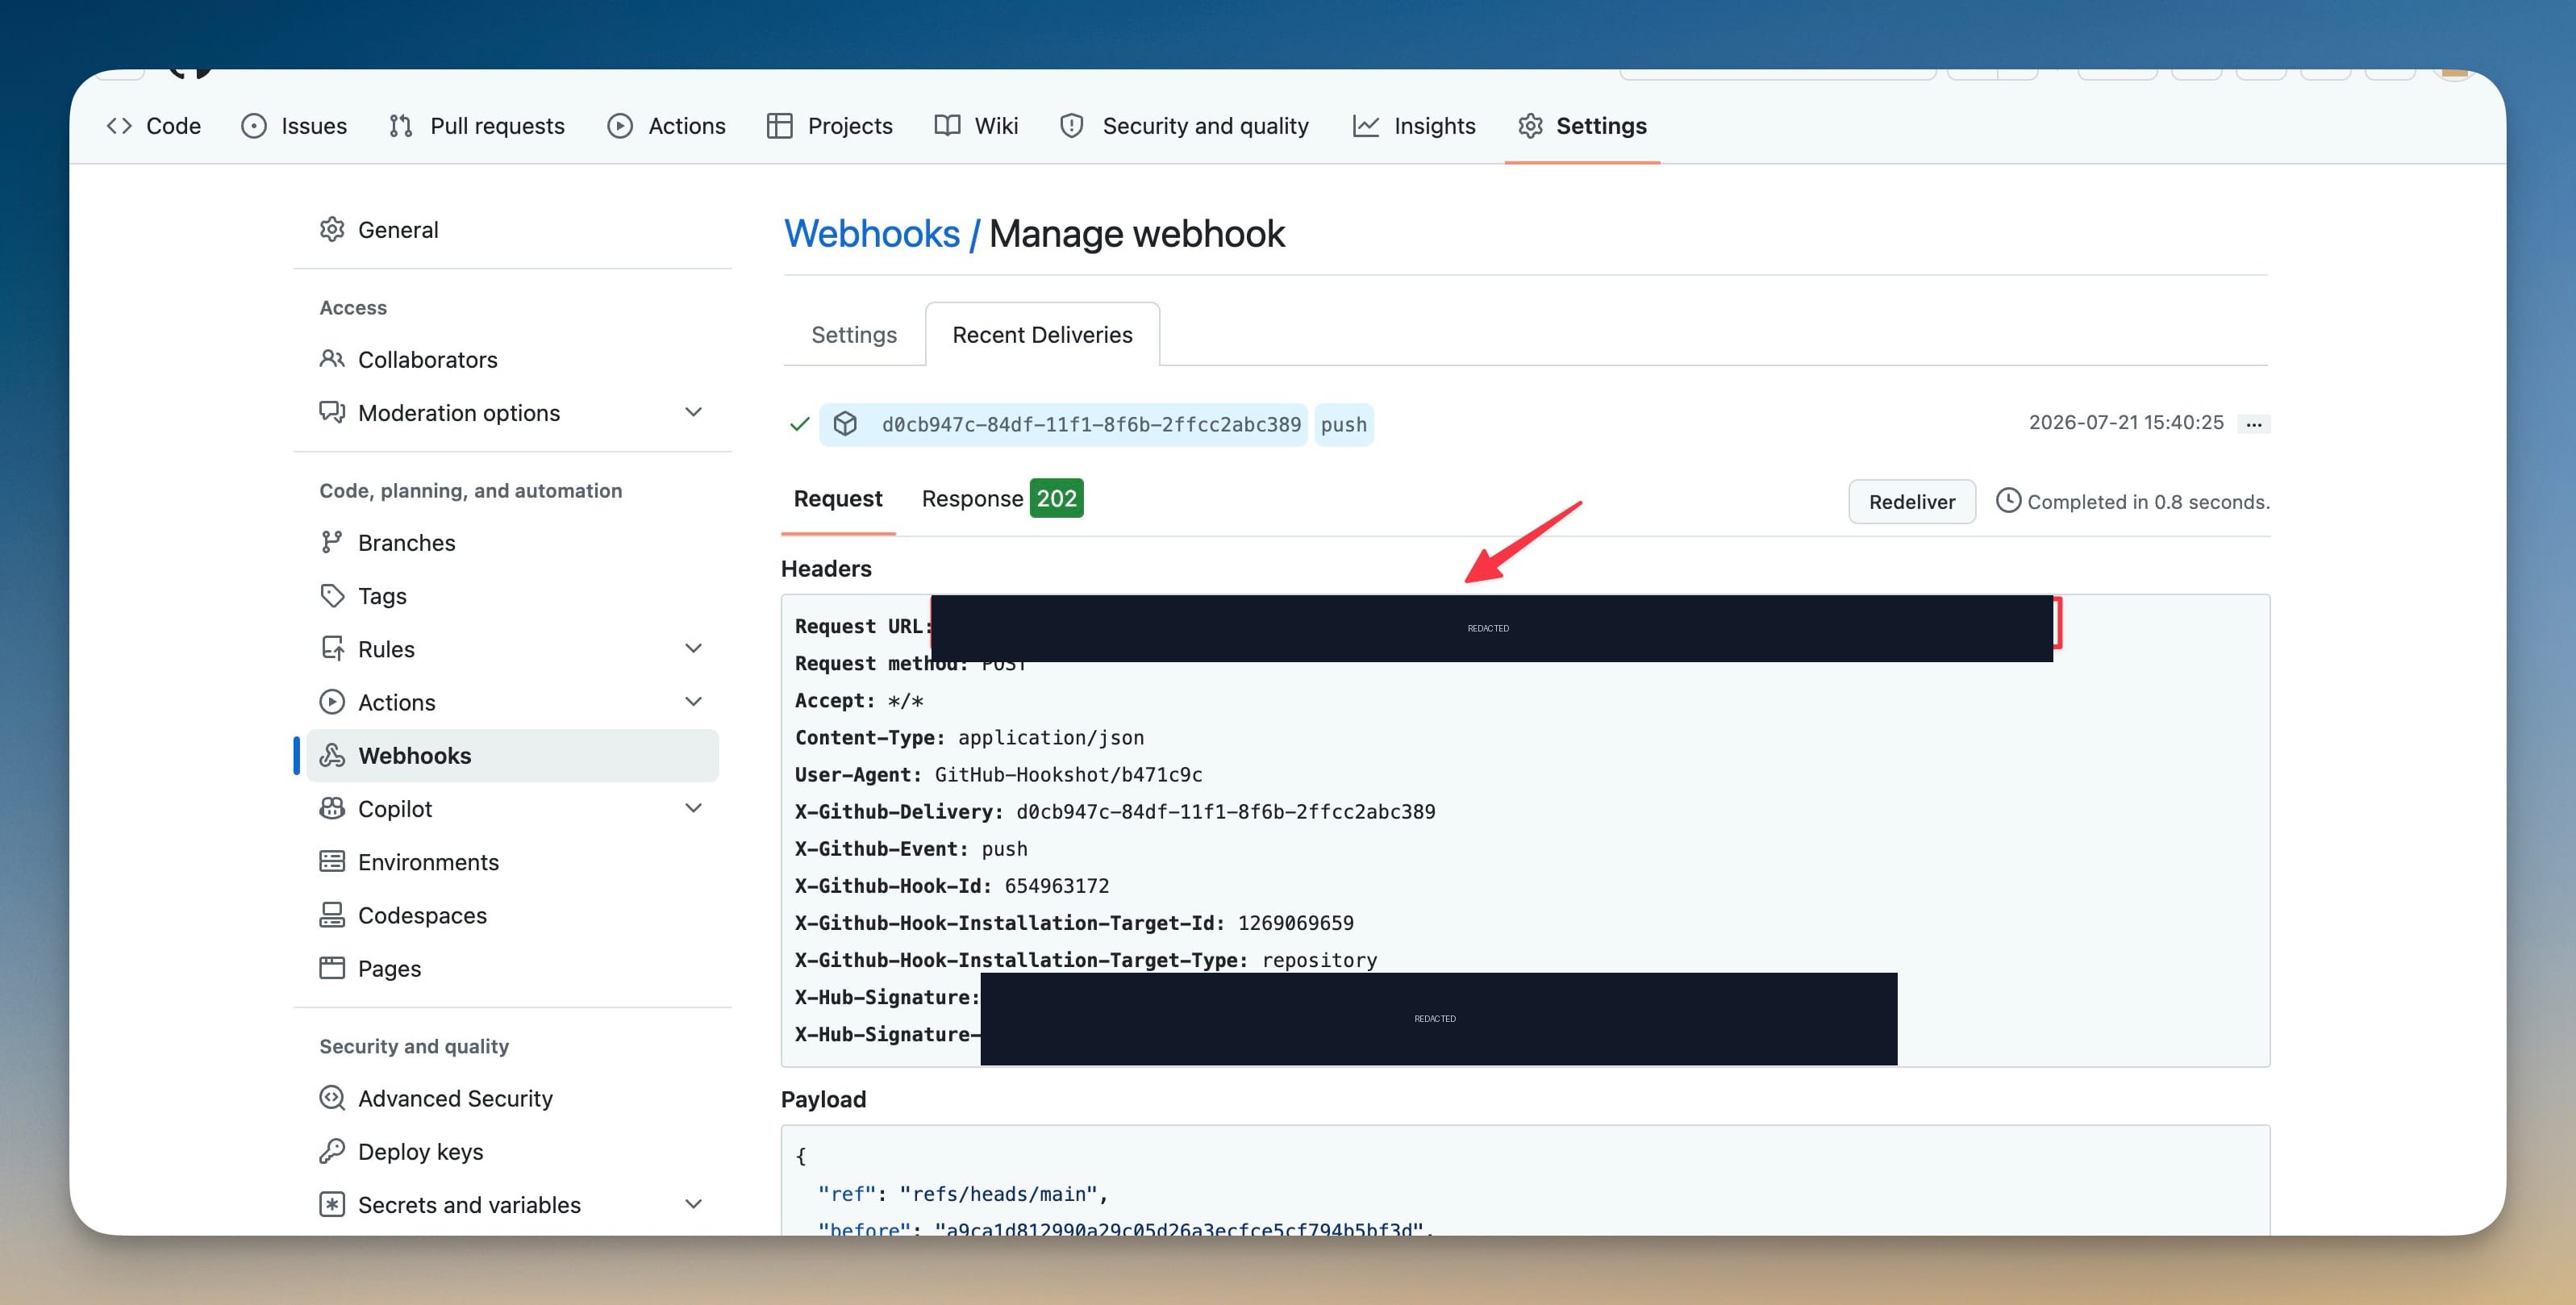
Send a test delivery. In the webhook's Recent Deliveries, a healthy setup returns HTTP 202 — GitHub reached your tunnel, the receiver verified the signature, and the job was accepted. (The webhook path carries a secret, so keep this URL private.)
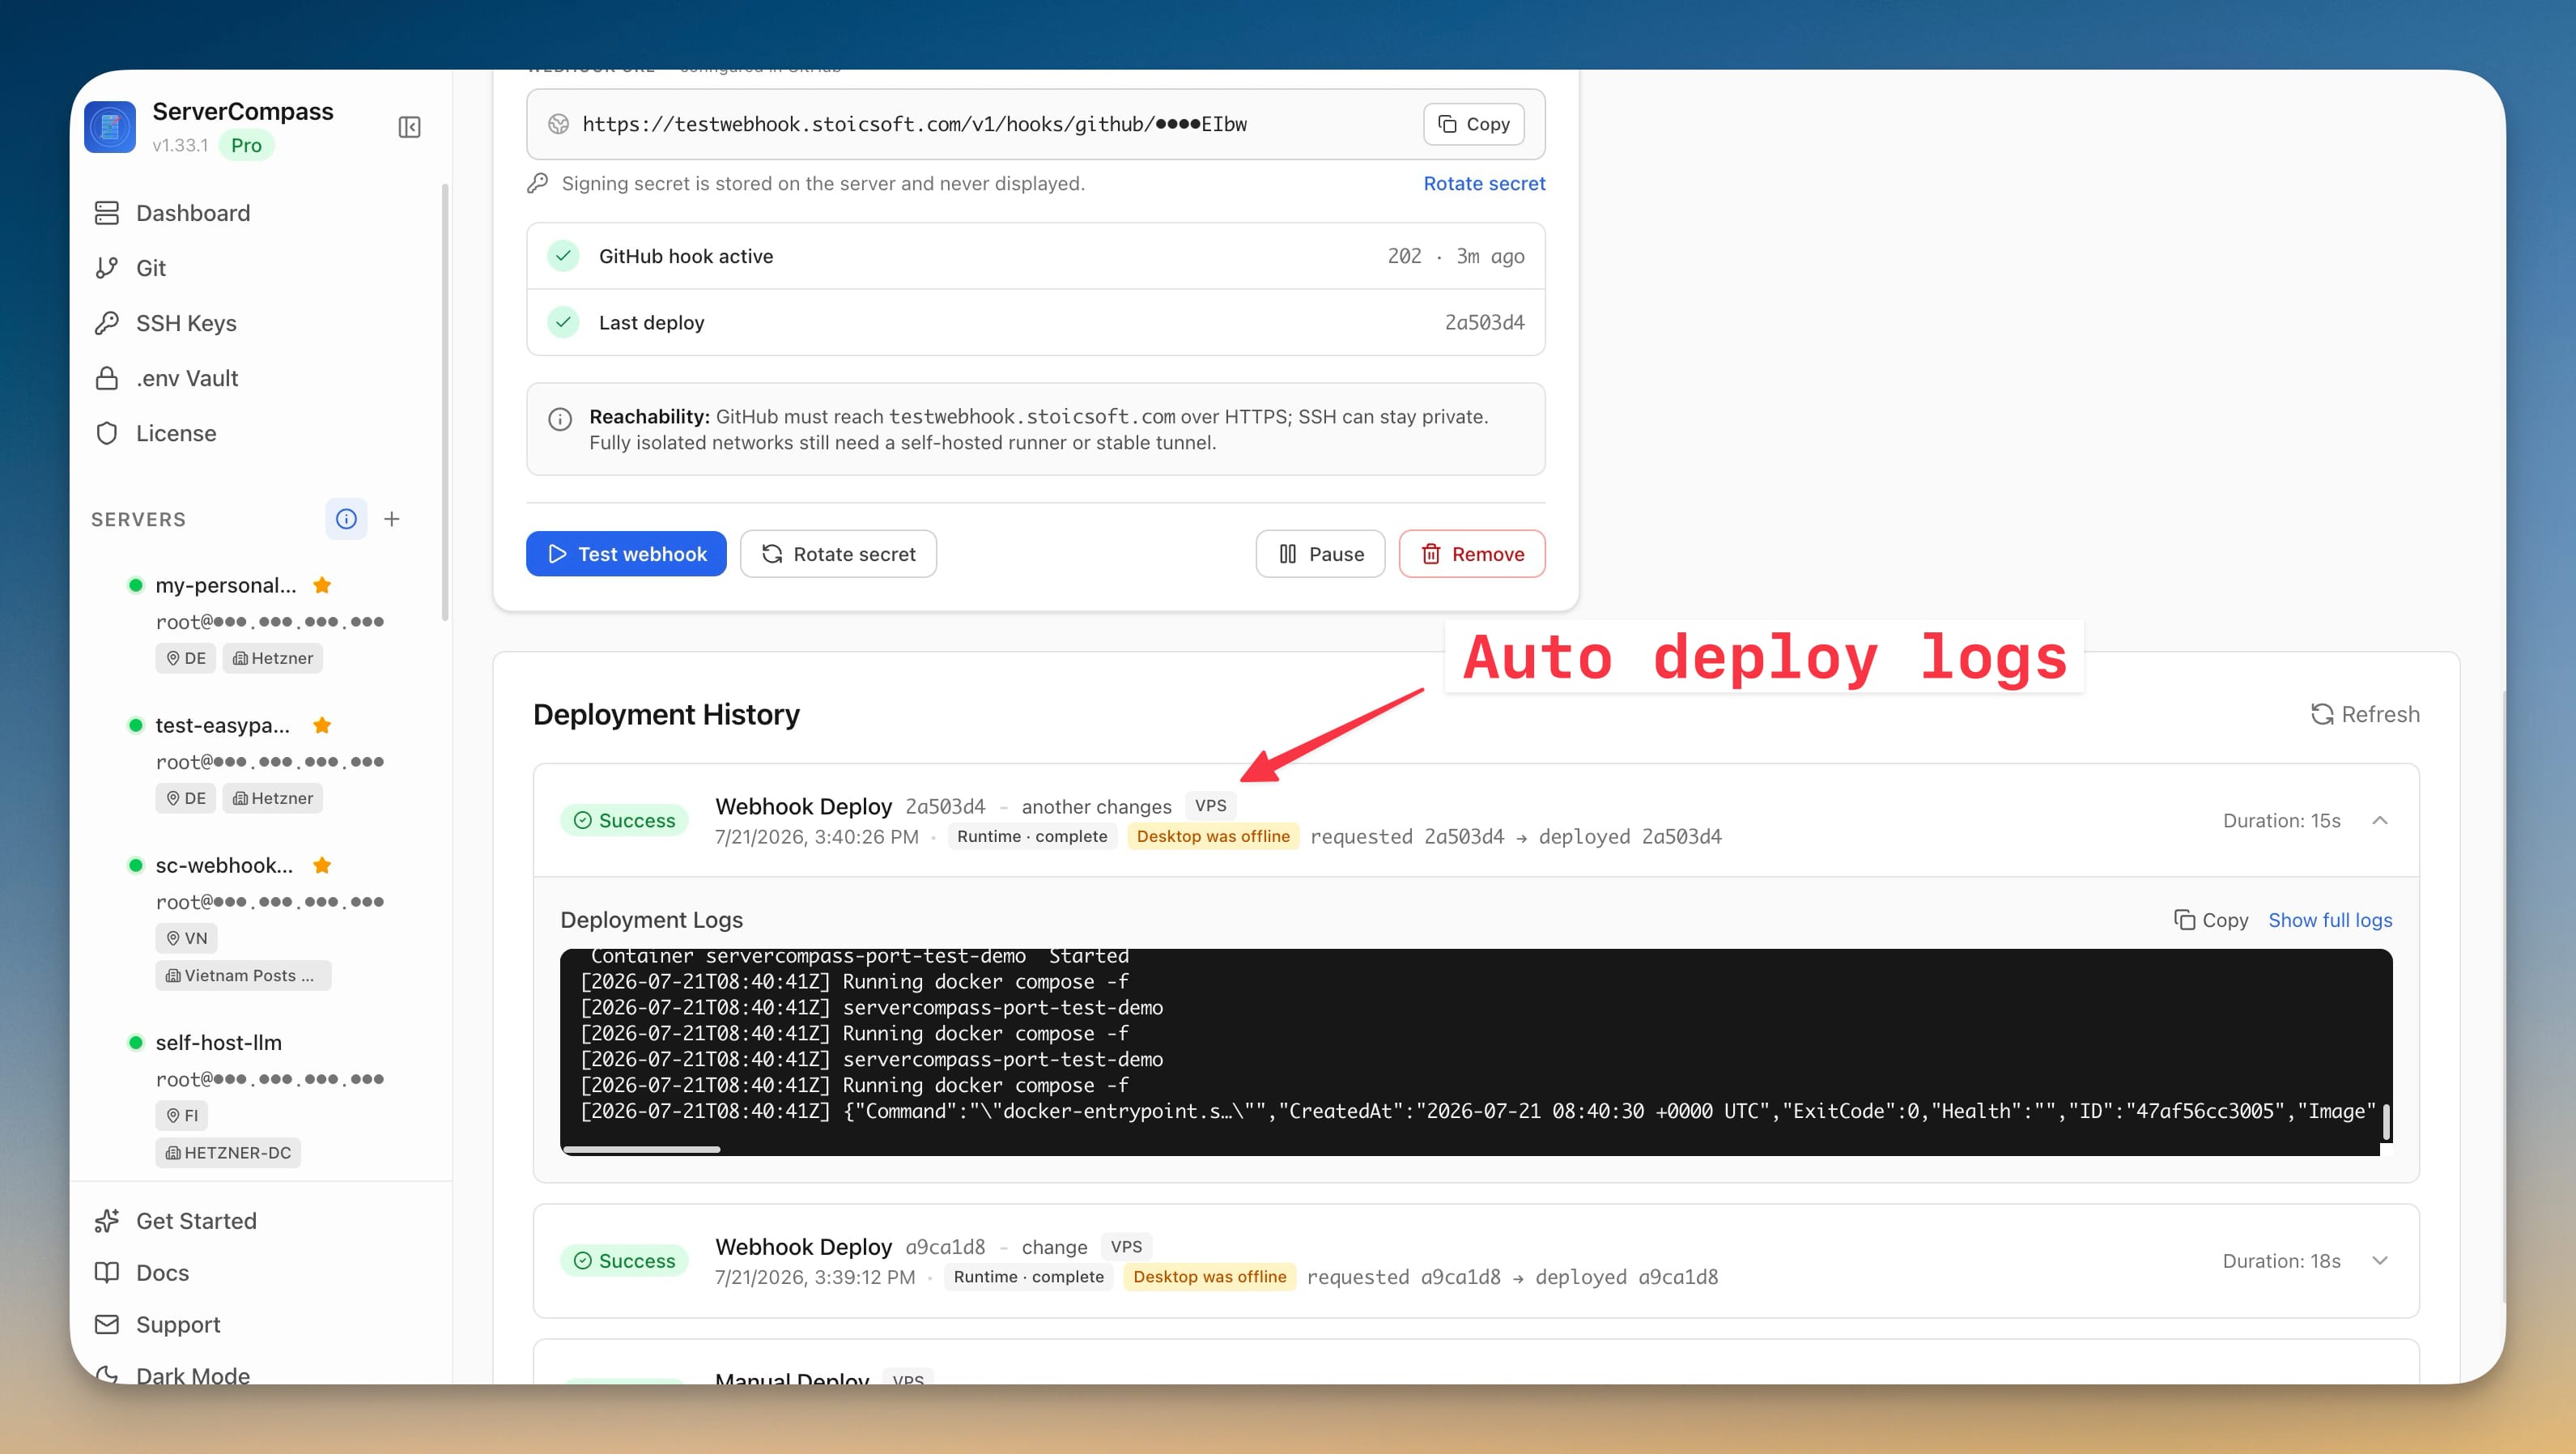
Back on the Auto Deploy card, the status walks through Installed → Routed → Hooked → Verified → Active. The Deploy automatically on push toggle is on, the webhook URL is shown with its secret masked, and you get a one-line health summary: GitHub hook active with the last response code, and the last deployed commit hash. A reminder note confirms the important part — GitHub must reach your hostname over HTTPS, but SSH can stay private.
Step 7 — Push, and watch it deploy itself
Now the payoff. Make a change, commit, and push to main. You don't touch Server Compass — you can close it entirely.
Open the Deployment History later and you'll see a Webhook Deploy entry for your commit, marked Success, with the live logs of the build and container start. The telling detail: it's tagged "Desktop was offline." The deploy ran without the app open, driven entirely by the always-on worker on your server.
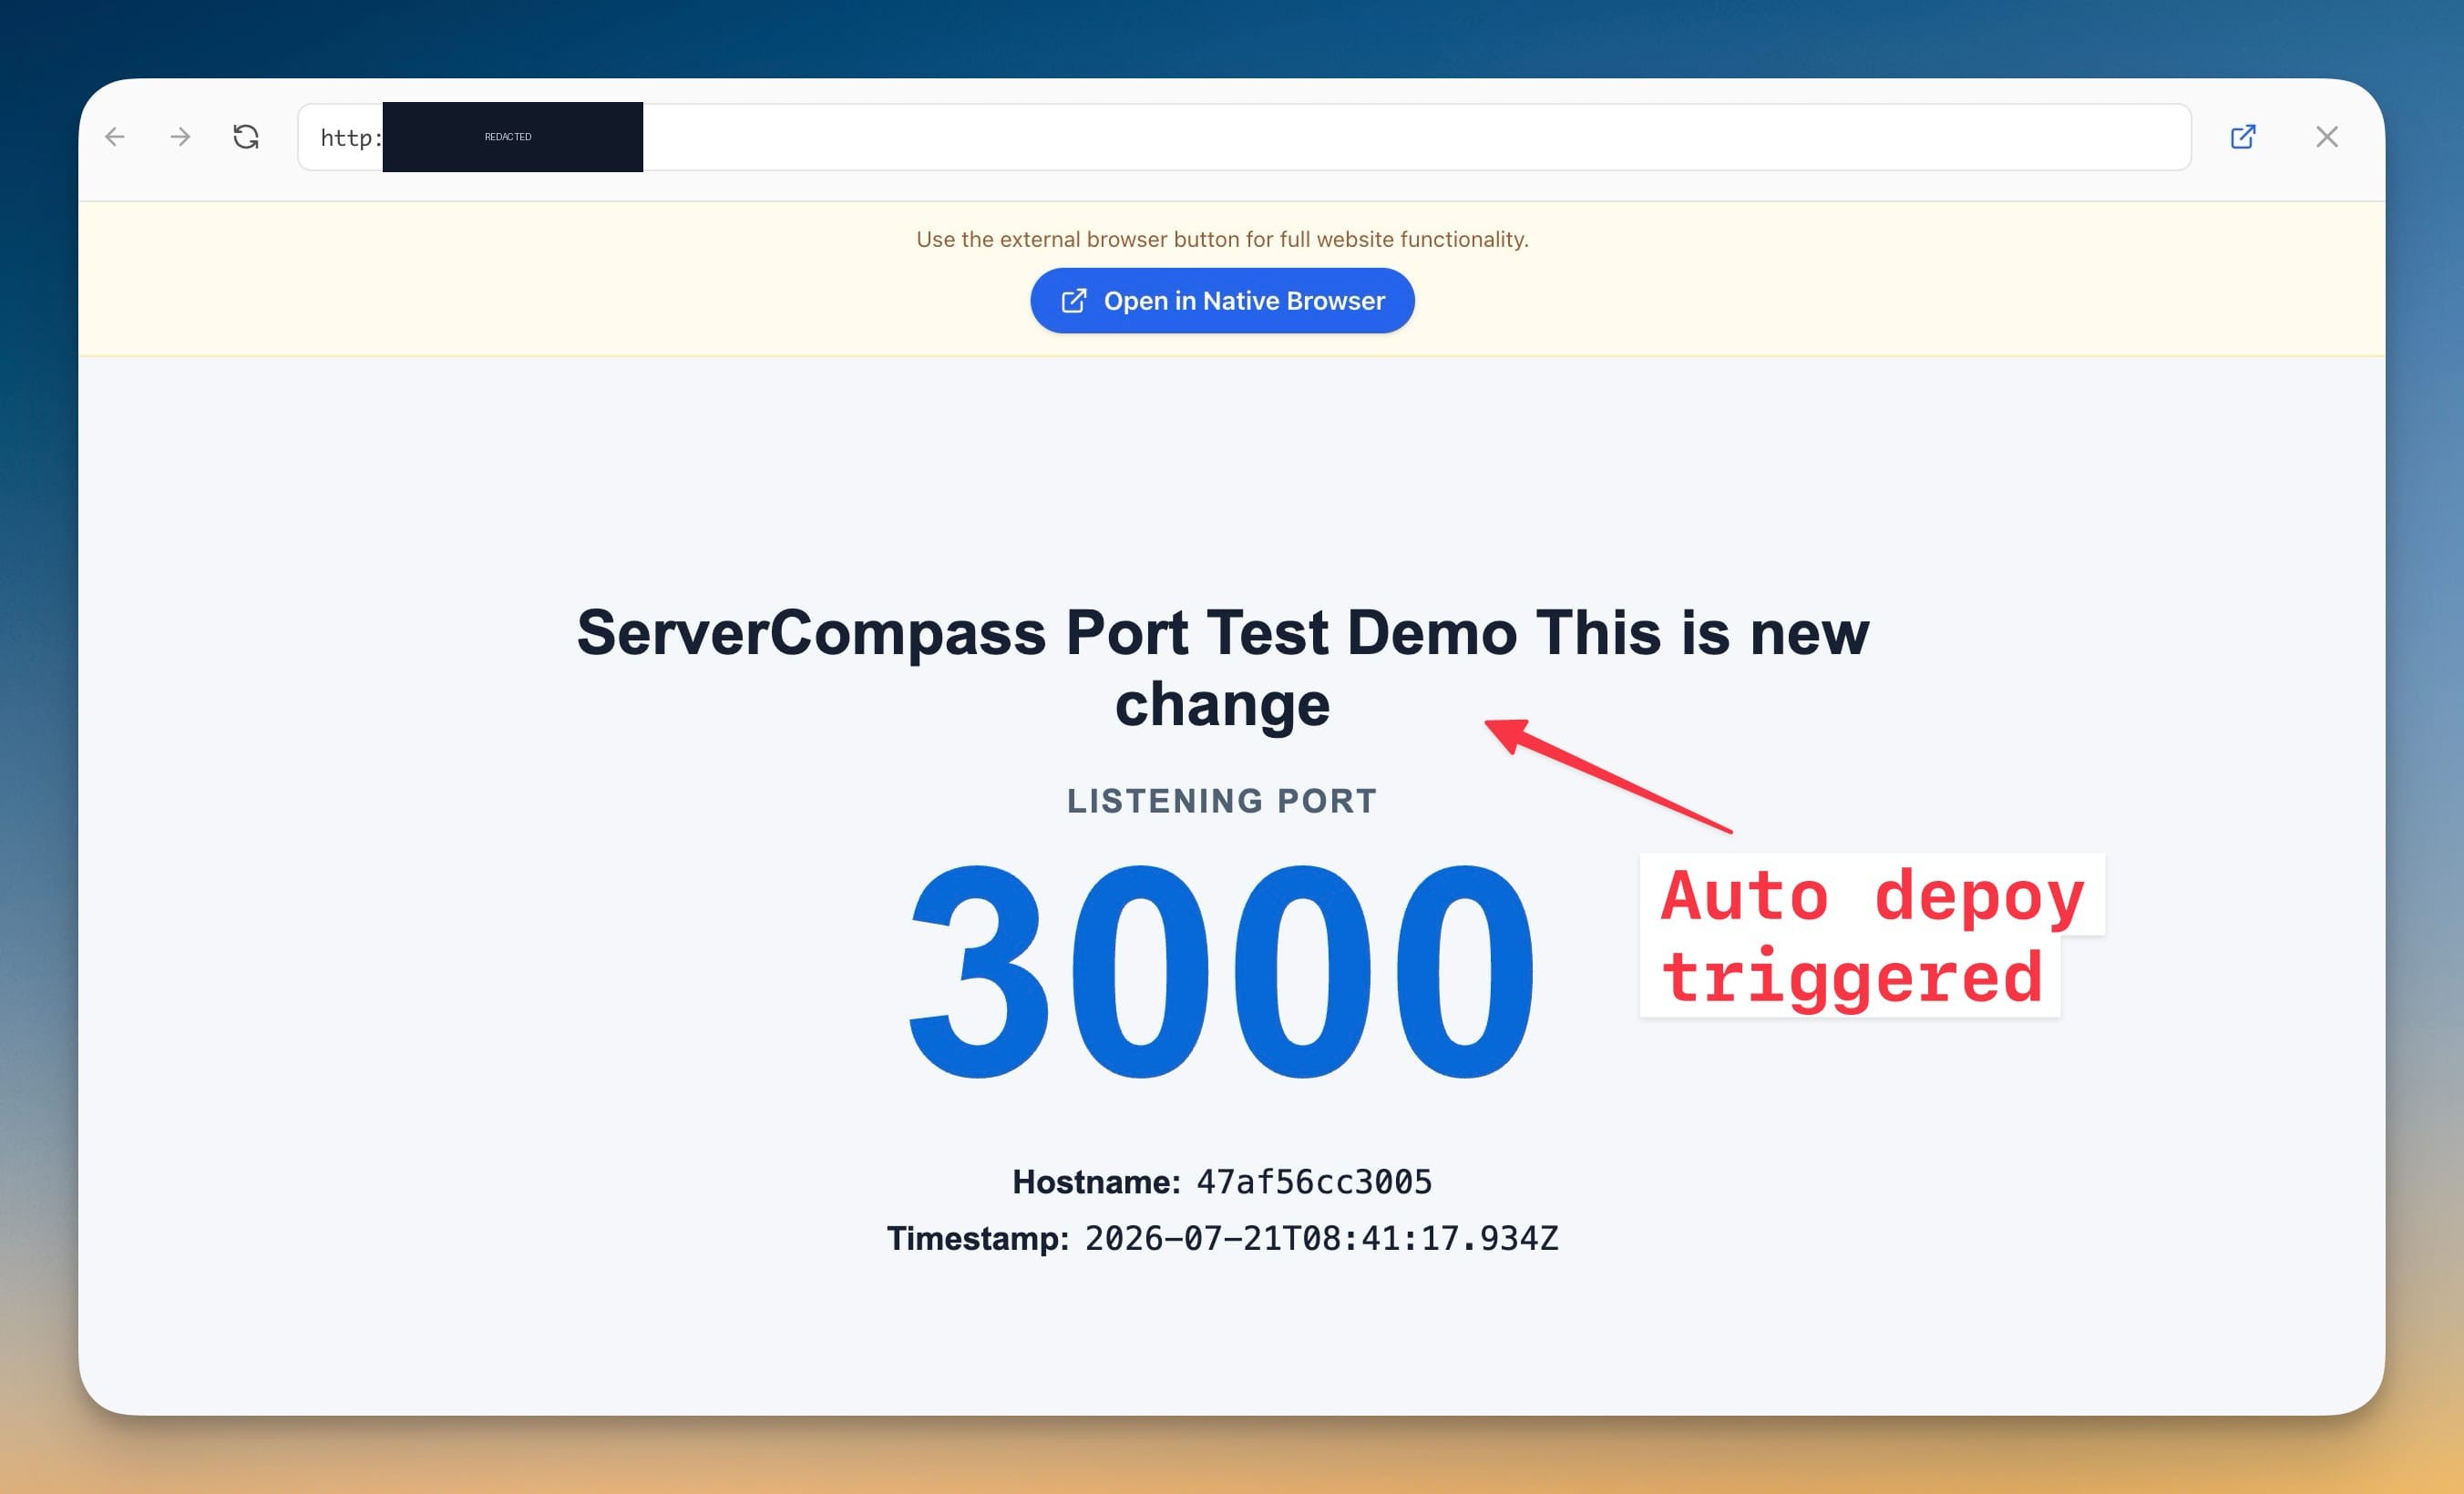
Load the app and the change is live — new commit, new content, served from the exact commit you pushed.
How it works under the hood
The design keeps the risky parts far away from anything sensitive:
- On each push, GitHub sends a signed webhook over HTTPS to your public hostname.
- A lightweight receiver verifies the signature and queues the job. This public-facing piece has no access to your Docker socket or a shell — the worst it can do is enqueue a build request for a repo you already connected.
- The always-on worker on your server picks up the job, checks out the exact commit, and redeploys the app — the same build path as a manual deploy.
- Because the build happens on the server, your SSH port never has to be reachable from the internet. GitHub only ever talks to the HTTPS hostname.
That's why it works with the desktop app closed and your machine asleep: nothing about the deploy depends on your computer.
Managing the deployment service
The Auto Deploy card and the Deployment Service view give you the controls you'll actually reach for:
- Rotate secret — the signing secret is stored on the server and never displayed. Rotate it any time; Server Compass updates the GitHub webhook to match.
- Pause / Resume — stop deploying on push without tearing anything down, then switch it back on.
- Emergency stop — instantly stop accepting new webhook deployments while keeping the queue and full history intact.
- One shared history — webhook deploys and the deploys you start by hand land in the same Deployments list.
- Remove — uninstall Auto Deploy from a server in a single step. Your deployment history is preserved.
Troubleshooting reachability
If deliveries don't reach 202:
- Fully isolated networks still need a self-hosted runner or stable tunnel. A hostname alone isn't enough — DNS, TLS, firewall/NAT, and proxy routing all have to line up so GitHub's request lands on the gateway.
- Re-run Check server in the Activate dialog to confirm Docker, Compose, and the gateway port are healthy.
- Make sure your tunnel's Service URL points at the exact loopback gateway port Server Compass showed, and that the public hostname matches on both sides.
- Your reverse proxy or tunnel must preserve the raw request body and GitHub headers — the signature is computed over the unmodified payload.
Wrapping up
You now have a proper push-to-deploy pipeline that doesn't cost you a managed platform, a CI runner, or an exposed SSH port. Push to main, and the commit ships itself.
If you're building out a fuller pipeline, these guides pair well with this one:
- Self-Hosted CI/CD: GitHub Actions + Your VPS — when you want a build step in the cloud before deploy.
- Stop Blind Pushes to Your GitHub Repos — add a confirmation gate to GitHub-triggered deploys.
- Cloudflare Tunnel Feels Random? A Reliability Checklist — keep the tunnel you set up here rock-solid.
Auto Deploy ships with Server Compass v1.34.0. Update the app, open any GitHub-connected app's Deployments tab, and click Set up Auto Deploy to turn your next git push into a deploy.