Auto Deploy
Deploy every push to your tracked GitHub branch through an always-on webhook worker on your server.
How Auto Deploy works
Auto Deploy redeploys a GitHub app whenever GitHub sends a push event for the branch that the app tracks. Server Compass installs an always-on gateway and private deployment worker on your server, creates the repository webhook, verifies GitHub's signed test delivery, and queues the exact commit for deployment.
The Server Compass desktop app does not need to remain open after setup. The server-side runtime restarts with Docker and continues receiving webhooks, building the app, and recording deployment history. Your SSH port can remain private; only the webhook hostname must be reachable from GitHub over HTTPS.
Requirements
Before starting, confirm that you have:
- A Docker app that has already been deployed from a GitHub repository
- Build on VPS selected as the build location; GitHub Actions builds are not supported by webhook Auto Deploy v1
- A managed Git checkout inside the app's Server Compass directory
- A linked GitHub account with permission to create repository webhooks
- Docker Engine and Docker Compose on the server
- A dedicated public HTTPS hostname such as
deploy.example.com - A route from that hostname to the webhook gateway
Auto Deploy follows the branch saved on the deployed app. Each push to that exact branch queues the commit included in the GitHub event; pushes to other branches are ignored.
Set up the app
- In Server Compass, deploy the repository as a GitHub app.
- Select Build on VPS during deployment.
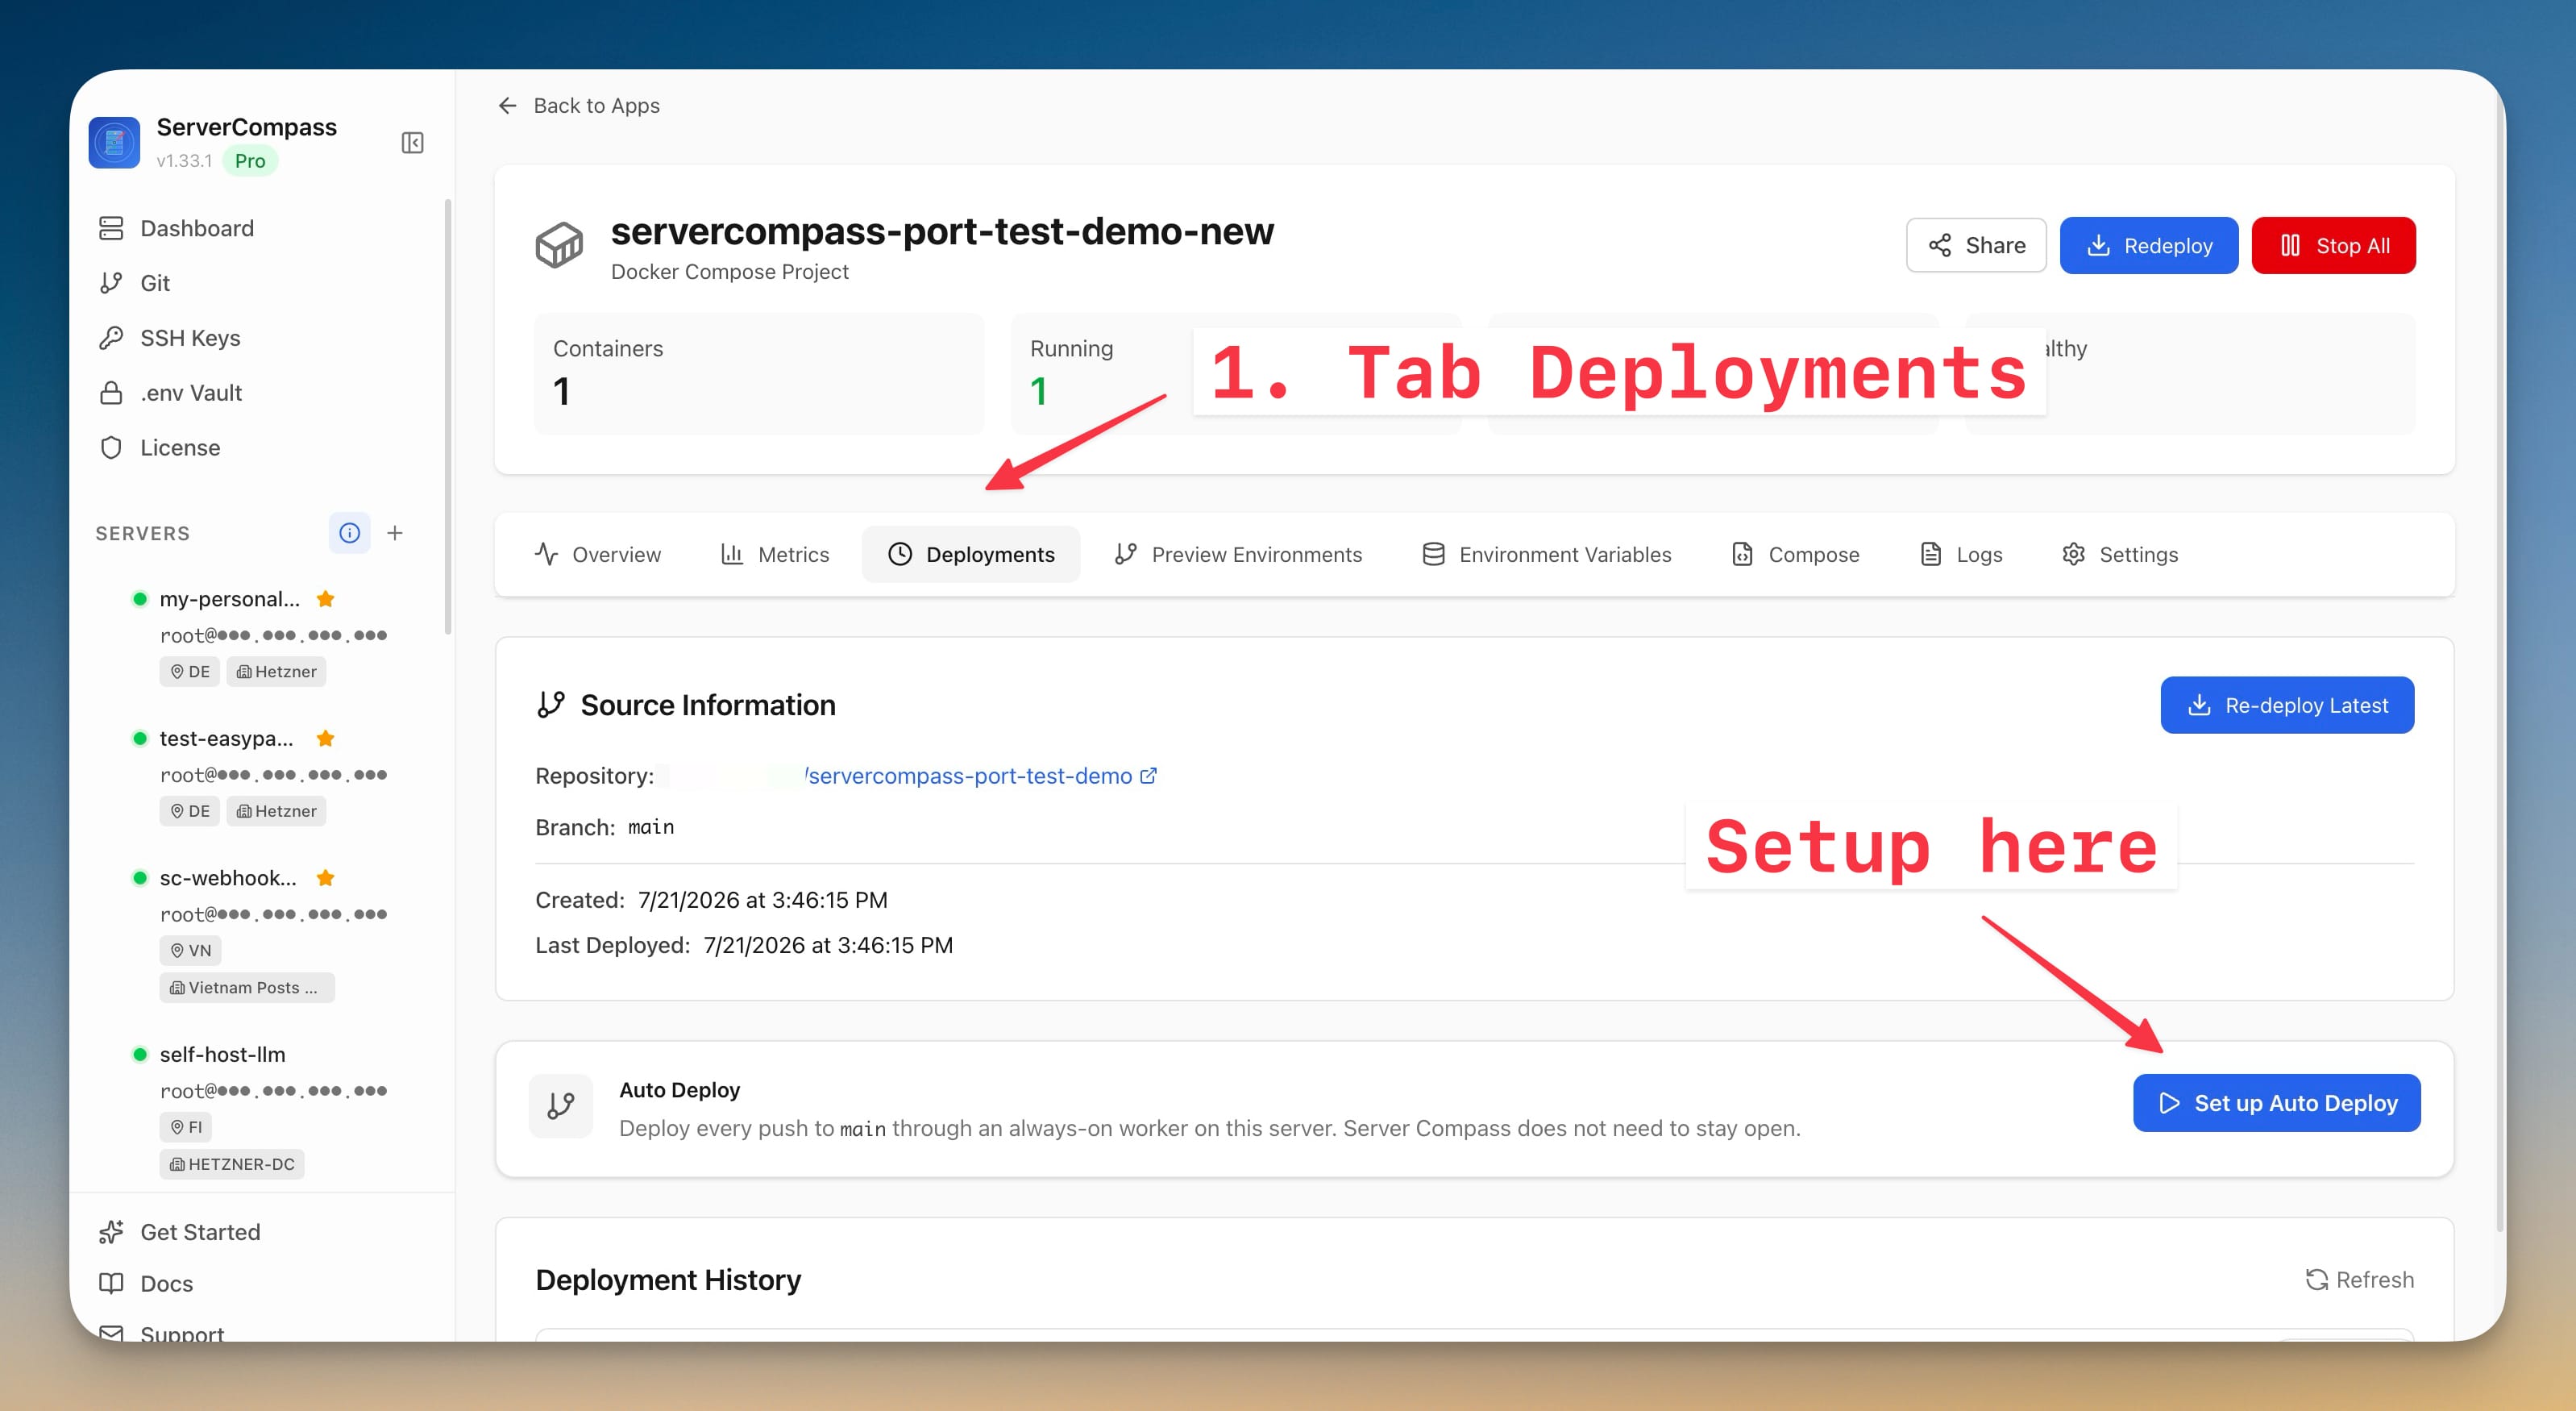
- Open the deployed app and go to Deployments.
- Find the Auto Deploy card and click Set up Auto Deploy.
- Enter a public webhook hostname. Use only the hostname or HTTPS origin, for example
deploy.example.comorhttps://deploy.example.com. Do not add a path, query string, or custom port.
The hostname is the public entrance for GitHub. A domain by itself is not enough: DNS, TLS, firewall or NAT rules, and your proxy or tunnel must form a complete route to the gateway on the server.
Choose how GitHub reaches the server
All three route options use the same signed webhook and private deployment worker. Only the public route is different.
Server Compass-managed Traefik
Use this when Server Compass-managed Traefik is already the public reverse proxy on the server. Point the hostname's DNS record to the server and make sure inbound ports 80 and 443 reach it. Server Compass attaches the webhook gateway to the existing traefik-public Docker network and configures the HTTPS host route.
This is usually the simplest option for a public VPS. It can also work for a LAN server when the router forwards ports 80 and 443 to that server and the hostname resolves to the router's public IP.
Existing reverse proxy
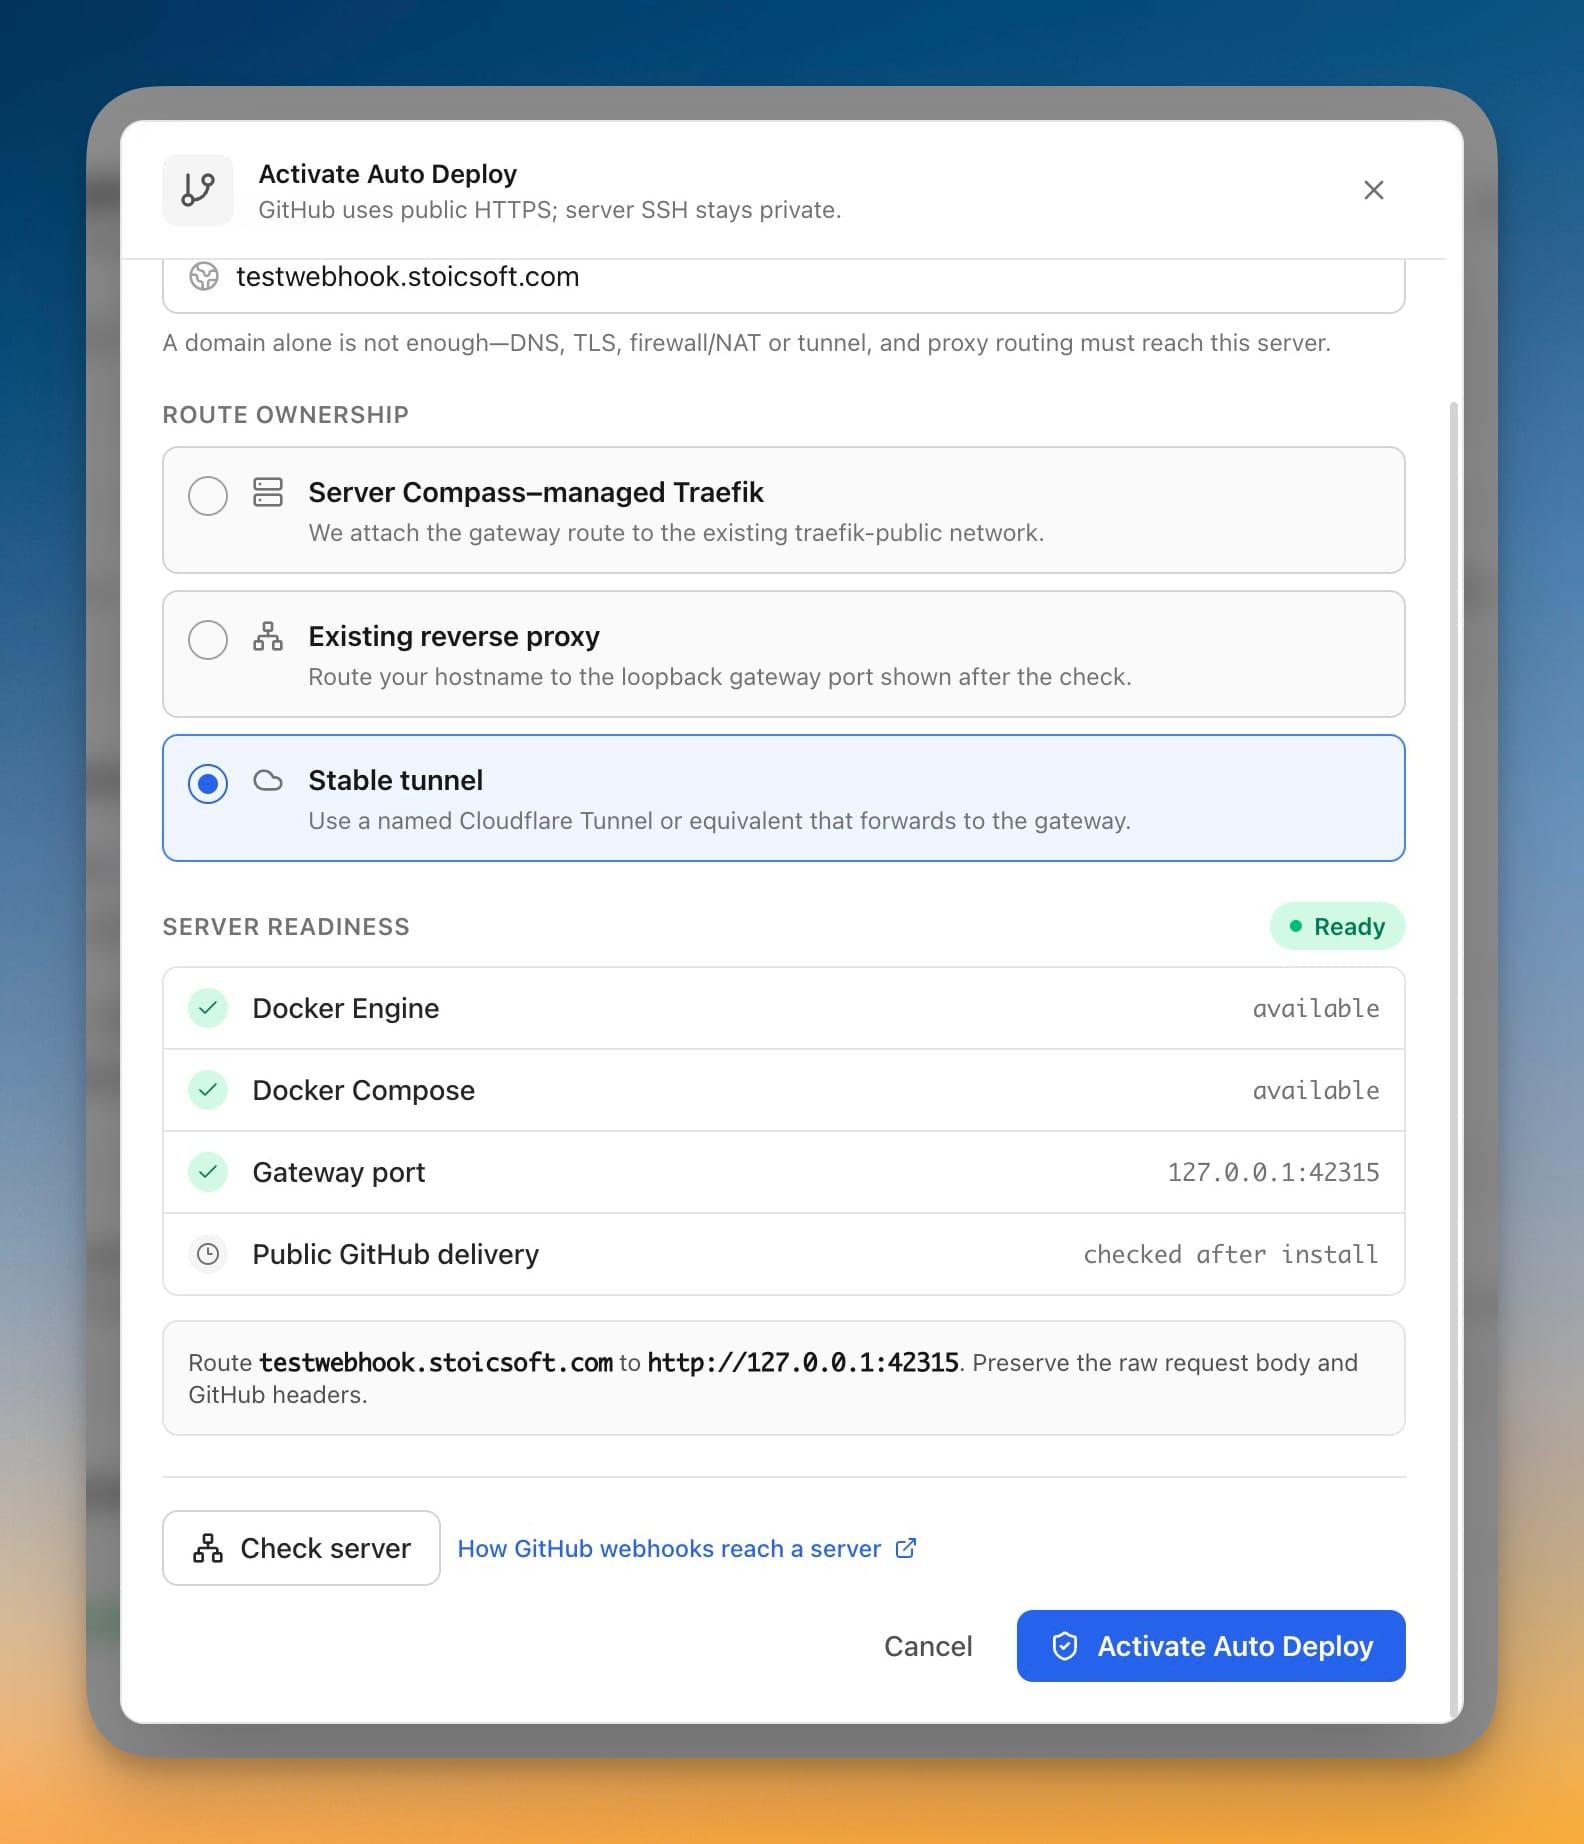
Use this when Nginx, Caddy, Traefik, HAProxy, or another proxy already handles the hostname. Click Check server to get the generated loopback target, then route the webhook hostname to the displayed address, for example http://127.0.0.1:42315.
The proxy must preserve the raw request body and GitHub webhook headers so the gateway can verify the HMAC signature. Do not place login middleware, Cloudflare Access, or another interactive authentication page in front of this route.
If the proxy runs in Docker, remember that 127.0.0.1 inside the proxy container refers to that container. Use host networking, a host-gateway address, or an appropriate shared Docker network instead.
Stable tunnel
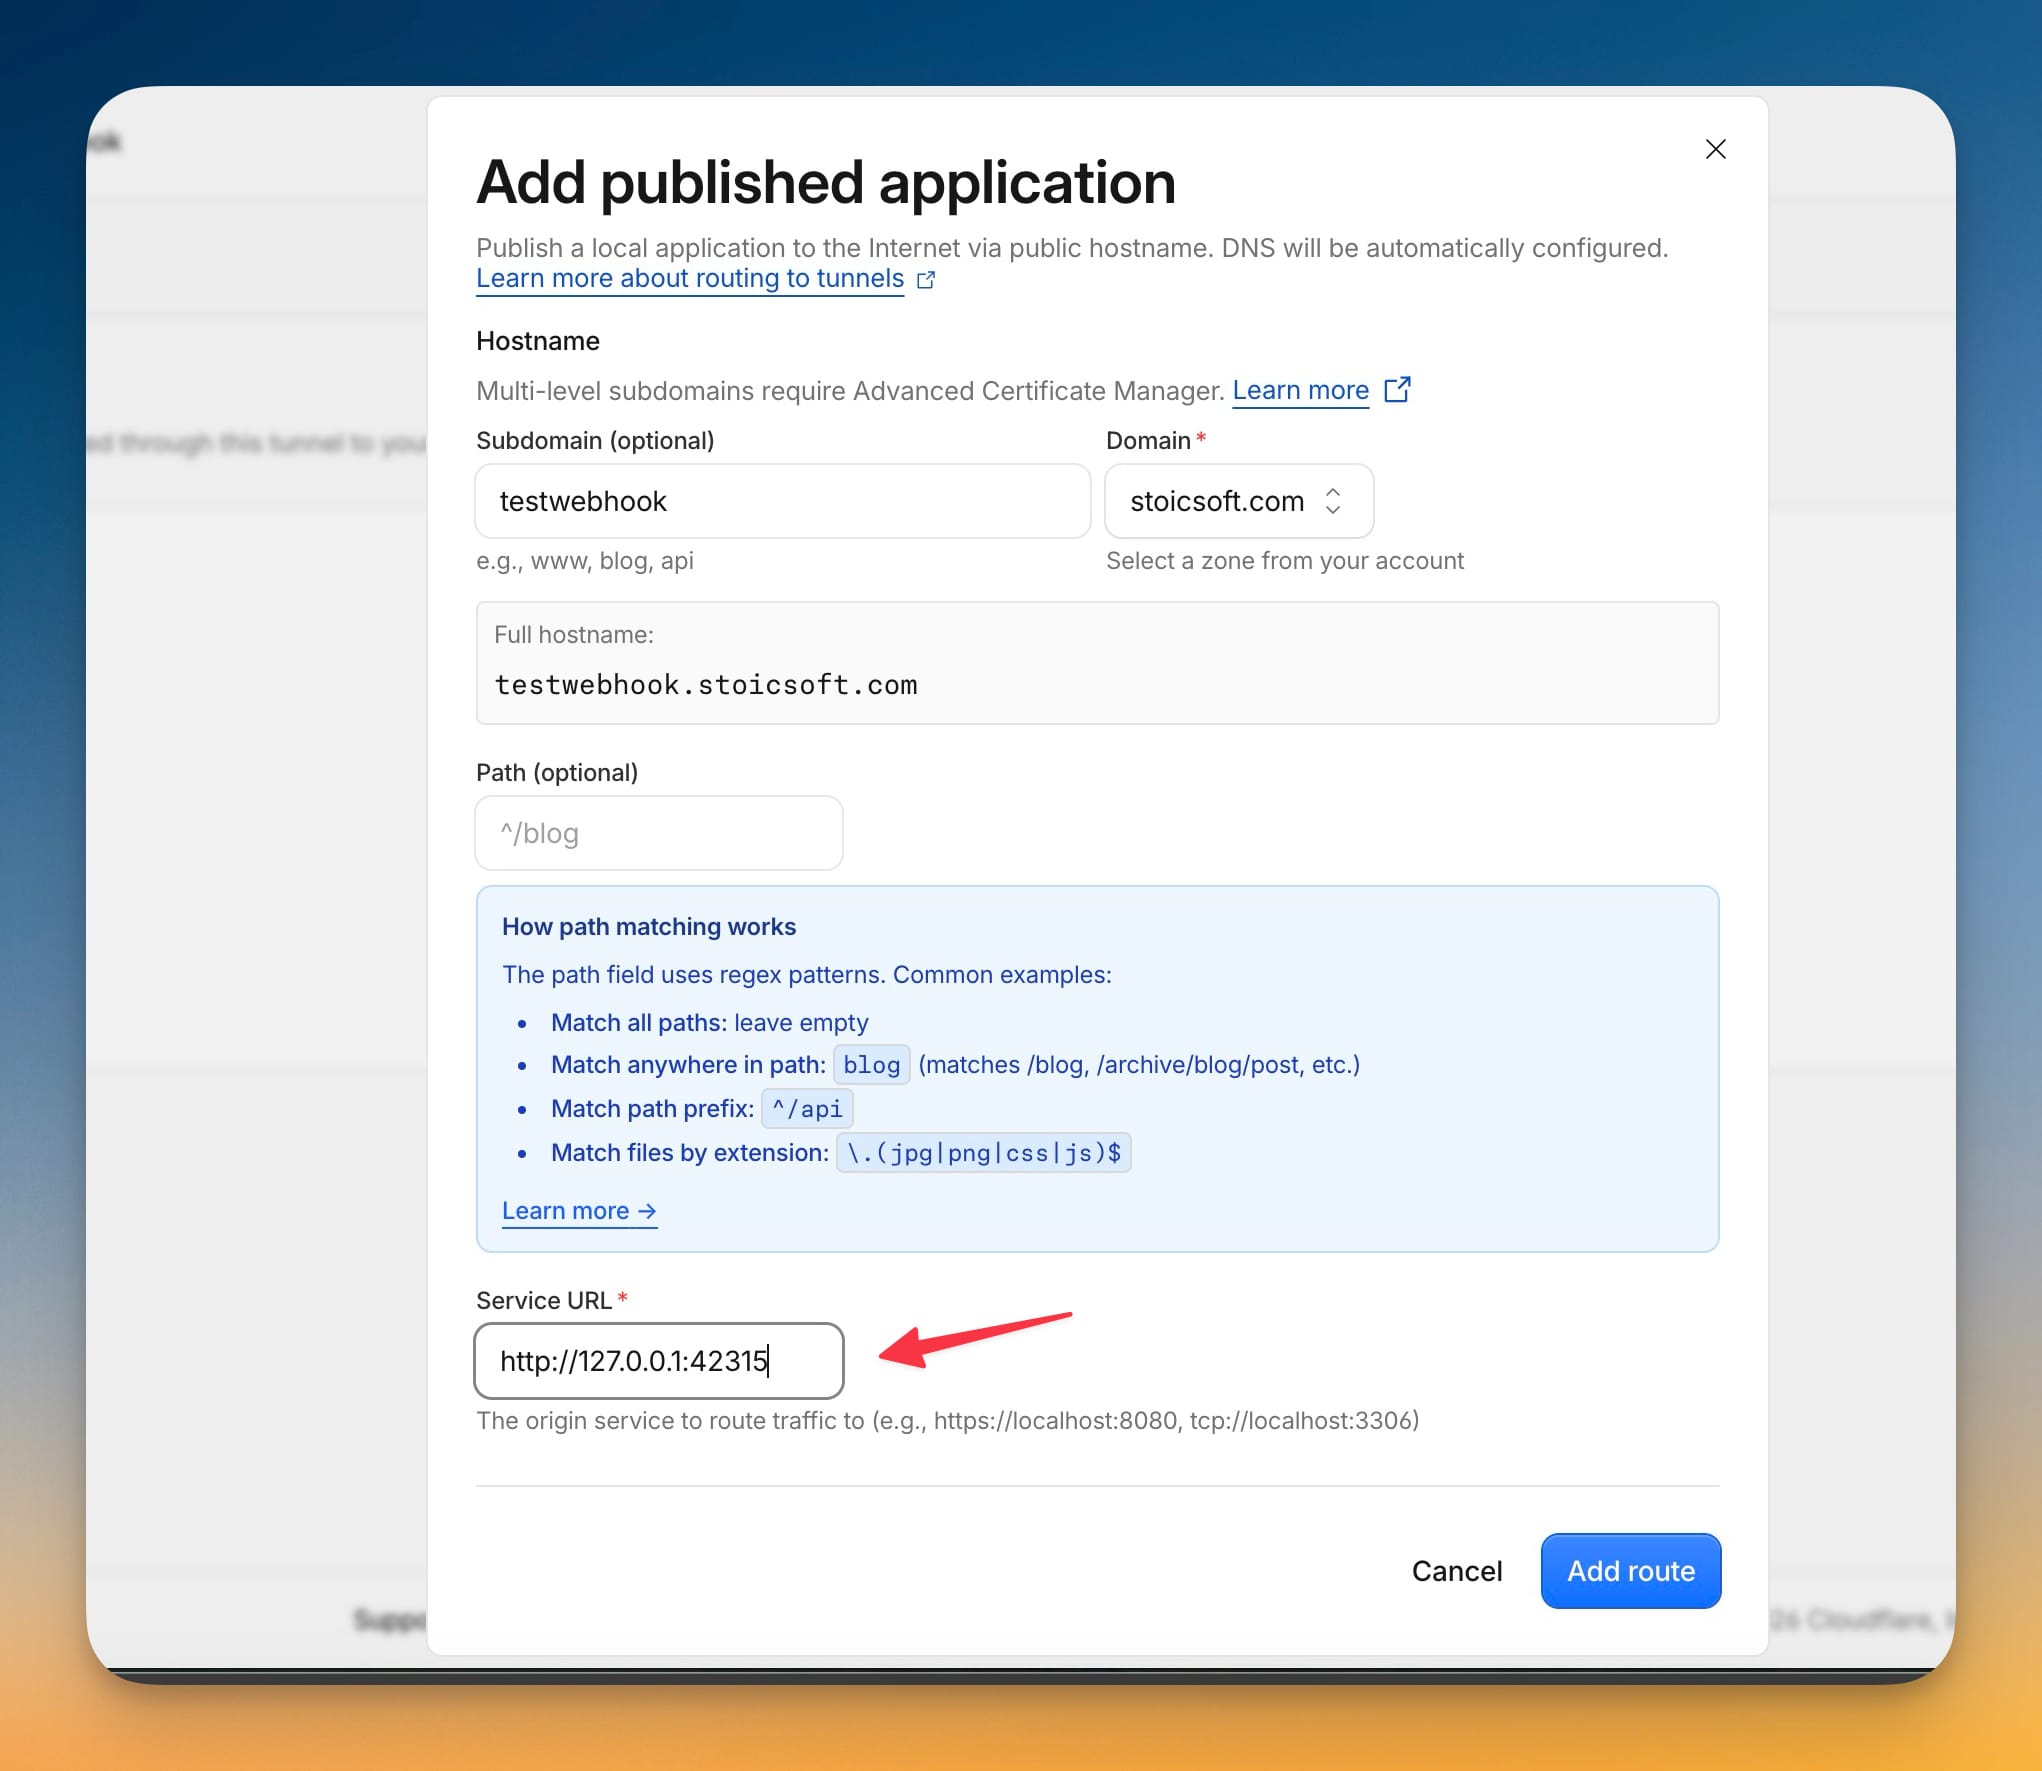
Use this for a LAN server, private VPS, CGNAT connection, or any server where you do not want to open inbound ports. Create a persistent named Cloudflare Tunnel or an equivalent tunnel, run its connector on the server, and map the public hostname to the loopback target shown by Check server, such as http://127.0.0.1:42315.
The tunnel must be stable and start automatically after a reboot. A temporary Quick Tunnel or an ngrok URL that changes when restarted is not suitable because GitHub stores the webhook URL. If the connector runs in Docker, give it host networking or another route that can actually reach the gateway on the host.
Check the server and activate
- Click Check server.
- Confirm that Docker Engine, Docker Compose, and the suggested gateway port pass the readiness check.
- If you selected managed Traefik, confirm that the
traefik-publicnetwork also passes. - If you selected an existing proxy or stable tunnel, finish the external route to the exact loopback port shown in the result.
- Click Activate Auto Deploy.
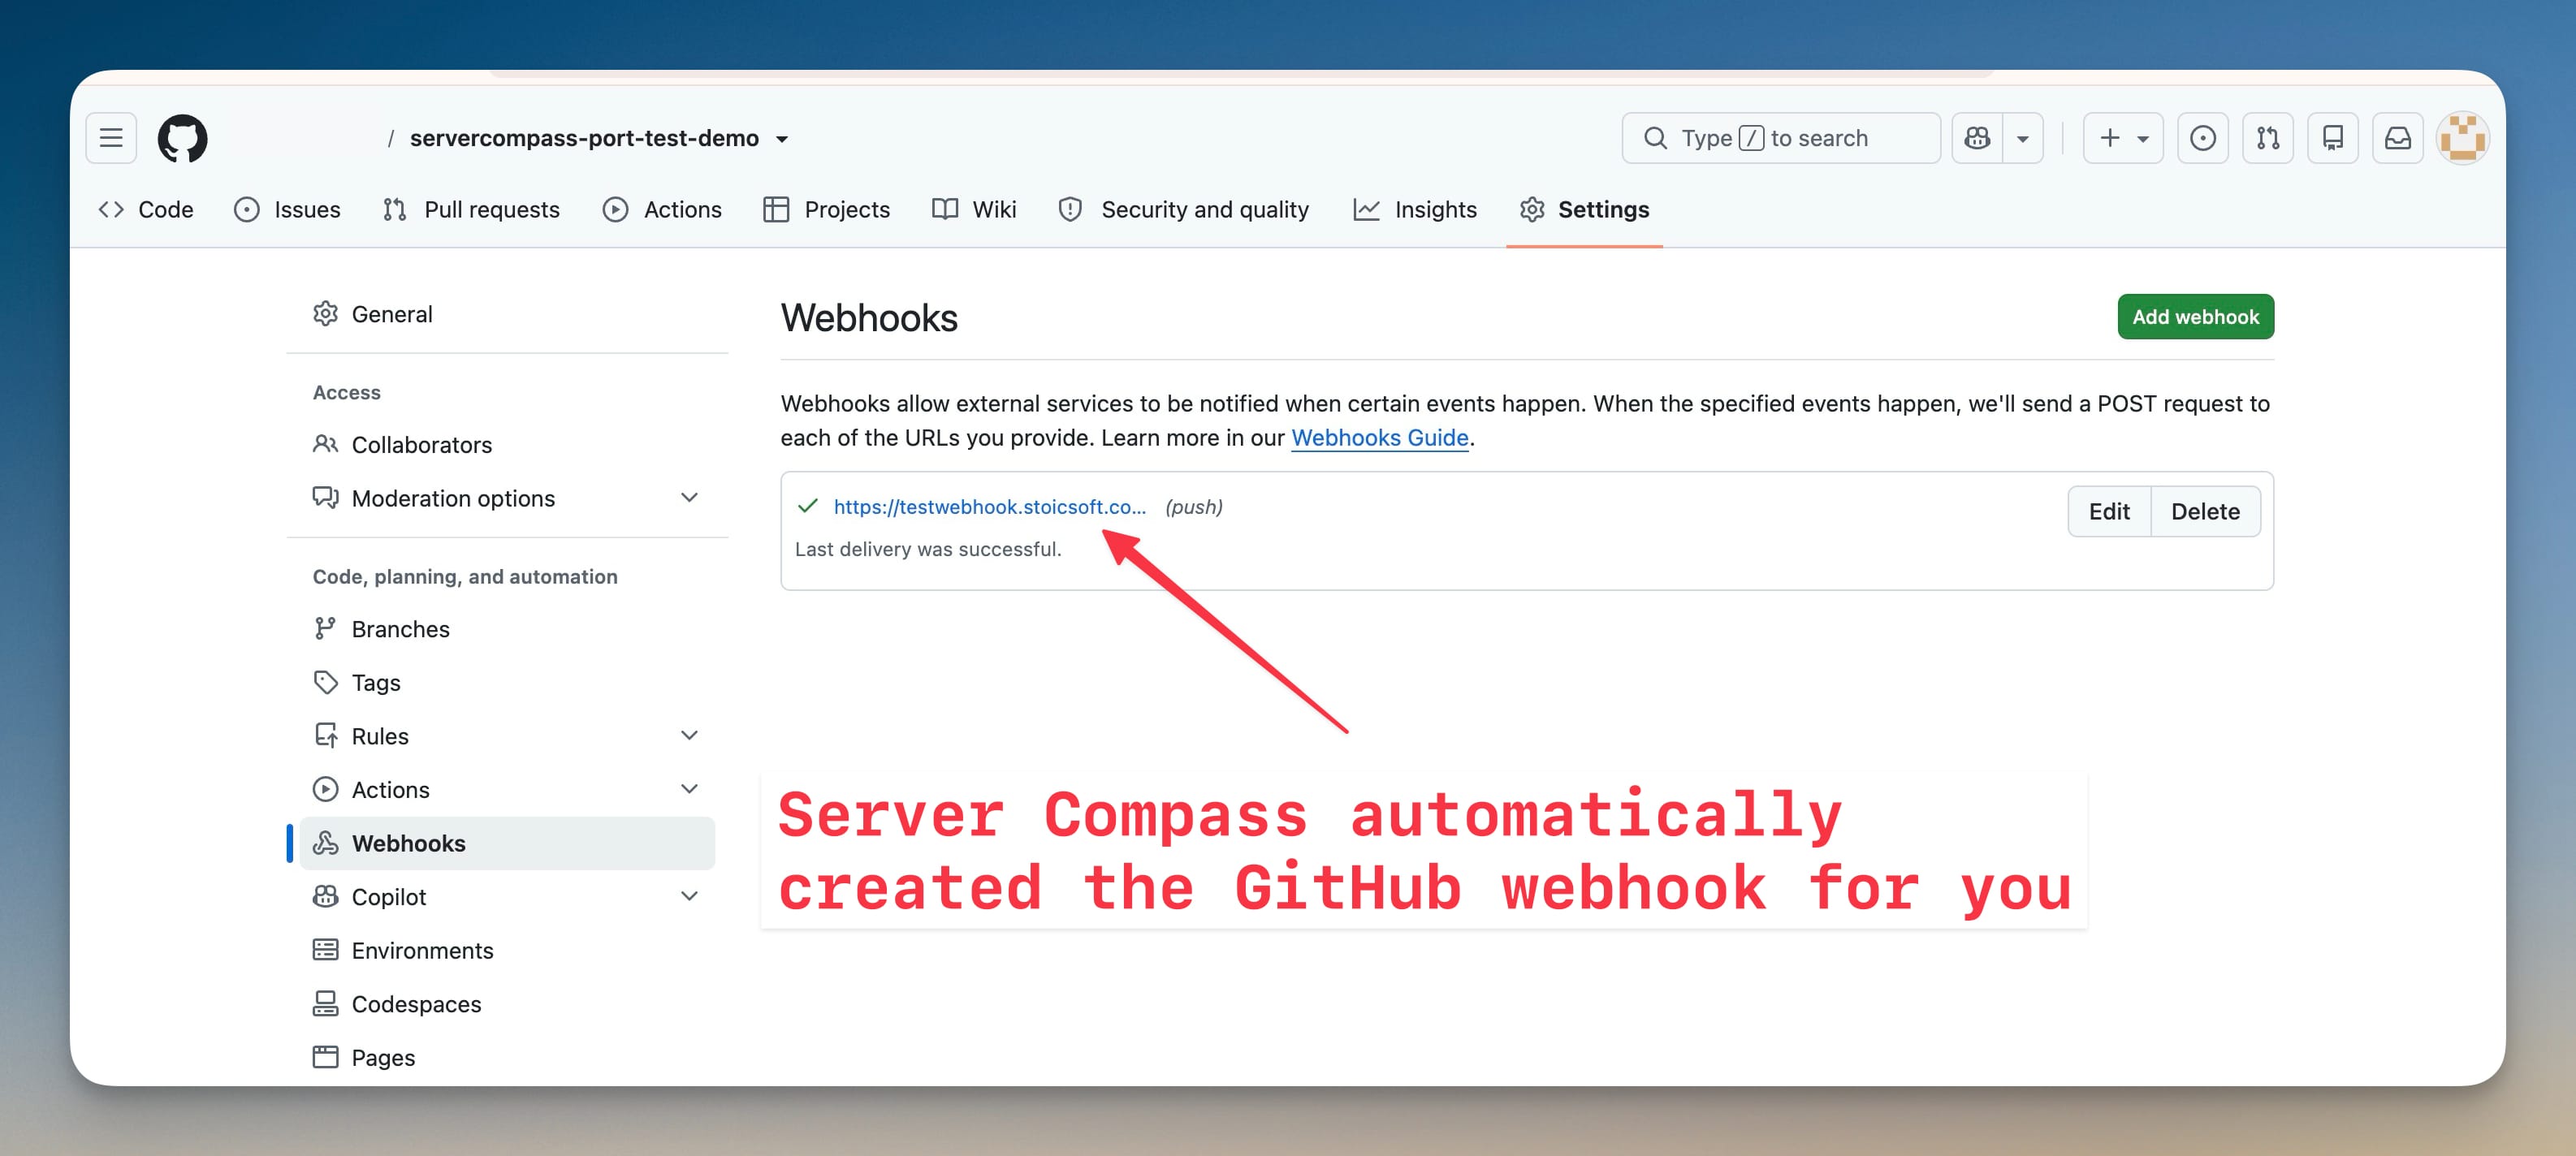
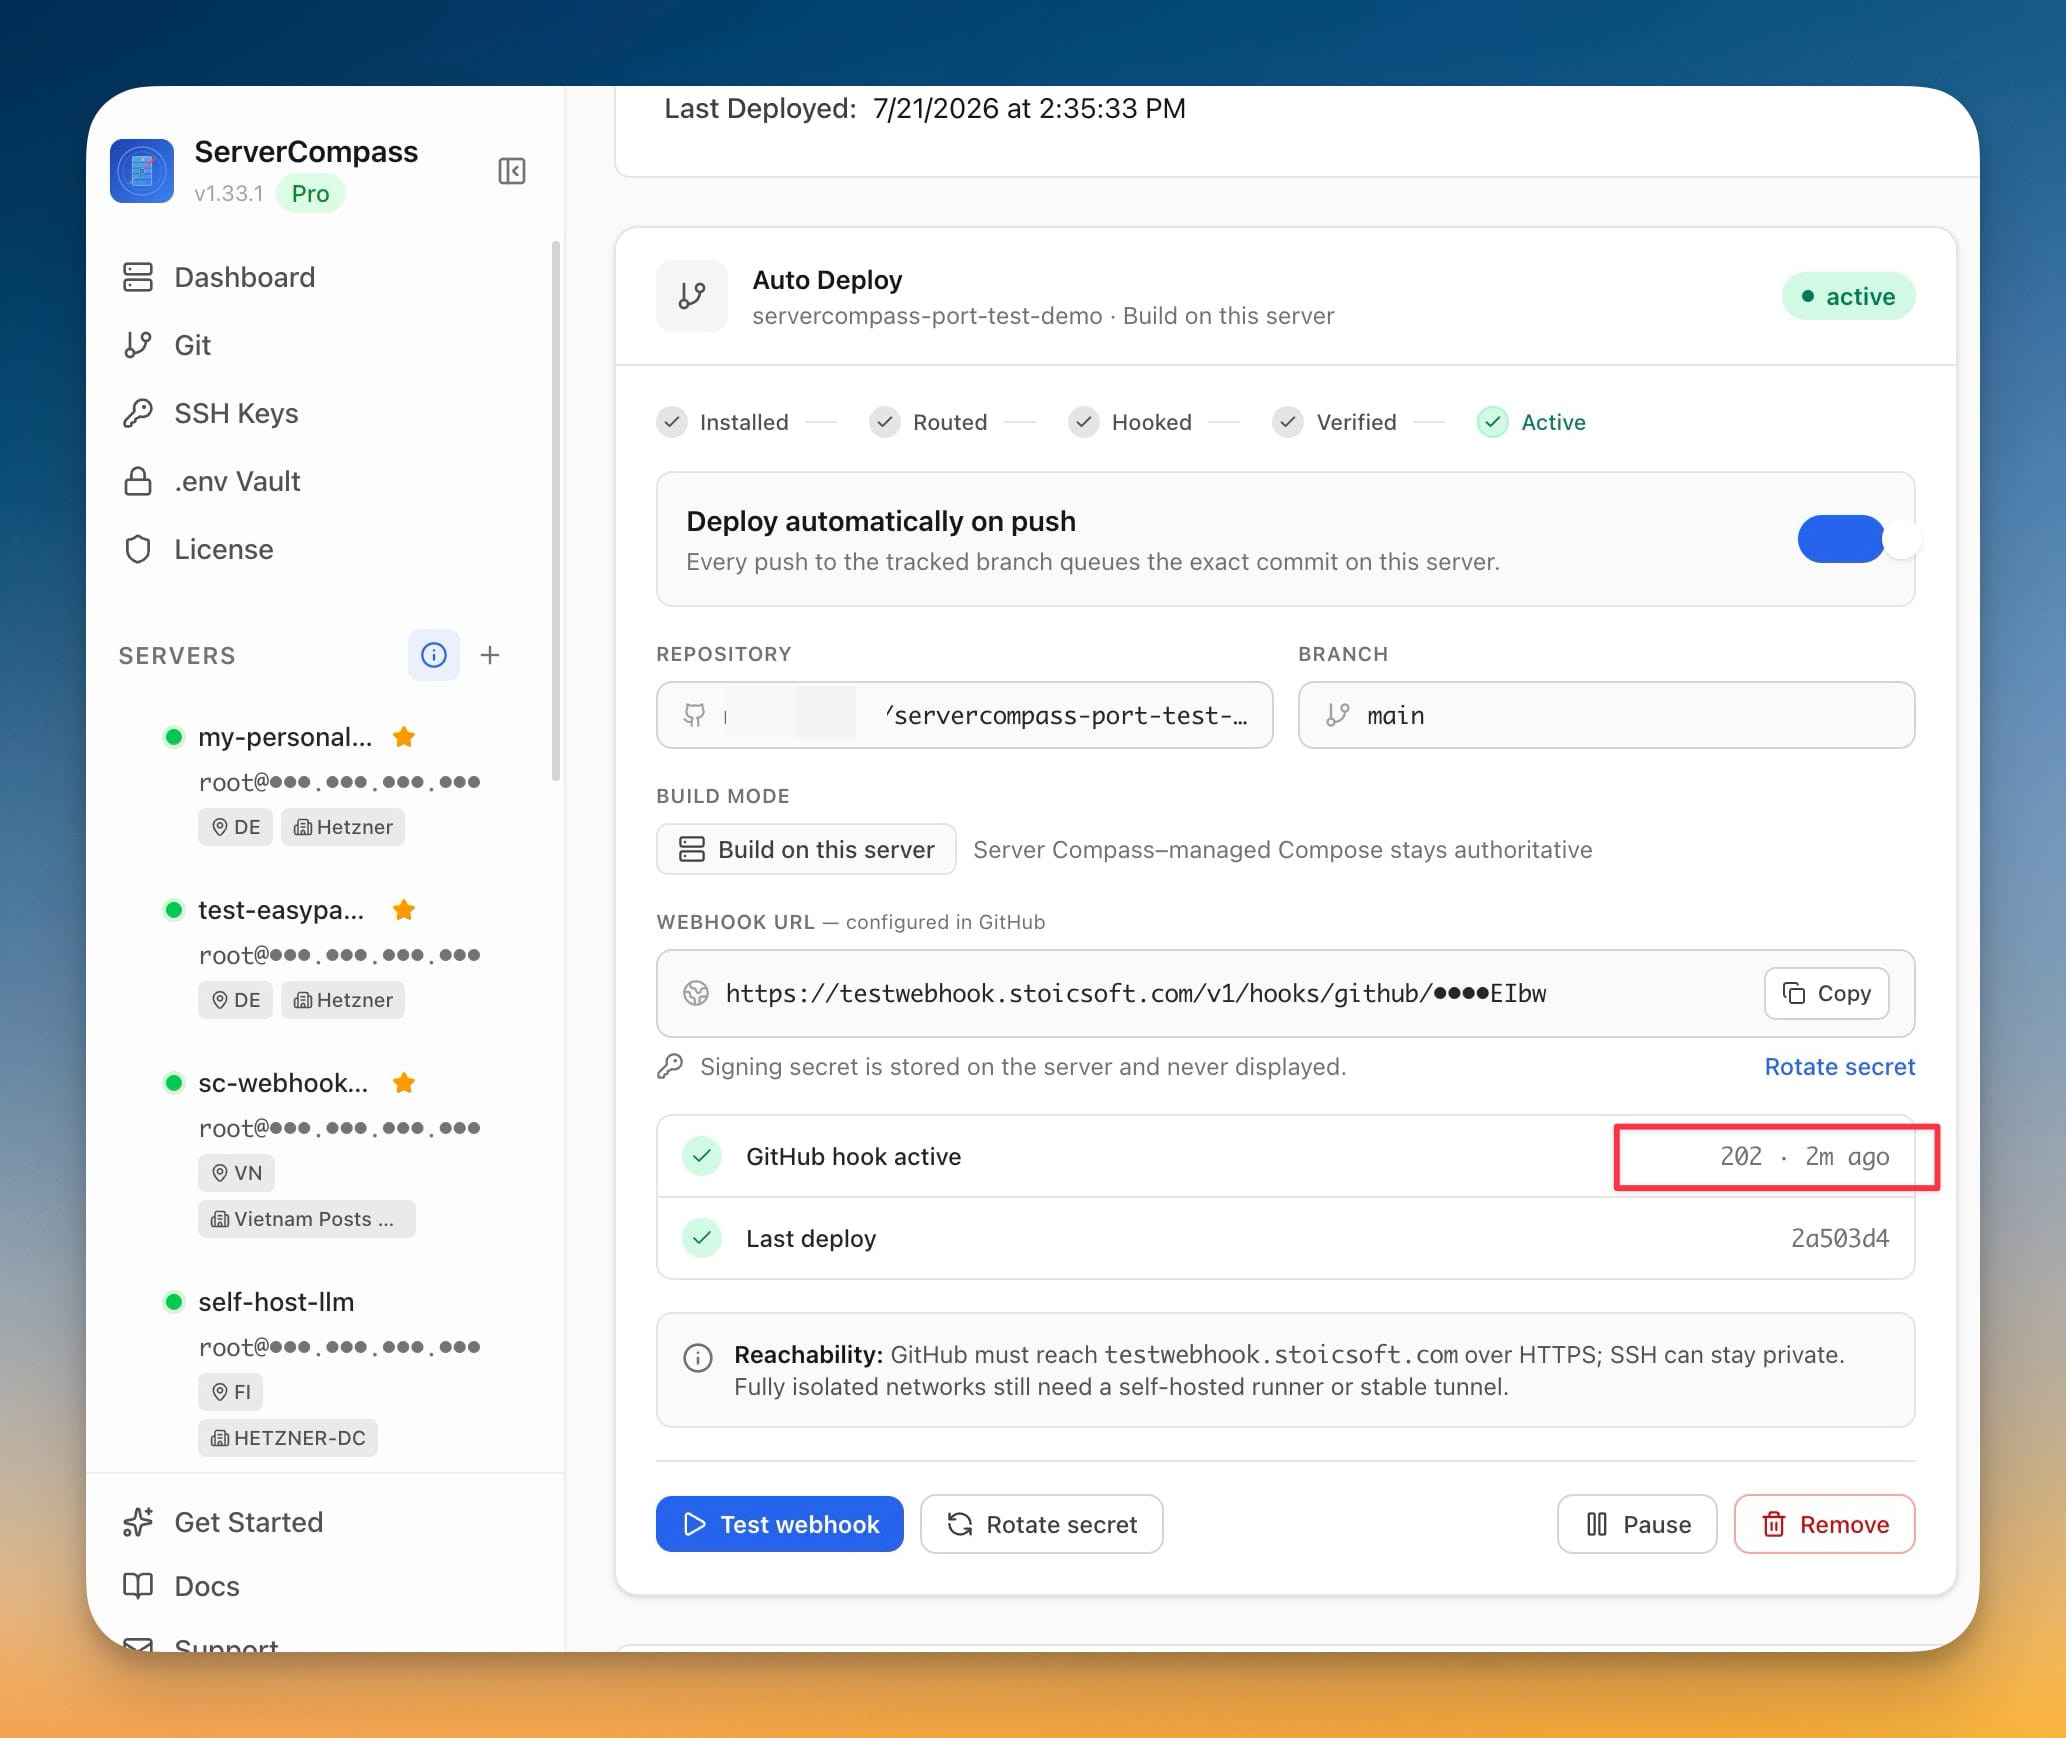
Server Compass installs the gateway and worker, creates a private webhook URL, stores the signing secret on the server, creates the webhook in GitHub, sends a GitHub ping, and waits for a successful signed delivery. The status progresses through Installed, Routed, Hooked, Verified, and Active.
If setup stops at Awaiting route, the runtime is already installed but GitHub cannot reach it yet. Complete or correct the DNS, TLS, firewall/NAT, proxy, or tunnel route, then click Continue setup. You do not need to reinstall the app.
Verify Auto Deploy
First confirm that the public health endpoint reaches the Server Compass gateway:
curl -fsS https://deploy.example.com/healthz
Then verify the complete deployment flow:
- In GitHub, open the repository and go to Settings > Webhooks.
- Open the webhook created by Server Compass and confirm that its latest delivery returned a
2xxresponse. - Push a small commit to the tracked branch.
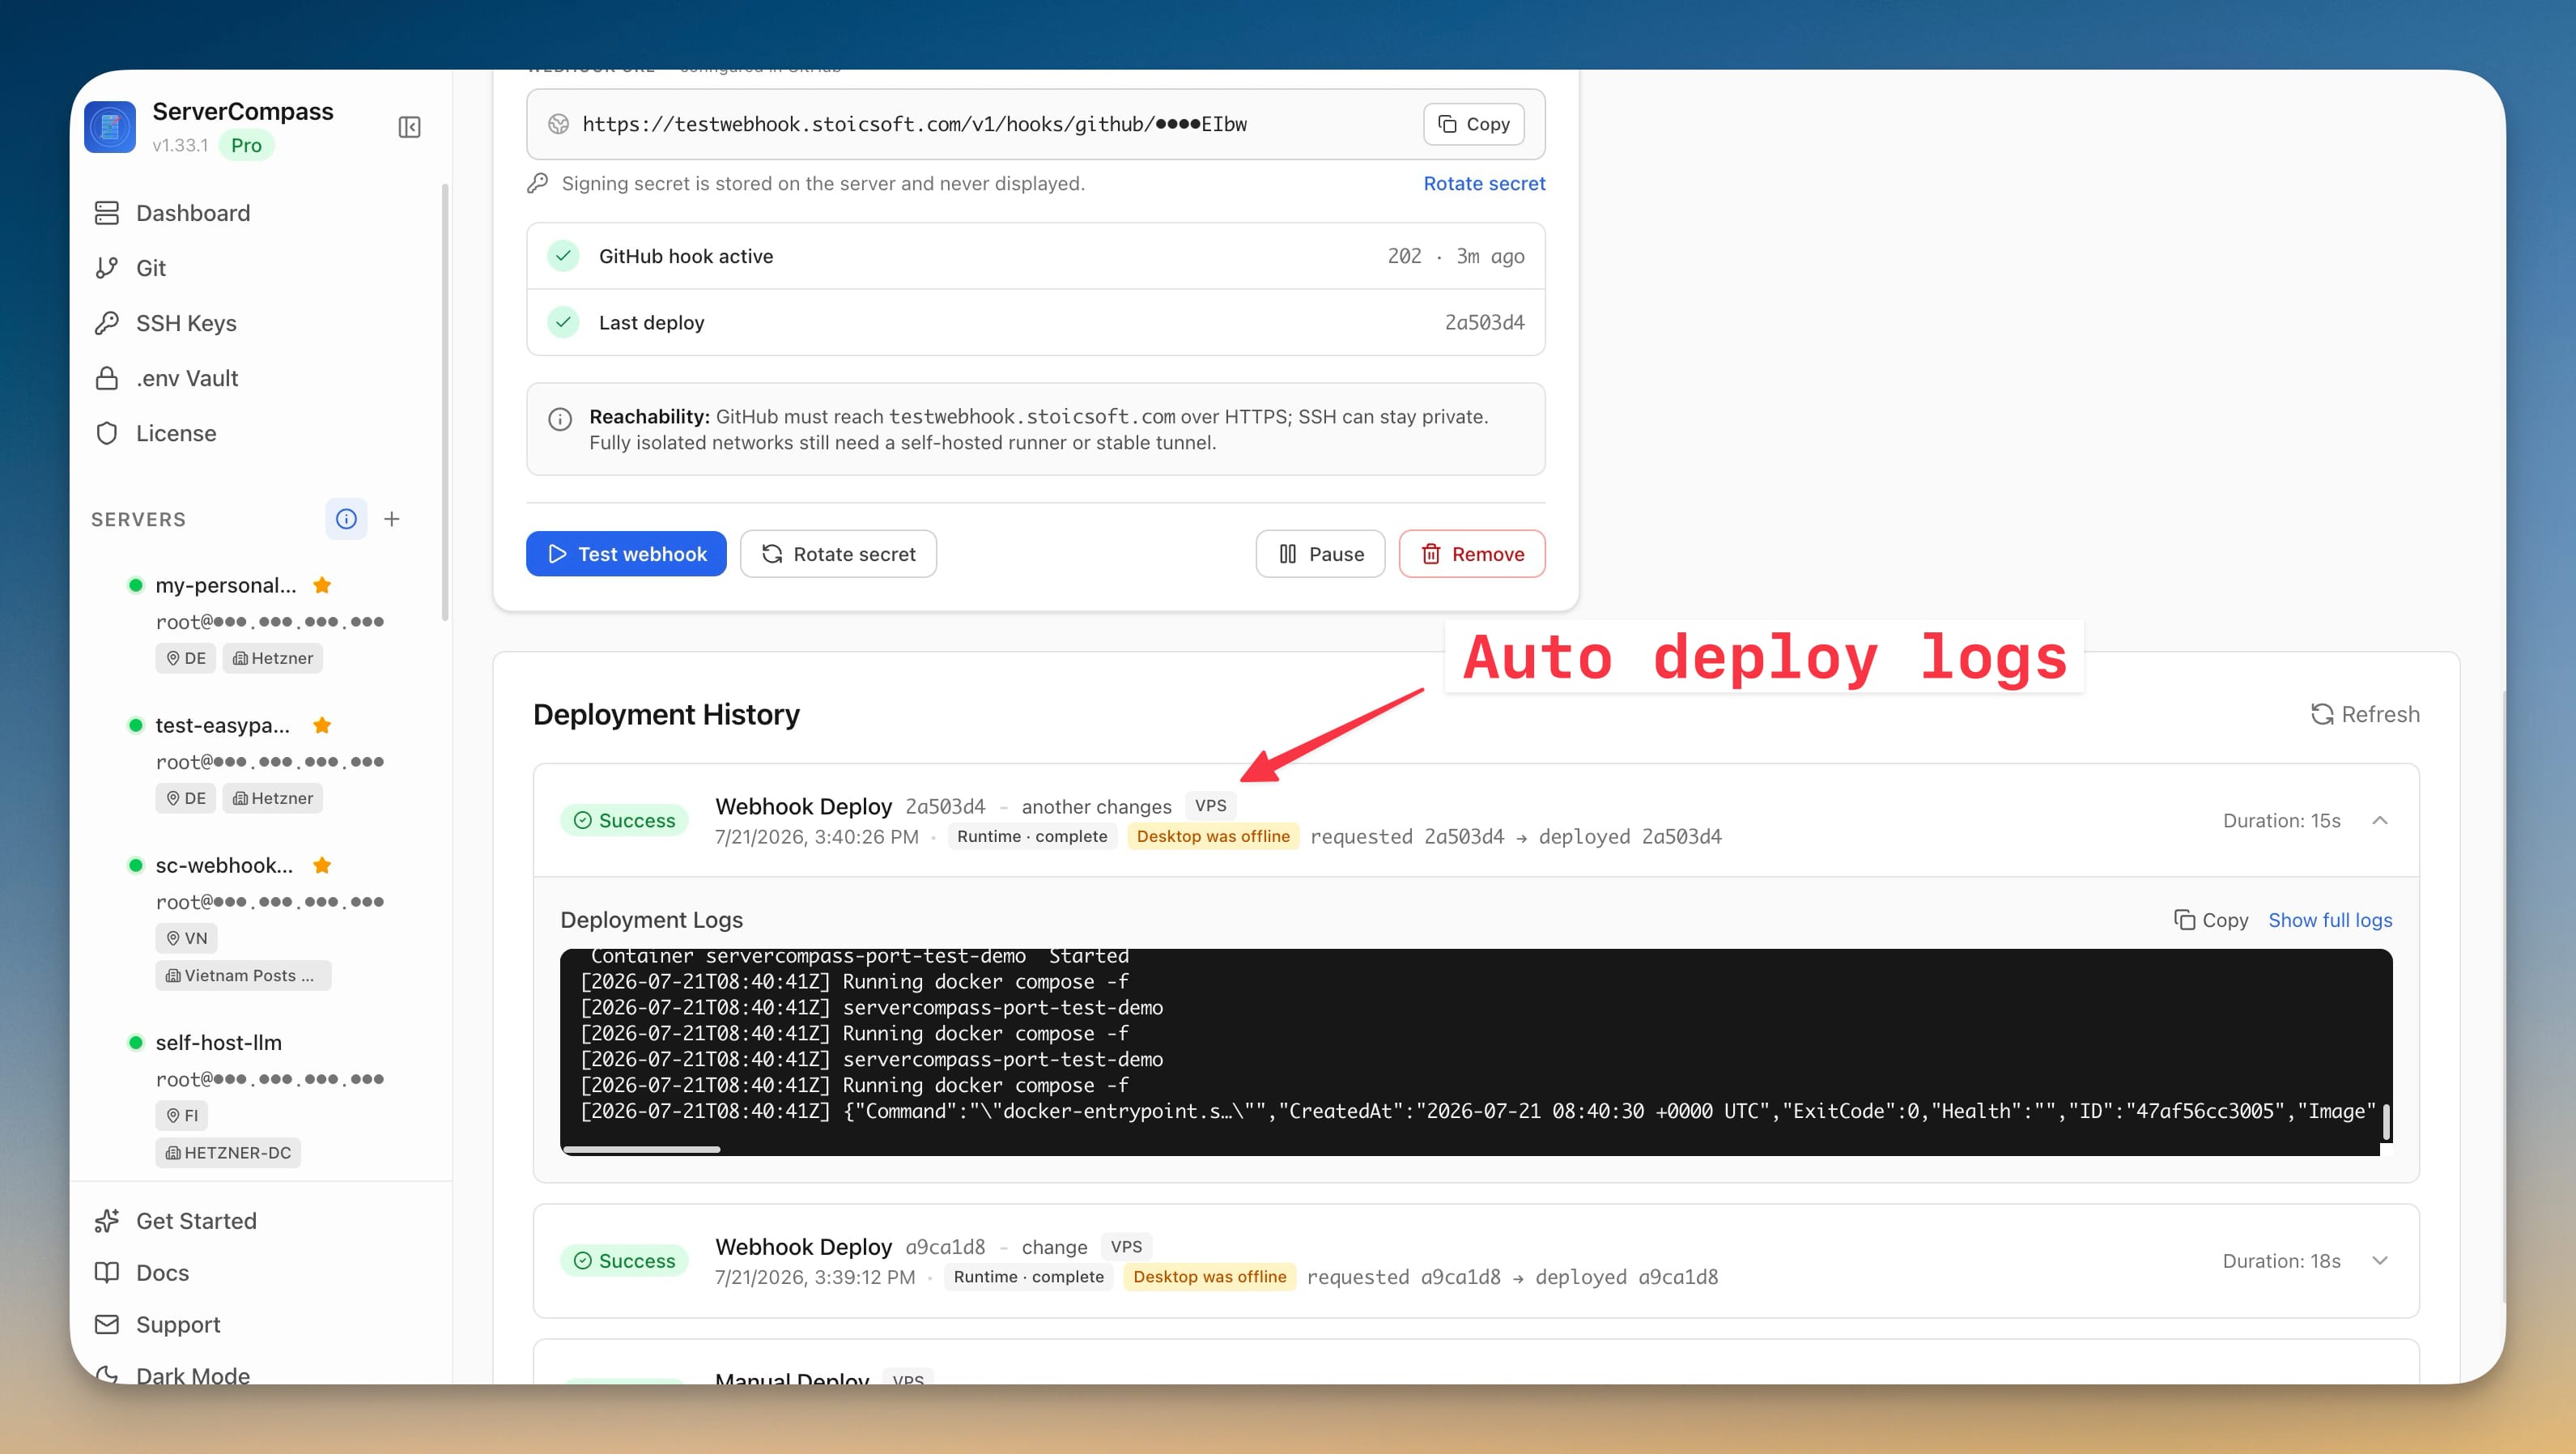
- In Server Compass, open the app's deployment history and confirm that the webhook job used the pushed commit.
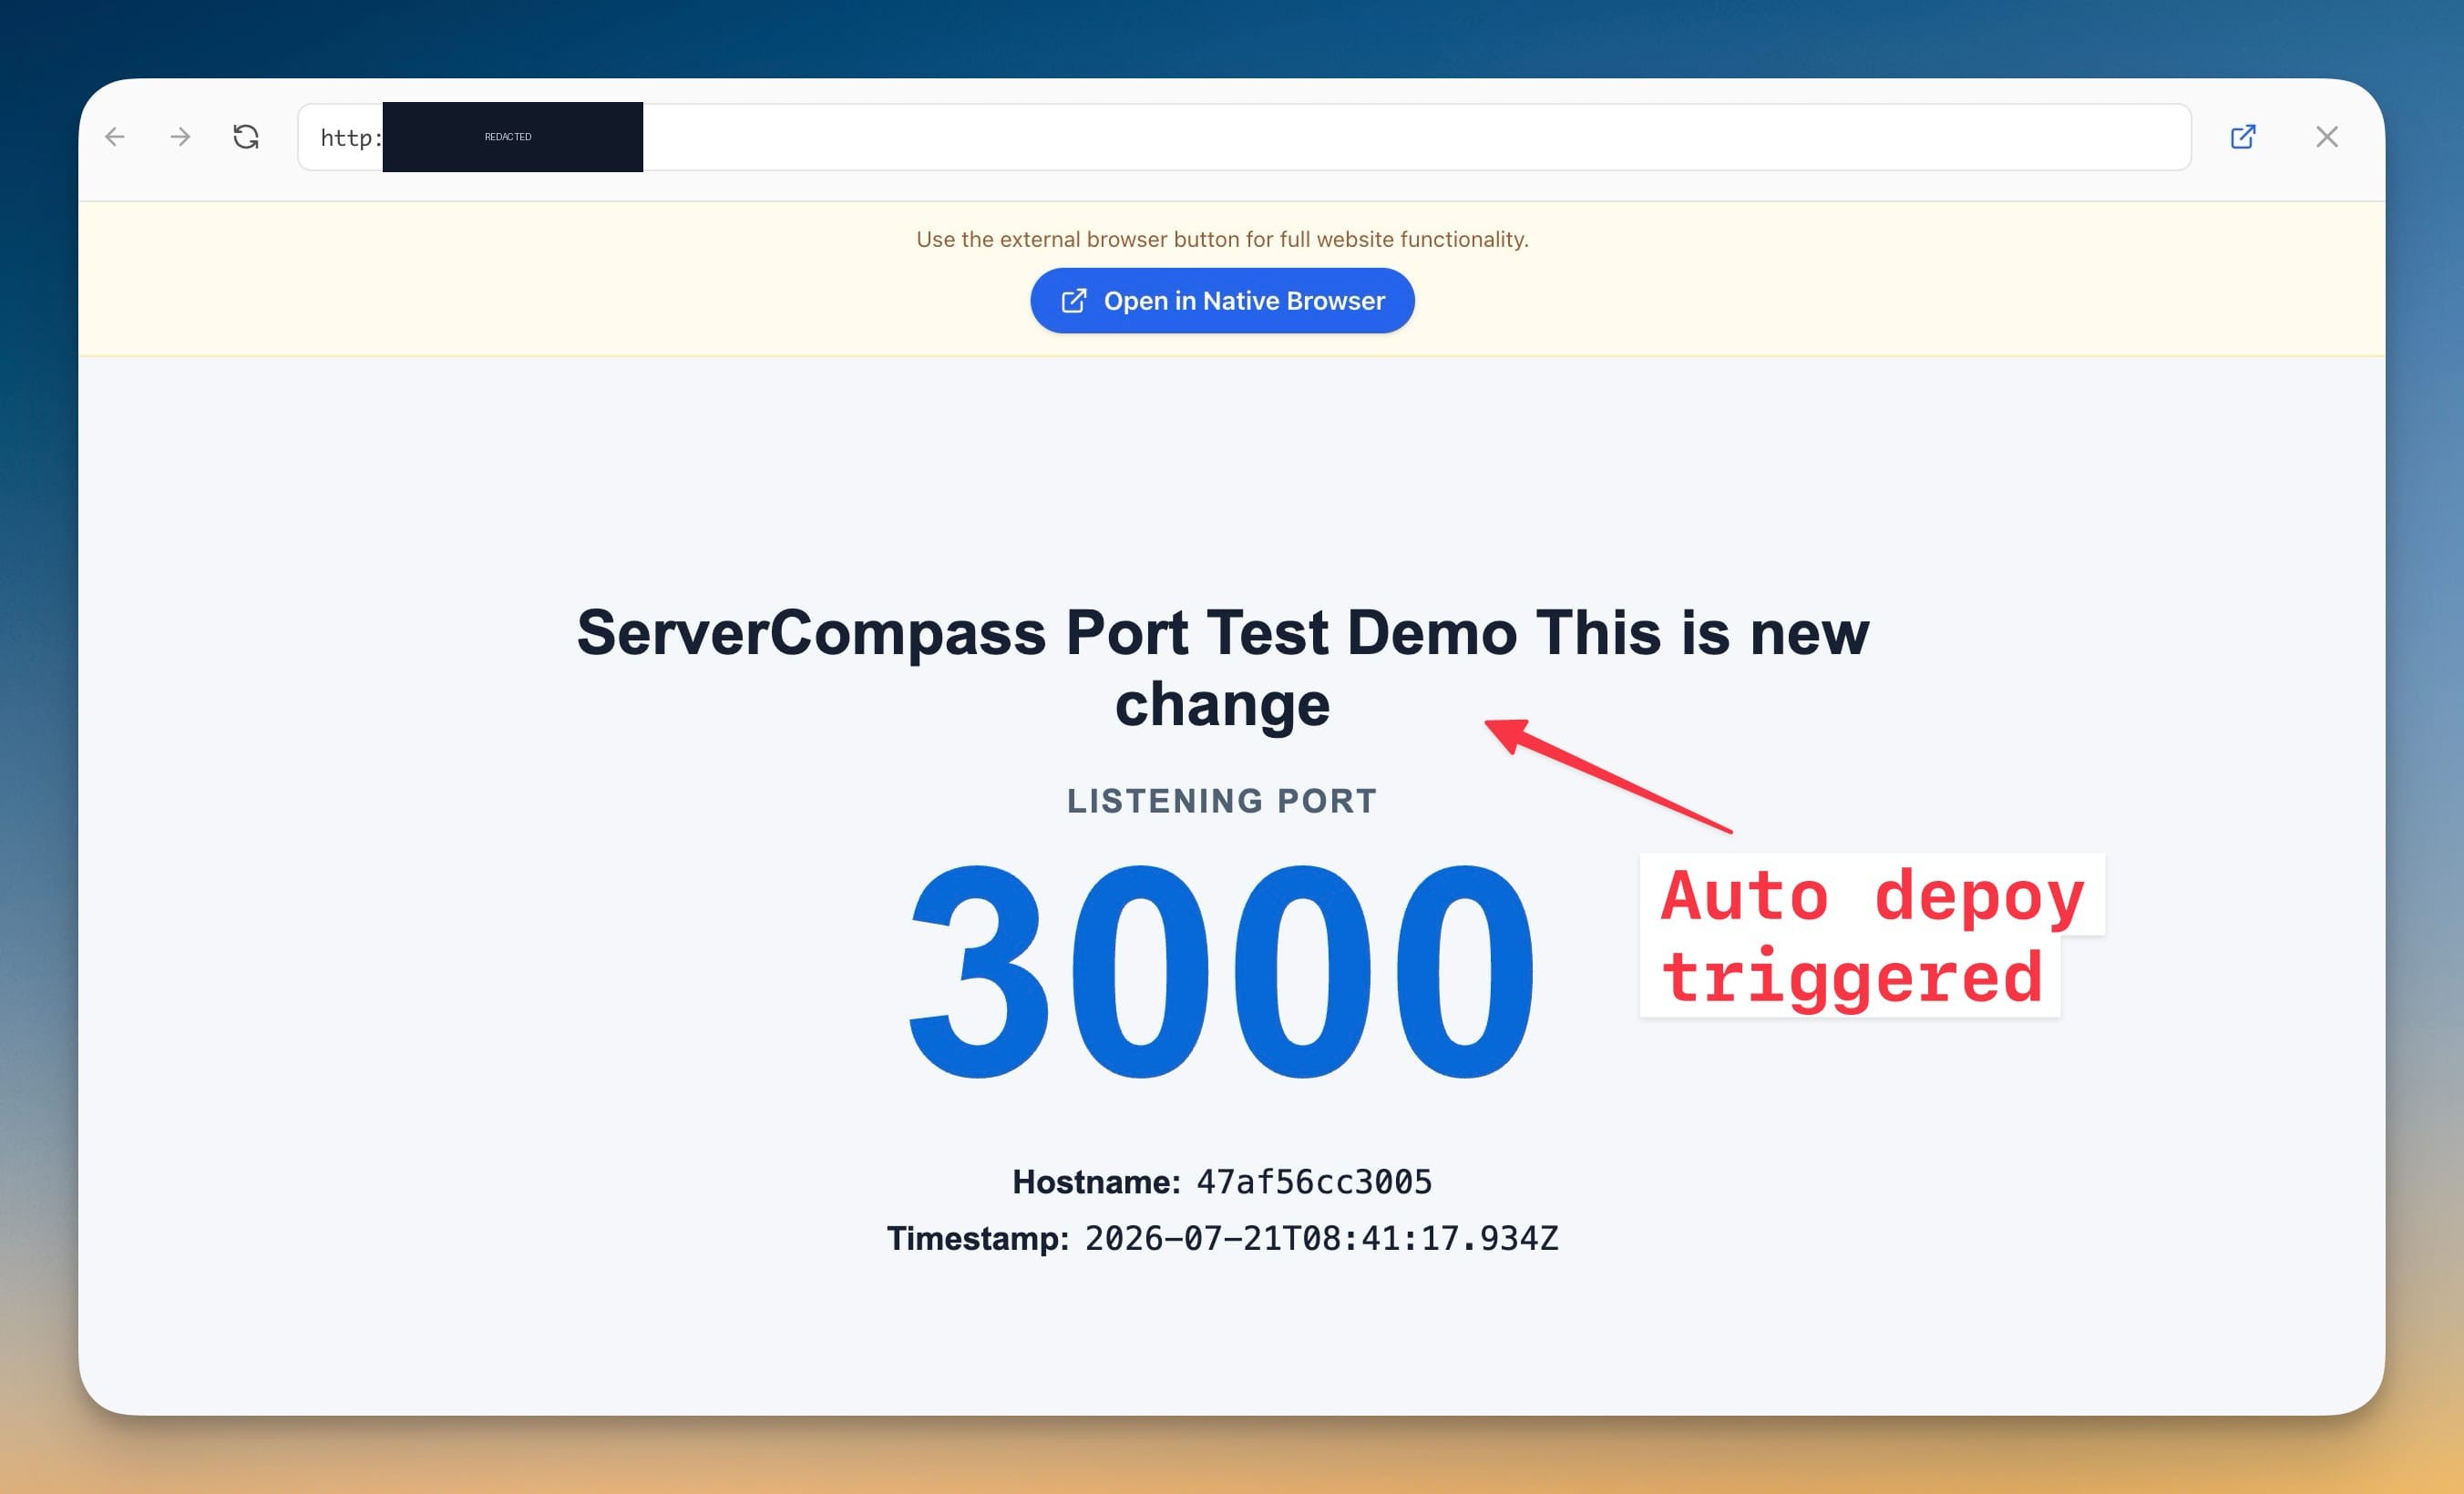
- Confirm that the deployed application contains the change.
For the final test, fully quit Server Compass, push another commit to the tracked branch, and verify the application again. The deploy should still complete because the gateway, queue, and worker run on the server.
Manage an active webhook
The Auto Deploy card provides these actions:
- Test webhook sends another GitHub test delivery and refreshes its status.
- Rotate secret replaces the signing secret on both the server and the GitHub webhook.
- Pause keeps the target and history but stops automatic deployments; Resume enables them again.
- Remove deletes the GitHub webhook and its remote target policy while retaining deployment history.
To change the tracked repository or branch, remove Auto Deploy first, update and redeploy the app with the new repository or branch, then set up Auto Deploy again.
Troubleshooting and security
- Health endpoint fails or returns 502/404: verify DNS and TLS, confirm the proxy or tunnel points to the current loopback port, and make sure the gateway container is running.
- GitHub delivery is not
2xx: inspect the webhook's recent delivery, confirm that no authentication layer blocks GitHub, and make sure the proxy has not changed the raw body or removed GitHub headers. - Push does not deploy: confirm that Auto Deploy is Active, not Paused, and that the push was made to the exact tracked branch.
- Tunnel worked until a reboot: configure the named tunnel connector as a system service or restartable container. Do not use a temporary URL.
- Desktop is closed and deployment fails: check that the server is online and that the Server Compass gateway and worker containers are running.
The webhook URL contains a private route token and should not be published. GitHub deliveries are authenticated with an HMAC signing secret that is generated and stored on the server and is never displayed in the UI. You do not need to expose SSH, the Docker socket, or the private worker to the internet.
Screenshots
Ready to try Server Compass?
Download the app and deploy your first application in under 5 minutes.
Download Server Compass