March 6, 2026
Deploy Express.js App to VPS (Step-by-Step Guide)
Learn how to deploy your Express.js application to a VPS step by step. This comprehensive guide covers production preparation, PM2 process management, Nginx reverse proxy, SSL certificates, firewall configuration, and a Docker alternative.
Express.js powers millions of Node.js applications — from REST APIs to full-stack web apps. It's fast, flexible, and developer-friendly. But when it's time to deploy your Express app to a VPS, the simplicity ends and the complexity begins.
SSH keys, Node.js installation, process management, reverse proxies, SSL certificates, firewall rules — what should be a straightforward deployment becomes a multi-hour ordeal. And if you get something wrong, your app crashes at 3 AM with no automatic restart.
This guide walks you through every step of deploying an Express.js application to a VPS. You'll learn the manual approach (so you understand what's happening under the hood), plus a Docker alternative and the easy way using Server Compass for visual deployment.
Why Deploy Express.js on a VPS?
Before diving in, let's address why you might choose a VPS over managed platforms like Heroku, Render, or Railway:
- Cost savings — A $5-10/month VPS can host multiple Express apps that would cost $50-100/month on PaaS platforms. See our Vercel pricing breakdown and Render pricing analysis for real numbers.
- Full control — Install any npm package, use any Node.js version, configure memory limits, and customize everything without platform restrictions.
- No cold starts — Unlike serverless platforms, your Express app runs continuously with instant response times.
- Data sovereignty — Your data stays on your server, in your chosen region, under your control.
- Learning experience — Understanding server deployment makes you a better developer and helps you debug production issues.
If you're building a serious project — an API backend, a SaaS application, or a production web app — deploying to your own VPS is often the most cost-effective and flexible choice.
Prerequisites
Before starting, make sure you have:
- A VPS — Any provider works: DigitalOcean, Hetzner, Linode, Vultr, or AWS Lightsail. Ubuntu 22.04 or 24.04 LTS is recommended. A $5-10/month instance with 1GB RAM is sufficient for most Express apps.
- A domain name — Point your domain's A record to your VPS IP address. This is required for SSL certificates.
- SSH access — You should have either password or SSH key access to your server. Key-based authentication is more secure.
- An Express.js application — Your app should be ready for production with a clear start command (usually
npm startornode app.js). - Git repository — Your code should be in a Git repository (GitHub, GitLab, or Bitbucket) for easy deployment and updates.
Step 1: Prepare Your Express App for Production
Before deploying, ensure your Express application follows production best practices. These changes make your app more secure, stable, and easier to manage on a VPS.
Use Environment Variables
Never hardcode sensitive values like database URLs, API keys, or secrets. Use environment variables and the dotenv package:
{`// app.js or index.js
require('dotenv').config();

const express = require('express');
const app = express();

const PORT = process.env.PORT || 3000;
const NODE_ENV = process.env.NODE_ENV || 'development';
const DATABASE_URL = process.env.DATABASE_URL;

app.listen(PORT, () => {
  console.log(\`Server running in \$ mode on port \$\`);
});`}
Create a .env.example file (committed to Git) showing required variables, and a .env file (in .gitignore) with actual values:
# .env.example - commit this to your repository
PORT=3000
NODE_ENV=production
DATABASE_URL=
JWT_SECRET=
API_KEY=
Separate Production Dependencies
Keep development dependencies separate in your package.json. On the server, you'll install only production dependencies with npm ci --production:
{
  "name": "my-express-app",
  "version": "1.0.0",
  "scripts": {
    "start": "node app.js",
    "dev": "nodemon app.js"
  },
  "dependencies": {
    "express": "^4.18.2",
    "dotenv": "^16.3.1",
    "cors": "^2.8.5",
    "helmet": "^7.1.0"
  },
  "devDependencies": {
    "nodemon": "^3.0.2"
  }
}
Add Security Middleware
Install and configure security middleware before deploying. At minimum, use helmet for HTTP headers and cors for cross-origin requests:
const express = require('express');
const helmet = require('helmet');
const cors = require('cors');

const app = express();

// Security headers
app.use(helmet());

// CORS configuration
app.use(cors({
  origin: process.env.ALLOWED_ORIGINS?.split(',') || '*',
  credentials: true
}));

// Parse JSON bodies
app.use(express.json({ limit: '10mb' }));

// Trust proxy (required behind Nginx)
app.set('trust proxy', 1);
Add a Health Check Endpoint
A health check endpoint lets PM2, load balancers, and monitoring tools verify your app is running:
app.get('/health', (req, res) => {
  res.status(200).json({
    status: 'healthy',
    timestamp: new Date().toISOString(),
    uptime: process.uptime()
  });
});
Step 2: Connect to Your VPS via SSH
Open your terminal and connect to your VPS. Replace your-server-ip with your actual VPS IP address:
# Connect with password (you'll be prompted)
ssh root@your-server-ip

# Or connect with SSH key
ssh -i ~/.ssh/your-key root@your-server-ip
First time connecting? You'll see a fingerprint warning. Type yes to add the server to your known hosts.
Create a Deploy User (Recommended)
Running applications as root is a security risk. Create a dedicated user for deployments:
# Create a new user
adduser deploy

# Add to sudo group
usermod -aG sudo deploy

# Switch to the new user
su - deploy
For future connections, use ssh deploy@your-server-ip.
Step 3: Install Node.js
The recommended way to install Node.js on Ubuntu is using NodeSource or nvm (Node Version Manager). We'll use NodeSource for a system-wide installation:
# Update package index
sudo apt update && sudo apt upgrade -y

# Install required packages
sudo apt install -y curl git

# Add NodeSource repository (Node.js 20 LTS)
curl -fsSL https://deb.nodesource.com/setup_20.x | sudo -E bash -

# Install Node.js
sudo apt install -y nodejs

# Verify installation
node --version   # Should show v20.x.x
npm --version    # Should show 10.x.x
Alternative: Using nvm
If you need multiple Node.js versions or want user-level installation, use nvm:
# Install nvm
curl -o- https://raw.githubusercontent.com/nvm-sh/nvm/v0.39.7/install.sh | bash

# Reload shell configuration
source ~/.bashrc

# Install Node.js 20 LTS
nvm install 20
nvm use 20
nvm alias default 20
Step 4: Clone Your Repository and Install Dependencies
Create a directory for your applications and clone your repository:
# Create apps directory
mkdir -p ~/apps
cd ~/apps

# Clone your repository
git clone https://github.com/yourusername/your-express-app.git
cd your-express-app

# Install production dependencies only
npm ci --production
The npm ci command installs exact versions from package-lock.json, ensuring consistent deployments. The --production flag skips devDependencies.
Private Repositories
For private GitHub repositories, you'll need to set up authentication. The easiest method is a personal access token:
# Clone with token embedded (not recommended for shared servers)
git clone https://[email protected]/yourusername/your-express-app.git

# Or configure Git credentials
git config --global credential.helper store
git clone https://github.com/yourusername/your-express-app.git
# Enter your username and token when prompted
For better security, use SSH keys or a credentials manager. See our GitHub deployment guide for detailed instructions.
Step 5: Configure Environment Variables
Create your production .env file on the server. Never commit this file to Git:
# Create .env file
nano ~/apps/your-express-app/.env
Add your production environment variables:
PORT=3000
NODE_ENV=production
DATABASE_URL=postgresql://user:password@localhost:5432/mydb
JWT_SECRET=your-super-secret-key-change-this
API_KEY=your-api-key
ALLOWED_ORIGINS=https://yourdomain.com,https://www.yourdomain.com
Save and exit (Ctrl+X, then Y, then Enter).
Security tip: Restrict file permissions so only the owner can read it:
chmod 600 ~/apps/your-express-app/.env
Step 6: Set Up PM2 for Process Management
PM2 is the industry-standard process manager for Node.js applications. It keeps your app running, restarts it if it crashes, and provides logging and monitoring:
# Install PM2 globally
sudo npm install -g pm2
Create PM2 Ecosystem Configuration
Instead of starting your app directly, create an ecosystem configuration file for better control. Create ecosystem.config.js in your project root:
// ecosystem.config.js
module.exports = {
  apps: [
    {
      name: 'my-express-app',
      script: 'app.js',
      instances: 'max',        // Use all available CPU cores
      exec_mode: 'cluster',    // Enable cluster mode for load balancing
      env: {
        NODE_ENV: 'development',
        PORT: 3000
      },
      env_production: {
        NODE_ENV: 'production',
        PORT: 3000
      },
      // Restart configuration
      max_memory_restart: '500M',  // Restart if memory exceeds 500MB
      restart_delay: 3000,         // Wait 3 seconds between restarts
      max_restarts: 10,            // Maximum restart attempts
      min_uptime: '10s',           // Minimum uptime to consider "started"

      // Logging
      log_file: '/var/log/pm2/my-express-app.log',
      error_file: '/var/log/pm2/my-express-app-error.log',
      out_file: '/var/log/pm2/my-express-app-out.log',
      merge_logs: true,
      log_date_format: 'YYYY-MM-DD HH:mm:ss Z',

      // Monitoring
      watch: false,               // Don't watch files in production
      ignore_watch: ['node_modules', 'logs', '.git'],
    }
  ]
};
Start Your Application with PM2
# Navigate to your app directory
cd ~/apps/your-express-app

# Create log directory
sudo mkdir -p /var/log/pm2
sudo chown -R $USER:$USER /var/log/pm2

# Start the application
pm2 start ecosystem.config.js --env production

# Check status
pm2 status

# View logs
pm2 logs my-express-app

# Monitor in real-time
pm2 monit
Configure PM2 to Start on Boot
This ensures your app automatically restarts after a server reboot:
# Generate startup script
pm2 startup systemd

# Copy and run the command it outputs (will look like):
# sudo env PATH=$PATH:/usr/bin pm2 startup systemd -u deploy --hp /home/deploy

# Save current process list
pm2 save
Essential PM2 Commands
# Restart application
pm2 restart my-express-app

# Reload with zero downtime (cluster mode)
pm2 reload my-express-app

# Stop application
pm2 stop my-express-app

# Delete from PM2
pm2 delete my-express-app

# View detailed info
pm2 describe my-express-app

# Clear logs
pm2 flush
Step 7: Configure Nginx as a Reverse Proxy
Nginx sits in front of your Express app, handling SSL termination, static file serving, compression, and load balancing. It's the industry-standard setup for Node.js applications.
# Install Nginx
sudo apt install -y nginx

# Start and enable Nginx
sudo systemctl start nginx
sudo systemctl enable nginx
Create Nginx Configuration
Create a configuration file for your domain:
sudo nano /etc/nginx/sites-available/your-express-app
Add the following configuration:
# Upstream for Express app (supports multiple instances)
upstream express_backend {
    server 127.0.0.1:3000;
    keepalive 64;
}

server {
    listen 80;
    server_name yourdomain.com www.yourdomain.com;

    # Redirect HTTP to HTTPS (will be handled by Certbot)
    location / {
        return 301 https://$server_name$request_uri;
    }
}

server {
    listen 443 ssl http2;
    server_name yourdomain.com www.yourdomain.com;

    # SSL certificates (will be added by Certbot)
    # ssl_certificate /etc/letsencrypt/live/yourdomain.com/fullchain.pem;
    # ssl_certificate_key /etc/letsencrypt/live/yourdomain.com/privkey.pem;

    # Security headers
    add_header X-Frame-Options "SAMEORIGIN" always;
    add_header X-Content-Type-Options "nosniff" always;
    add_header X-XSS-Protection "1; mode=block" always;
    add_header Referrer-Policy "strict-origin-when-cross-origin" always;

    # Gzip compression
    gzip on;
    gzip_vary on;
    gzip_min_length 1024;
    gzip_types text/plain text/css text/xml text/javascript application/javascript application/json application/xml;

    # Proxy settings for Express
    location / {
        proxy_pass http://express_backend;
        proxy_http_version 1.1;
        proxy_set_header Upgrade $http_upgrade;
        proxy_set_header Connection 'upgrade';
        proxy_set_header Host $host;
        proxy_set_header X-Real-IP $remote_addr;
        proxy_set_header X-Forwarded-For $proxy_add_x_forwarded_for;
        proxy_set_header X-Forwarded-Proto $scheme;
        proxy_cache_bypass $http_upgrade;
        proxy_read_timeout 300s;
        proxy_connect_timeout 75s;
    }

    # Static files (if serving from Express)
    location /static/ {
        alias /home/deploy/apps/your-express-app/public/;
        expires 30d;
        add_header Cache-Control "public, immutable";
    }

    # Health check endpoint (for monitoring)
    location /health {
        proxy_pass http://express_backend;
        proxy_http_version 1.1;
        proxy_set_header Host $host;
        access_log off;
    }

    # Deny access to hidden files
    location ~ /\\. {
        deny all;
    }
}
Enable the Configuration
# Create symbolic link to enable the site
sudo ln -s /etc/nginx/sites-available/your-express-app /etc/nginx/sites-enabled/

# Remove default site (optional)
sudo rm /etc/nginx/sites-enabled/default

# Test configuration syntax
sudo nginx -t

# If test passes, reload Nginx
sudo systemctl reload nginx
Step 8: Set Up SSL with Certbot (Let's Encrypt)
Free SSL certificates from Let's Encrypt are essential for any production website. Certbot automates the entire process:
# Install Certbot and Nginx plugin
sudo apt install -y certbot python3-certbot-nginx

# Obtain and install certificate
sudo certbot --nginx -d yourdomain.com -d www.yourdomain.com
Certbot will ask for your email address and whether to redirect HTTP to HTTPS. Choose to redirect for best security.
Automatic Certificate Renewal
Certbot sets up automatic renewal via a systemd timer. Verify it's active:
# Check timer status
sudo systemctl status certbot.timer

# Test renewal process
sudo certbot renew --dry-run
Certificates renew automatically 30 days before expiration.
Step 9: Configure UFW Firewall
Secure your server by allowing only necessary incoming traffic:
# Install UFW (usually pre-installed on Ubuntu)
sudo apt install -y ufw

# Allow SSH (IMPORTANT: do this first to avoid lockout!)
sudo ufw allow OpenSSH

# Allow HTTP and HTTPS
sudo ufw allow 'Nginx Full'

# Enable the firewall
sudo ufw enable

# Check status
sudo ufw status verbose
Important: Always allow SSH before enabling UFW, or you'll lock yourself out of the server.
Additional Security (Optional)
For enhanced security, consider installing Fail2ban to block brute-force attacks:
# Install Fail2ban
sudo apt install -y fail2ban

# Start and enable
sudo systemctl start fail2ban
sudo systemctl enable fail2ban
See our Fail2ban feature guide for configuration options.
Deploying Updates
When you push changes to your repository, here's how to deploy them:
# SSH into your server
ssh deploy@your-server-ip

# Navigate to your app
cd ~/apps/your-express-app

# Pull latest changes
git pull origin main

# Install any new dependencies
npm ci --production

# Reload with zero downtime (cluster mode)
pm2 reload my-express-app

# Or restart (if not using cluster mode)
pm2 restart my-express-app
Automated Deployment Script
Create a deployment script to automate these steps:
#!/bin/bash
# deploy.sh

set -e  # Exit on any error

APP_DIR=~/apps/your-express-app
APP_NAME=my-express-app

echo "Deploying $APP_NAME..."

cd $APP_DIR

echo "Pulling latest changes..."
git pull origin main

echo "Installing dependencies..."
npm ci --production

echo "Reloading application..."
pm2 reload $APP_NAME

echo "Deployment complete!"
pm2 status $APP_NAME
Make it executable and run:
chmod +x deploy.sh
./deploy.sh
Docker Alternative: Containerized Deployment
Docker provides consistent deployments across environments. Here's how to containerize your Express app:
Create a Dockerfile
# Dockerfile
FROM node:20-alpine AS builder

WORKDIR /app

# Copy package files
COPY package*.json ./

# Install dependencies
RUN npm ci --production

# Copy application code
COPY . .

# Production image
FROM node:20-alpine

WORKDIR /app

# Create non-root user
RUN addgroup -g 1001 -S nodejs && \\
    adduser -S express -u 1001

# Copy from builder
COPY --from=builder --chown=express:nodejs /app/node_modules ./node_modules
COPY --from=builder --chown=express:nodejs /app .

# Switch to non-root user
USER express

# Expose port
EXPOSE 3000

# Health check
HEALTHCHECK --interval=30s --timeout=3s --start-period=5s --retries=3 \\
  CMD wget --no-verbose --tries=1 --spider http://localhost:3000/health || exit 1

# Start application
CMD ["node", "app.js"]
Create docker-compose.yml
# docker-compose.yml
version: '3.8'

services:
  express-app:
    build: .
    container_name: my-express-app
    restart: unless-stopped
    ports:
      - "3000:3000"
    environment:
      - NODE_ENV=production
      - PORT=3000
    env_file:
      - .env
    networks:
      - app-network
    healthcheck:
      test: ["CMD", "wget", "--no-verbose", "--tries=1", "--spider", "http://localhost:3000/health"]
      interval: 30s
      timeout: 10s
      retries: 3
      start_period: 10s

networks:
  app-network:
    driver: bridge
Deploy with Docker
# Build and start containers
docker compose up -d --build

# View logs
docker compose logs -f

# Stop containers
docker compose down

# Rebuild and deploy updates
docker compose up -d --build
Nginx with Docker
Update your Nginx proxy_pass to point to the Docker container:
upstream express_backend {
    server 127.0.0.1:3000;
    keepalive 64;
}
The rest of the Nginx configuration remains the same. For a complete Docker + Nginx + SSL setup, see our FastAPI Docker deployment guide which uses a similar architecture.
The Easy Way: Deploy with Server Compass

Everything above works, but it's a lot of manual configuration. If you're deploying multiple apps or want to skip the terminal entirely, Server Compass automates the entire process.
What Server Compass Does For You
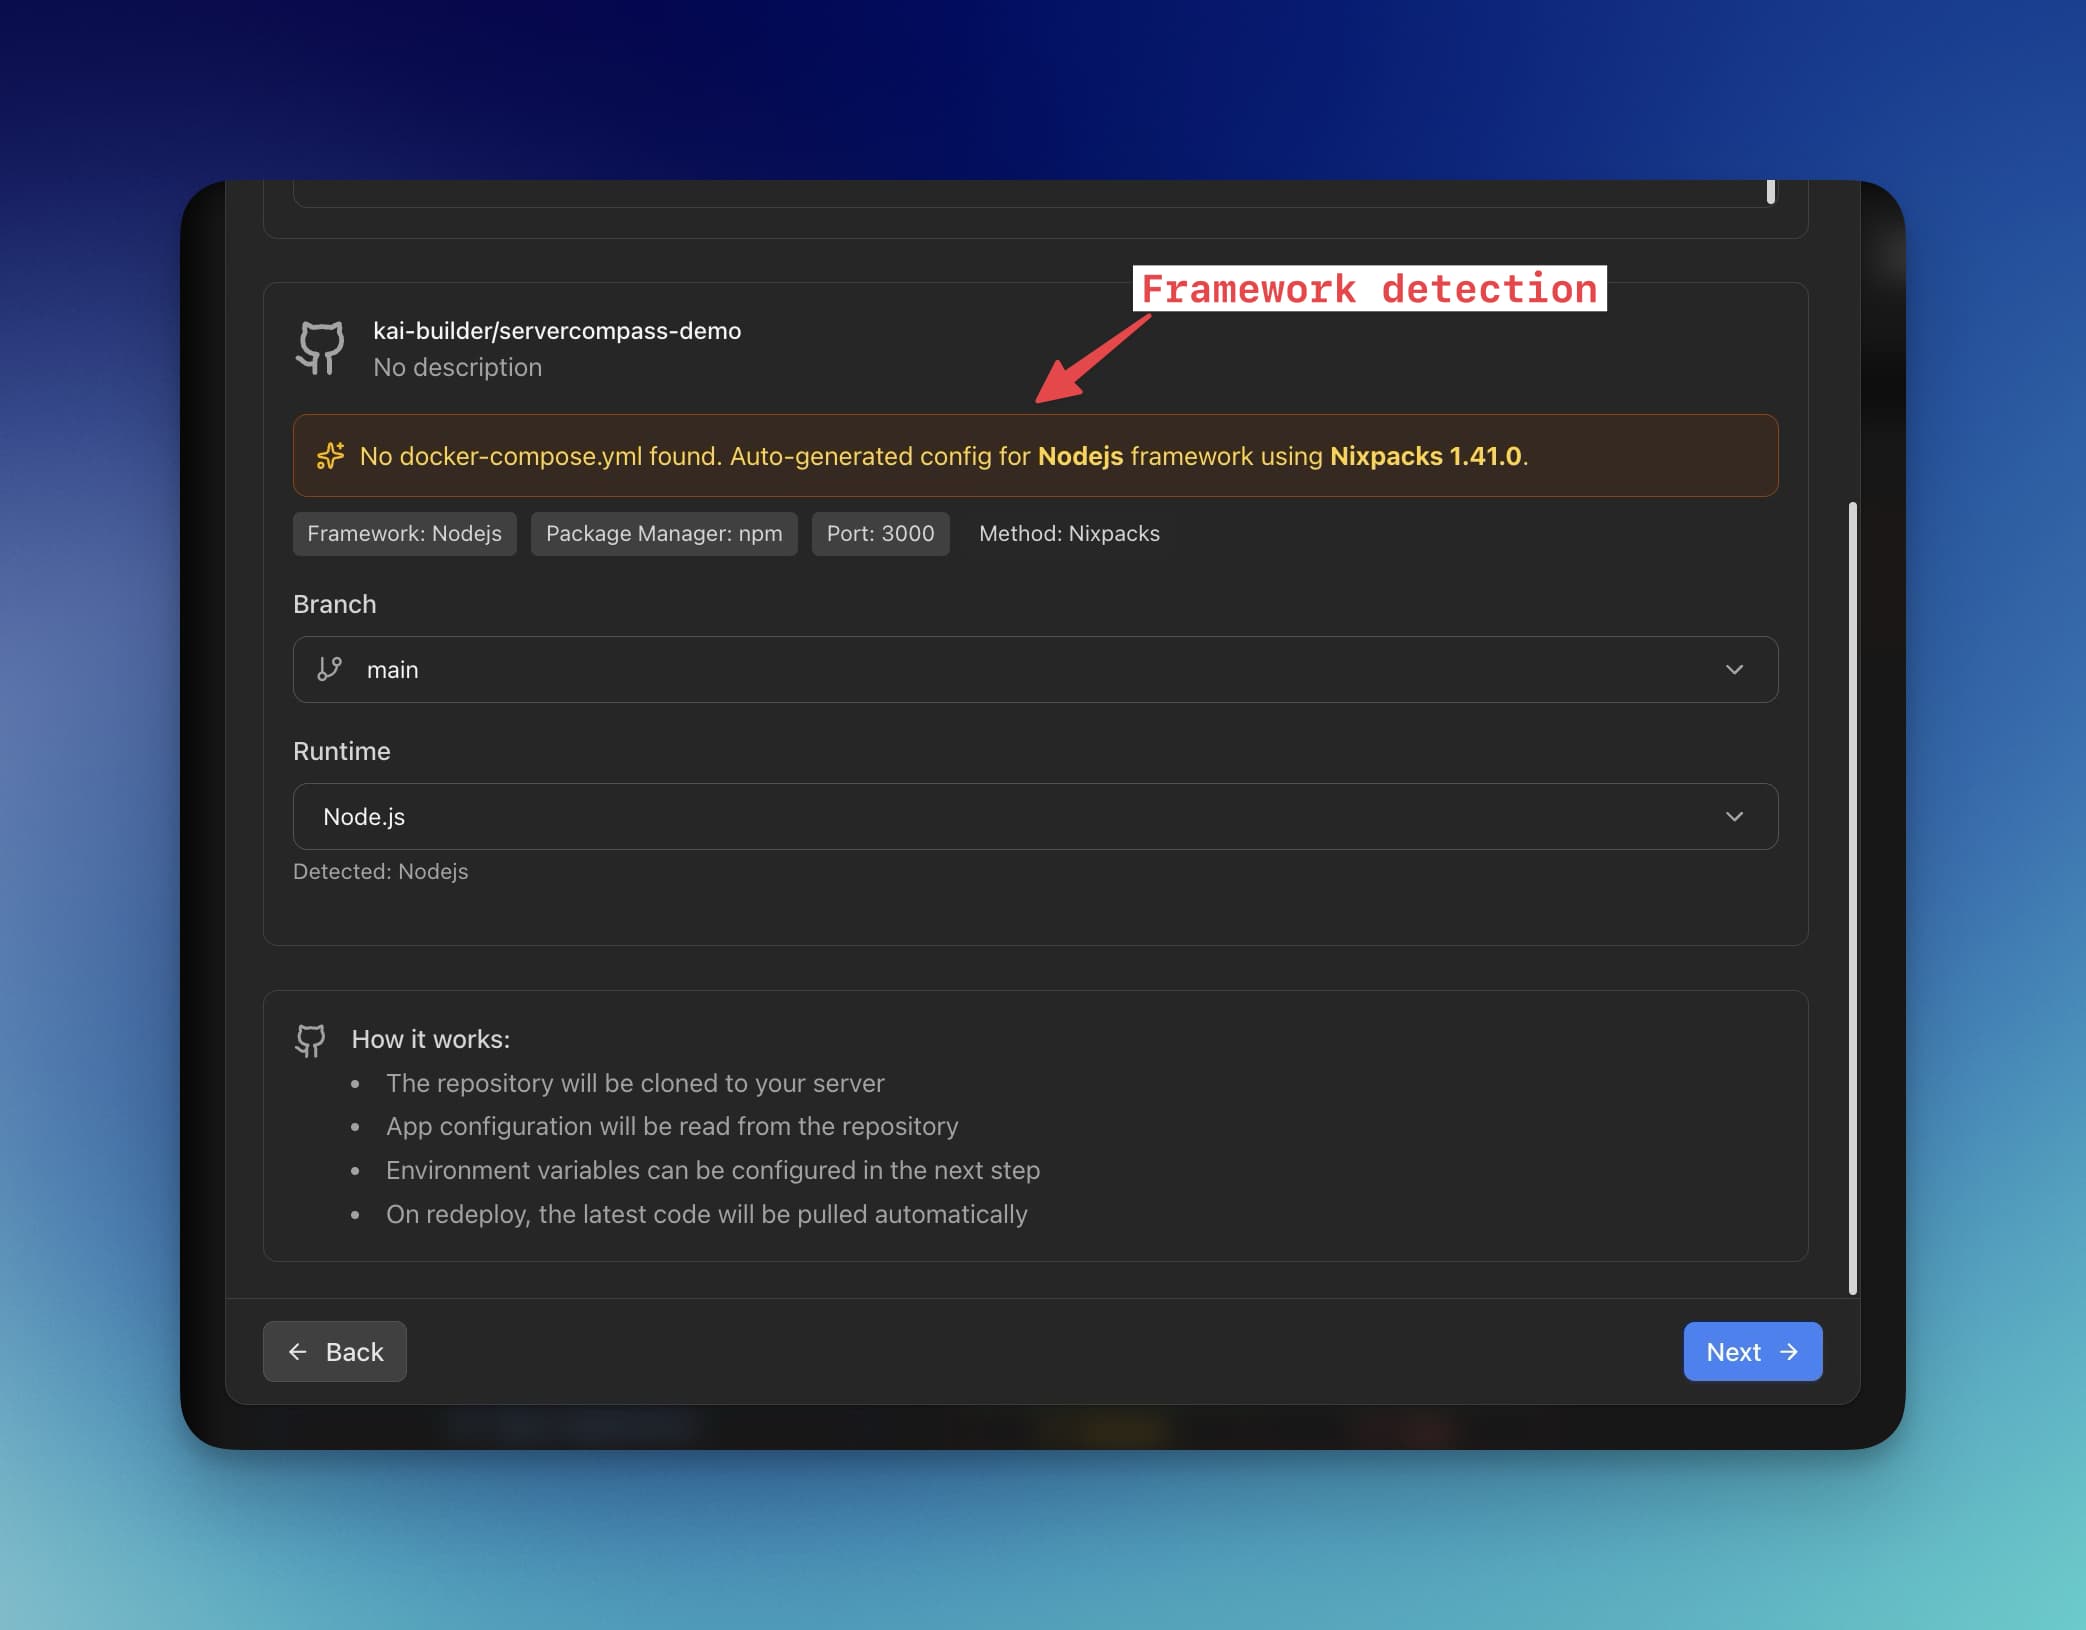
- Automatic framework detection — Detects Express.js projects and configures the build automatically. See framework detection.
- Visual environment variables — Manage
.envfiles with the .env Vault. No more nano editing. - One-click deployments — Connect your GitHub repository and deploy with a single click.
- Docker support — The Docker Stack Wizard handles containers, volumes, and networking.
- Process management — Built-in PM2 integration with visual monitoring via container status.
- SSL certificates — Automatic Let's Encrypt certificates with renewal.
- Deployment history — View logs, rollback to previous versions, and track what's deployed with deployment history.
Deploy Express.js with Server Compass
- Connect your VPS — Add your server with SSH credentials in Server Compass
- Connect GitHub — Authorize access to your repositories
- Select your Express repository — Server Compass detects the framework automatically
- Configure environment variables — Add your production
.envvalues - Deploy — Click deploy and watch the real-time logs
The entire process takes about 5 minutes instead of 2+ hours. And when you need to deploy updates, it's a single click.
Try Server Compass — $29 one-time, no subscription. Includes all features, unlimited servers, and unlimited deployments.
FAQ
Which VPS provider should I use?
For Express.js apps, any modern VPS works well. Hetzner offers the best price-to-performance ratio (starting at $4/month). DigitalOcean and Linode have excellent documentation and support. Vultr has the most global locations. For beginners, DigitalOcean's interface is the most user-friendly.
How much RAM do I need?
A basic Express.js API runs comfortably on 512MB-1GB RAM. For production apps with moderate traffic, 2GB is recommended. If you're running PM2 in cluster mode (multiple instances), calculate roughly 100-200MB per instance plus overhead.
Should I use PM2 cluster mode?
Yes, for production. Cluster mode runs multiple instances of your app across CPU cores, improving performance and enabling zero-downtime reloads. Set instances: 'max' in your ecosystem config, or specify a number like instances: 2.
How do I handle WebSockets with Nginx?
The Nginx configuration in this guide already supports WebSockets via the Upgrade and Connection headers. If you're using Socket.io, ensure sticky sessions are enabled for cluster mode (or use Redis adapter).
Can I run multiple Express apps on one VPS?
Absolutely. Run each app on a different port (3000, 3001, 3002, etc.) and create separate Nginx server blocks for each domain. PM2 handles multiple apps natively — just add more entries to your ecosystem config.
What about databases?
You can run PostgreSQL, MySQL, or MongoDB on the same VPS. See our guides for self-hosted PostgreSQL and MongoDB templates. For simplicity, consider Docker Compose to manage your Express app and database together.
How do I set up CI/CD?
Use GitHub Actions to automate deployments. Push to main, Actions runs tests, builds your app, and SSHs into your server to pull and restart. See our GitHub Actions deployment guide for a complete walkthrough.
How do I monitor my Express app?
PM2 provides built-in monitoring (pm2 monit). For more comprehensive monitoring, consider:
- PM2 Plus — PM2's paid monitoring dashboard
- Server Compass — Visual monitoring with resource monitoring and container logs
- Uptime Kuma — Self-hosted uptime monitoring (see Uptime Kuma template)
How much does this all cost?
A complete production setup costs approximately:
- VPS: $5-10/month (Hetzner, DigitalOcean)
- Domain: $10-15/year
- SSL: Free (Let's Encrypt)
- Server Compass (optional): $29 one-time
Compare this to Heroku ($7-25/month per dyno), Render ($7+/month), or Railway (usage-based, often $20+/month). Self-hosting saves 50-80% annually while giving you full control.
Conclusion
Deploying Express.js to a VPS is straightforward once you understand the components: Node.js runtime, PM2 for process management, Nginx for reverse proxy and SSL, and UFW for security. The manual approach gives you complete control and helps you understand what's happening on your server.
For production deployments where you want to save time and reduce errors, Docker provides consistent, reproducible builds. And if you want to skip the terminal entirely, Server Compass handles everything visually — from GitHub integration to PM2 management to SSL certificates.
Ready to deploy? Pick the approach that fits your workflow:
- Learning or simple apps — Follow the manual steps above
- Team deployments or microservices — Use Docker + docker-compose
- Multiple apps or visual management — Try Server Compass
Questions about deploying Express.js? Check out our video tutorials or explore the template gallery for one-click deployments of popular stacks.
Related in the StoicSoft network
If you're choosing a VPS provider or benchmarking real-world performance like the post above explores, StoicVPS is the StoicSoft network's independent tracker for VPS pricing, performance, and migration safety.
If you're self-hosting on a VPS or working through a deployment guide like the one above, DeployToVPS is the StoicSoft network's handbook for VPS deployment recipes — docker-compose, nginx, traefik, and common app self-hosts.
From across the StoicSoft network
Hand-curated reads on the same topic from sister sites in the StoicSoft family.
 1DevTool11 min read
Self-Hosted AI Coding Assistant Workflow: Practical Setup Guide
A self-hosted AI coding workflow needs more than model hosting. You need environment control, connector governance, and reproducible operations. This guide covers the practical stack.
Read on 1devtool.com 1DevTool10 min read
Docker Desktop Alternatives for Developers in 2026
Developers want a Docker workflow that stays close to code, logs, and AI agents. This comparison breaks down Docker Desktop alternatives by performance, observability, and daily usability.
Read on 1devtool.com